Sep-02-18
 | | KEG: Yet another fascinating Pillsbury endgame victory. As I will attempt to show, however, there are serious questions about the analysis to date of this ending. 1. d4 d5
2. c4 e6
3. Nc3 Nf6
4. Bg5 Be7
5. e3 Nbd7
6. Nf3 0-0
Arriving at one of the standard positions in the Orthodox Variation of the Queens Gambit Declined: 
click for larger viewBoth players must have faced this position dozens if not hundreds of times in their careers. But the game took an unexpected turn here. 7. Bd3
7. Rc1 is the move most usually played here. 7. cxd5 and 7. Qc2 both also have their points. So why did Pillsbury play the text, allowing Showalter to cause him to lose a tempo? Needless to say, Pillsbury knew the QGD extremely well, especially from the White side. He most certainly knew the drawbacks of the text. Let's hear from Sergeant and Watts, (from their book on Pillsbury's games): "Pillsbury's tactics are different here from his usual, especially in leaving his c-pawn to be taken, involving three moves by his King's Bishop in the opening." Since Pillsbury knew all this, why did he play 7. Bd3? This question can only be analyzed by noting Pillsbury's opponent: Showalter. These two player had contested two matches for the Championship of the USA, one that lasted 21 games and another that lasted 12 games. Pillsbury and Showalter had also crossed swords in numerous tournaments. As is obvious, they knew each other's games and styles extremely well. As in all long rivalries, one must often throw out the books and the odds in considering a specific contest. When Ohio State and Michigan meet every fall on the gridiron, when the Yankees square off against the Red Sox, and when Kasparov played Karpov, special factors entered the equation and the theoretical odds and theoretical best play often mean nothing. My guess is that Pillsbury was looking to take Showalter out of any plans he had for the game. 7. Bd3 still leaves White with a small advantage. At worst, Pillsbury would wind up (as he did) with an even middle-game. At best, his long-time rival would be out of his comfort zone, after which anything could happen. Any one who has faced the same opponent many times has experienced this phenomenon. And as for Pillsbury here, the prospect of playing a theoretically even position against Showalter was hardly awful (since Pillsbury was much the more talented player). 7... c6
7...dxc4 or 7...h6 were theoretically better, but the Slav-like position Showalter obtained with the text was certainly quite playable. 8. 0-0
Pillsbury might again have avoided loss of tempo with the (theoretically) better 8. cxd5. 8... dxc4
9. Bxc4 Nd5
9...h6 was more accurate.
10. BxB QxB
11. e4 N5b6
12. Bd3
This left:
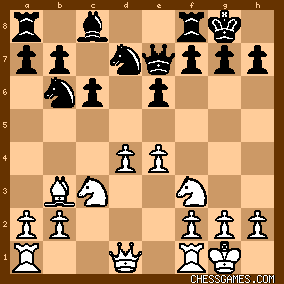
click for larger viewSo Pillsbury has moved his Bishop three times and gotten at most a small edge as White. From here, as I will discuss in my next post on this game, things became interesting, Showalter's careful defense matching Pillsbury's efforts to complicate, until when Showalter created problems for himself that plagued him for the rest of thegame. |
|
Sep-03-18
 | | KEG: Post II
After 12. Bd3, Showalter opened up his game and freed his c8 Bishop with: 12... e5
Both the Tournament Book and Sergeant/Watts in their book on Pillsbury give this move an "!" The move is doubtless best, but it is the most obvious move on the board, so I'm not sure it should be deemed brilliant. 13. Nxe5
A good alternative was 13. Qe2, making it a bit harder for Showalter to equalize. 13... NxN
14. dxN Qxe5
This left:

click for larger viewShowalter had thus managed to hold his own as Black in one of Pillsbury's favorite openings. With many other players, the position might be deemed "drawish." But not with Pillsbury at the helm. Like Alekhine after him, Pillsbury had the knack of finding tactical possibilities in nearly any position. This game--and indeed this position--is a prime example: 15. f4?!
Computers retch when presented with this move, which creates all sorts of weaknesses in the White camp but which prepares for an attack in the center and on the King-side. The move certainly mixes things up, and makes the game far more interesting than something safe like 15. Qd2 or 15. Qd3 or 15. Qe2. 15... Qc5+
16. Kh1
A diagram shows how the nature of the game changed dramatically as a result of Pillsbury's 15. f4?! 
click for larger viewChances may be about even, but Showalter has to decide how to free his game. To be more specific, what to do about the Bishop on c8. In addition, he had to decide how best to anticipate potential advances of the e and/or f pawns by Pillsbury. Showalter made a critical decision in this position that allowed Pillsbury to create further tactical opportunities that extended into the endgame. I'm not saying that Showalter's move was a mistake. I belabor the point only because it reveals how difficult it must have been to face Pillsbury across the board. 16... Be6
"!" -- Tournament Book.
"An ingenious method of preventing f5 (for if 16. Bc2 Nc4 [or 16...Rad8--KEG]), but it leaves a pawn weakness of which White takes advantage at once." (Sergeant-Watts). 17. BxB fxB
18. Qg4
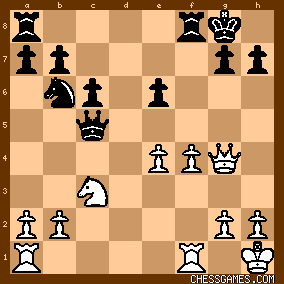
click for larger viewFrom the boring drawish-looking position before move 15, Pillsbury had created an unbalanced alignment with all sorts of chances and counter-chances. For starters, Pillsbury targeted the now isolated Black e-pawn. So, once again, Showalter faced a critical decision. This time, he erred in deciding how to defend the e-pawn: 18... Rf6?
"Probably 18...Qe7 was Black's best, to be followed by Rad8." (Sergeant-Watts). One thing is for certain, Showalter's move allowed Pillsbury to put the Black King-side Rook in a box: 
click for larger viewThe manner in which Pillsbury exploited the position of the Black wayward Rook will be discussed in my next post on this game. |
|
Sep-03-18
 | | KEG: Post III
Showalter should, as Sergeant-Watts note, have preferred 18...Qe7 to the questionable 18...Rf6. Another possibility was to take the bull by the horns with 18...e5. I am far from convinced that Showalter's game was lost after 18...Rf6. But from here he had to face a fire-storm from Pillsbury> 19. e5!
Fixing the White e-pawn and confining the Black Rook. 19... Rg6
Tying his game up further. 19...Rh6--though unpleasant--was better. This left:

click for larger viewShowalter no doubt expected Pillsbury to retreat his Queen (to e2 or d1 or f3), allowing Black time to reorganize his pieces. But--as I mentioned in my last post--Pillsbury (like Alekhine) always found ways to unearth hidden possibilities. In the above position, PIllsbury played: 20. Ne4?!
Is this the theoretically best move [Stockfish thinks 20. Qe2 or 20. Qf3 give White a won game; and Fritz--less optimistic about White's chances--prefers 20. Qe2 or 20. Qd1]. Pillsbury, like Tahl, probably couldn't have cared less. He was not seeking the type of slow positional crush Karpov would have preferred. As always, he was confident he could best his opponent in a tactical shoot-out. 20... Qc2
20...Qb5 was a reasonable alternative, but Showalter--probably to Pillsbury's delight--chose the sharpest line. The position was now: The position was now:

click for larger viewAll of a sudden, all of Pillsbury's pieces appear to be hanging (his Queen, his Knight, and his b2 pawn). One option Pillsbury had here was 21. Qf3, sacrificing his b2 pawn. Stockfish thinks 21. Qf3 was best and gives White a healthy advantage in the ensuing slugfest. Pillsbury, however, preferred something even sharper (as does Fritz): 21. Ng5!
Showalter now didn't dare play 21...Qxb2 since 22. Qh5 would be a killer. So what should Showalter have done here? 21... Rf8!
"Better was 21...h6 22. Rac1 Qf5 (he cannot unguard the Rook because of White's threat of Qh5) 23. QxQ exQ 24. Nf3 Rf8 and White's superiority is very small." (Sergeant-Watts). I agree with the Sergeant-Watts line after 21...h6, but not with their assessment of the position after 24...Rf8: 
click for larger viewPillsbury seems much better here. His passed e-pawn is a monster, and after playing Nd4 and g3 White has all sorts of tactical chances. Black certainly seems to have better chances with Showalter's actual move. Returning to the actual game:
22. Qh3 Rh6
23. Qb3
This left:

click for larger viewShowalter now faced another critical decision: should he trade Queens? I will discuss Showalter's choice and its consequences in my next post on this game. |
|
Sep-03-18
 | | KEG: Post IV
In fact, Showalter did trade Queens with:
23... QxQ
Both the Tournament Book and Sergeant/Watts criticize this move, the latter writing: "An error of judgment. 23...Qf5 was correct. Pillsbury now makes use of the confinement of Black's Rook." I must disagree. If 23...Qf5 (as Sergeant/Watts suggest), Pillsbury would have had a major--if not winning advantage-- with 24. g3 or even with 24. Rae1 or 24. Rf3), taking advantage of the very factor--the badly placed Black Rook at h6--that Sergeant/Watts thought doomed Showalter in the endgame. The endgame was indeed better for White after the exchange of Queens, but what Sergeant/Watts seems to have overlooked is that: (a) White's edge was less than after the awkward 23...Qf4; and (b) there was another and better way for Showalter to exchange Queens--by playing 23...Qc4. This way, after 24. QxQ NxQ White does not get a free move as in the game. Even after the text, Showalter had better play than on the line touted by Sergeant/Watts. 24. axQ
Now, Black pretty much has to play 24...a6, as he did: 24... a6
The position after the trade of Queens was:
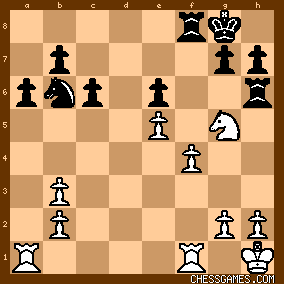
click for larger viewPillsbury had two advantages in this ending, which together were certainly more important than his one "problem" (the doubled isolated b-pawn): (i) the isolated e-pawn; and (ii) the confined Rook on h6. Do these together equal a win for White? I doubt it. As I will try to show, a major part of Showalter's problems derive from later errors, including his failure to find a way to free his h6 Rook. 25. g3
The (possibly superior) alternative was 25. Ne4. But Pillsbury preferred to strengthen his position before looking to pull the trigger. 25... Rd8
Showalter should blocked play by Pillsbury on the d-file with 25...Nd5 and then focused on freeing his "trapped" Rook. 26. Rfd1
Pillsbury was only too happy to have opposing Rooks on the d-file. 26... Rd5?
A very bad move, though not criticized in either the Tournament Book or in the commentary by Sergeant/Watts. There was still time to play 26...Nd5. 27. h4?!
Sharp play, but 27. Ne4! was more forceful and better. 27... Kf8?
Whatever Showalter's plan, this waiting move was weak. 27...Rg6 was probably the best way for Showalter to try to free his Rook. The position was now:

click for larger viewThings have clearly gone poorly for Showalter. But how should Pillsbury proceed here: 28. RxR
This can not be best. 28. Ne4 was very strong. Alternatively, Pillsbury could slowly have improved his position with 28. Kg2. 28... exR
This left:

click for larger viewThe trade of Rooks gave Pillsbury a protected passed pawn on e5, and this was indeed a nasty threat. But Showalter no longer had an isolated e-pawn to worry about, and he was now much closer to solving the problem of his h6 Rook. Did Pillsbury still have a won game at this point? Doubtful at best. But from here, as I will discuss in my next post on this game, Showalter panicked and was in hopeless shape within a very few moves. |
|
Sep-03-18
 | | Sally Simpson: Hi KEG,
Pillsbury and Showalter had reached this exact same position... 
click for larger view...a few months before Pillsbury vs Showalter, 1900 There Showalter slipped in h6 and then took on c4 so I assume Pillsbury was happy with his position as Showalter was first to deviate probably to avoid a later improvement. |
|
Sep-03-18
 | | KEG: Post V
29. Kg2
From this move, onlookers might have concluded that Pillsbury was intending a slow build-up. 29. Rc1 would serve the same purpose. But, as will be seen, that was not what Pillsbury had in mind. 29... Ke7
29...Nd7 seems more productive for Showalter.
I had toyed with 29...c5 in my preliminary analysis, thinking it the best way to get the h6 Rook back into play. But after 29...c5 30. Rc1 c4 31. bxc4 dxc4 32. Kf3, White would have solved his only problem (the doubled b-pawn) and seems to win in walk. 30. f5?!
Zooks! So much for Pillsbury's slow build-up. 30. Kf3 or 30. Rc1 or 30. Rd1 all seem more logical. Pillsbury always liked sharp variations, but the text--in pushing his King-side pawns but leaving his e-pawn vulnerable-- made White's task more problematic. Even after Showalter's weak 29th move, it is now doubtful that White had a win, especially after: 30... Nd7!
The only defense, but a good one.
31. Re1
The alternative way of defending the e-pawn, the position now being: 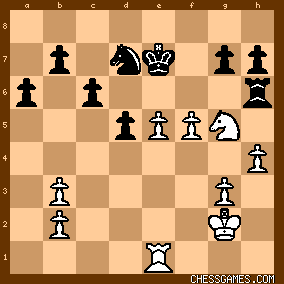
click for larger viewShowalter here has at least two reasonable defensive plans: (i) 31...a5 (to prevent 32. b4); or (ii) 31...Nc5 seeking counterplay. Of the two, 31...a5 looks like the best plan. But here, Showalter wimped out, and was thereafter quickly dispatched by Pillsbury: 31... Nf8?
This move neither prevents 32. b4 nor gives Black any counterplay. Playing thus was a recipe for disaster against an endgame demon like Pillsbury. And so it was here: 32. b4!
This move tied up the Queen-side and nixed any plans Showalter may have entertained for counterplay. It is doubtful that Black can now recover. In any case, Showalter essentially threw in the towel here, his remaining move smacking of desperation and/or a sense of futility. 32... a5?
Had Showalter's heart still been in the game, he might have tried to defend with 32...Nd7 (tacitly admitting that his 31st move was a mistake) or to counter-attack with 32...d4 or 32...c5. The text did allow Showalter to play c4, but at what cost!! 33. bxa5 c5
So Showalter got to play c5, but the game is now over: 
click for larger view34. e6! Rf6
34...Ng6 may have been slightly better here, but the game is lost for Black. 35. Re5 g6
If Showalter had been planning on 35...h6, he must have belatedly realized that it loses immediately to 36. Rxd5 (since 36...hxN loses the Rook to 37. hxg5). The position was now:
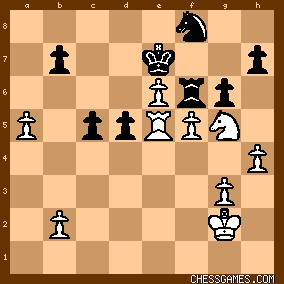
click for larger viewThe game is seemingly over. But, as I will show in my next and last post on this game, there was one more hiccup in store before the game ended. |
|
Sep-03-18
 | | KEG: Post VI
Homer nods.
With Showalter probably set to resign, Pillsbury inexplicably played: 36. fxg6
This move did not blow the win for Pillsbury, but is gave Showalter a chance to offer some resistance. 36. g4! would have been crushing. But now things got a bit trickier, the position now being: 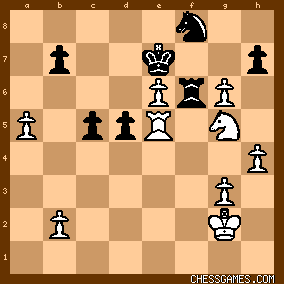
click for larger viewHad Showalter here played 36...Rxg6 (the only hope of extending the game), matters would have been tougher for Pillsbury after 37. Rxd5 h6 38. Ne4 Nxe6. While it is true that White soon picks up another pawn and should undoubtedly win, it must be recalled that Rook and Knight endings can always be tricky. And now, for a change Showalter has use of his previously impotent Rook. A slim chance for Black, but maybe a chance to play on for a while. After Showalter's awful actual move, however, the game was moct definitely over: 36... hxg6?
37. Rxd5
This left:
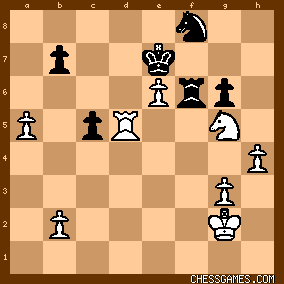
click for larger viewNow there was no hope for Black.
37... Rf5
"If 37...Nxe6 38. Re5 and White exchanges off the pieces and wins with the extra pawn." (Sergeant/Watts). The text, by allowing the exchange of Rooks, was tantamount to resignation. 38. RxR gxR
39. h5
Alternatively, Pillsbury could have won with 39. Kf3 immediately. 39... Kf6
40. Kf3
"!"--(Tournament Book)
The position was now:

click for larger viewObviously, if 40...KxN 41. e7!
Accordingly:
1-0 |
|
Jan-19-19
 | | KEG: Correction to Post I
Pillsbury's 12th move was 12. Bb3, not 12. Bd3 as I incorrectly stated at the end of my first post and the beginning of my second post on the game. The diagrams and analysis that follow in my have the Bishop correctly placed on b3. |
|
|
|
|


