Jun-23-19
 | | KEG: With both players winning with Black in the first two games of the playoff match to decide first place at Munich 1900 (after both had gone undefeated through through all 15 rounds of the event), the tournament had been reduced to a two-game match. Schlechter once again held tough as Black, and ended up a pawn ahead after Pillsbury overplayed his hand in trying to work up a King-side attack. With Bishops of opposite colors, however, Pillsbury was eventually able to force a draw. This was a striking echo of Pillsbury's encounter with Maroczy much earlier in the tournament, in which the latter managed to hold Pillsbury to a draw in a Bishops of opposite color ending though three pawns down. 1. d4
Having lost on the White side of a Petroff's Defense in the first playoff game against Schlechter, Pillsbury fell back on one of his favorite openings, the Queen's Gambit Declined. Pillsbury must have had mixed feelings in playing this opening against Schlechter here, since the only game he ever lost to Schlechter (other than the opening game of this match) was a Queen's Gambit Declined in one of the late rounds at Hastings 1895--a game that nearly cost Pillsbury his chance to win the tournament. His loss to Schlechter in that game, however, had nothing to do with the opening. 1... d5
2. c4 e6
3. Nc3 c5
Probably a surprise. Schlechter had played the more normal 3...Nf6 in their game at Hastings 1895. 4. cxd5 exd5
5. dxc5
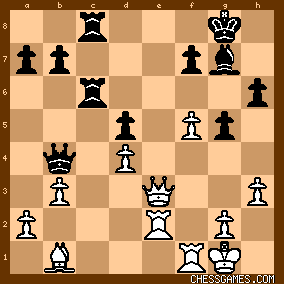
click for larger viewA surprise from Pillsbury. 5. Nf3 is normal (and best, I think). Perhaps Pillsbury played thus based on Schlechter's recent game against Marshall at Paris 1900, in which Marshall also played 5. dxc5 (the game ended in a draw). Perhaps Pillsbury thought he could improve on Marshall's play (though he only varied on move 9 with 9. Bd3 instead of Marshall's 9. Rc1, which does not seem all that much of an improvement to me. (Indeed, if Pillsbury knew of the Marshall-Schlechter game, a better improvement would have been on White's 6th move). If this move had been prepared in advance by Pillsbury (meaning that he somehow divined that Schlechter might try the Tarrasch Defense) perhaps he was thinking of Schlechter's win against Janowski at Cologne 1898 which transposed into this line. If so, Pillsbury was trying to force Schlechter to play against himself. 5... Nf6
The Tournament Book--rightly in my view--preferred 5...d4 here. The text, depending on how White plays, could represent a sacrifice of a pawn. 6. Bg5
With this move, the game now matched not only Marshall-Schlechter Paris 1900, but also a match game played between Showalter and Janowski in 1898 that Showalter won. The Bishop does not, however, seem well placed here on g5. 6. Be3 threatening to turn this into a gambit opening by Black (e.g., 6...Na6 7. Bd4 Nxc5 8. BxN QxB 9. Nxd5) seems more apt. 6... Bxc5
So much for the gambit!
White now had--at best--an equal game.
I devote all this space to considering earlier games on which Pillsbury may have relied because his play in this opening is uncharacteristic of his style. 7. e3 Be6
As played by Schlechter against Marshall and by Janowski against both Schlechter and against Showalter. But the move seems awkward. 7...0-0 or 7...Nc6 both seem better. 8. Nf3 Nc6
As played by Schlechter against Marshall and by Janowski against Showalter. Against Schlechter at Cologne 1898, however, Janowski had played 8...0-0. 9. Bd3
Marshall had played 9. Rc1 against Schlechter at Paris 1900. The text was Showalter's move against Jaowski. The players followed that game through move 14, and up until Pillsbury's ultra-aggressive (and perhaps reckless, 15th move here). The text, along with 9. Bb5 and 9. Be2, all seem better than Marshall's move. 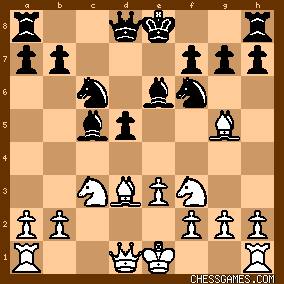
click for larger viewThe game now after 9. Bd3 shaped up as one with the perennial theme in the Tarrasch Defense: the strength/weakness of Black's isolated d-pawn. What gives this a twist here is that the struggle often develops into one in which Black seeks attacking counterplay while White seeks through positional play to exploit (and perhaps win) Black's isolated d-pawn. Seemingly a reversal of roles (i.e., Pillsbury as positional player and Schlechter as attacker). As will be seen, however, Pillsbury did not appear to fancy this role, and tried drastic means to become the hunter rather than the hunted. |
|
Jun-23-19
| | KEG: Post II
9... h6
10. Bh4 0-0
10...d4, riding himself of the isolated d-pawn, seems logical, but Schlechter seems to have been loathe to allow Pillsbury to open the e-file and so continued to follow the Showalter-Janowski game. 11. 0-0 Be7
"To release the Queen (from the pin)." (Sergeant-Watts ["SW"] from their book on Pillsbury's games. 12. Rc1
Pillsbury might alternatively have played 12. a3, anticipating Qa5, but--as will be seen, Pillsbury had other ideas on how to defend his Queen-side. 12... Qa5
13. Bb1
A typical Pillsbury move, preparing to attack on the King-side. The move brings to mind Pillsbury's 12. Bb1 in his famous victory against Tarrasch at Hastings 1895. Mere mortals might prefer 13. a3.
13... Rfd8

click for larger view14. Nd4
Again following Showalter-Janowski, but as will be seen Pillsbury had a very different notion on how to follow up this move. 14... NxN
The position, with Pillsbury yet to recapture Schlechter's Knight, was now: 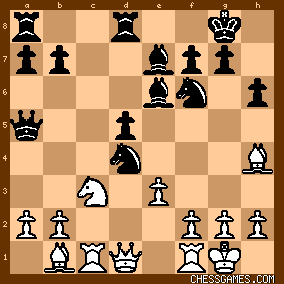
click for larger view15. exN?!
"Submitting to an isolated Pawn like his opponent, but with a view to a King-side attack. The White isolated Pawn proves weak." (SW). Showalter had played 15. QxN here against Janowski. The question at hand for Pillsbury was whether the possibility of a King-side attack was worth being saddled with an isolated d-pawn of his own. This move didn't even occur to me in playing over the game. Interestingly, when I fed the position to Fritz 15 and Stockfish, Fritz preferred Pillsbury's move and Stockfish preferred Showalter's 15. QxN. Blasting off in search of a King-side attack was very much in Pillsbury's style, and he won gaggles of games with this approach. But this was a playoff for first place in a major international tournament, and the opponent was Schlechter. In this game, Schlechter was not to be blown away by a King-side attack, and the isolated White Pawn on d4 was to become a problem for Pillsbury. 15... Rac8
16. Qd3
Having gotten an isolated d-pawn in order to open the e-file, I am surprised that Pillsbury didn't play 16. Re1. Apparently, Pillsbury wanted to try to invade on h7. If so, Schlechter had a surprise for him. 16... Rc4
"!"--Tournament Book.
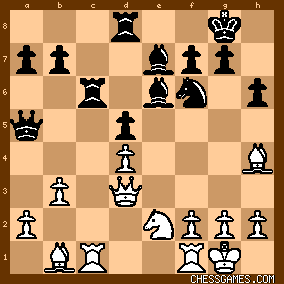
Schlechter could, of course, have address the threat of Qh7+ with 16...Kf8. But Schlechter decided to tempt Pillsbury into overreaching, the position now being (after 16...Rc4): 
click for larger view17. b3
As both SW and the Tournament Book pointed out, Schkechter would have had the better game after 17. BxN BxB 18. Qh7+ Kf8. Pillsbury might have been better advised to bring his Rooks into the game with 17. Rfe1 or 17. Rfd1. 17... Rcc8
18. Ne2
click for larger viewPillsbury was staking all on his King-side attack, else he would probably have played 18. Na4 or 18. f3. The game was now very much in the balance. |
|
Jun-23-19
| | KEG: Post III
18... Rdc8
Loading up on the c-file. But 18...RxR looks simpler here. 19. BxN
Pillsbury had this exchange in mind for several moves, and Schlechter was obviously ready for the consequences. 19... BxB

click for larger view20. Rce1
Ready for play on the e-file (the reason for his unexpected 15. exB?! But this was is last chance to play Qh7+, and that was perhaps best here. 20... g6!
Schlechter didn't give him another chance. All of a sudden, Schlechter position looked better, especially in light of the looming danger to Pillsbury's d-pawn (not to mention Schlechter's possession of the two Bishops): 
click for larger view21. Qe3 Bg7
This looks like an over-refinement. 21...Re8 or perhaps 21...Bd7 look better. But Schlechter still seemed to have much the better position, especially after Pillsbury's next rash move. 22. f4?!
Pillsbury was taking no prisoners in this game. 22. Nf4 or 22. Qf3 look more prudent. But Pillsbury was going all out for a win. 22... Bg4
"!"--(Tournament Book)
"This appears to aim at an ending with Bishops of opposite colors in which Black can win a Pawn." (SW) 
click for larger view23. f5!
Pillsbury was getting into trouble, and responded as is fans would have expected, with a full-scale attack. 23... g5!
First-rate. Schlechter played to prevent Nf4 by White. But did it? The position was now: 
click for larger view24. h3
Pulling back at the last moment. But what if Pillsbury here had played 24. Nf4!?! Things would then have gotten wild: i.e. 24...gxN 25. Qxf4 (trapping the Bishop) h5 26. h3 Bh6 27. Qg3 Qd2 28. hxB Rc3. This would leave Pillsbury up a pawn but facing a vicious attack: [Analysis Diagram]

click for larger viewOne can see why Pillsbury was reluctant to delve into this morass. But his plight after 24. h3 (to return to the actual game) was also not wonderful: 24... BxN
25. RxB Qb4
click for larger viewPillsbury's d-pawn was now bery weak, and it would take all of his tactical skill to hold the game. |
|
Jun-23-19
| | KEG: Post IV
26. Rd1 Rc3
26...Bf6 (preventing f6) was also very strong.
27. Qf2?!
27. Qd2 looks best. But Pillsbury had some cute tricks on the f-file in mind. 27... Rc1
The text is very strong, but Schlechter could also put an end to Pillsbury's scheme with 27...Bf6. The position after 27...Rc1 was:

click for larger view28. Red2 Bf6
This nove (preventing f6) was tempting, but 28...Qc3 was even better, and might have posed problems even Pillsbury would not have been able to solve. 29. g3
"!"--(Tournament Book)
"White sets a pretty trap into which Black does not fall." (SW). Theoretically, 29. Kh2 looks best (getting the King out of range of back-rank checks). But in these kind of difficult positions, it is often more effective to set difficult tactical problems for one's opponent. 29... RxR+
29... Qc3 or perhaps 29...Qa3 were probably stronger, but even after the text, Pillsbury seemed to be on the ropes. For one thing, his d-pawn still looked set to fall. 30. RxR

click for larger viewThis was the position for which Pillsbury had played. Superficially, Black has an easy win here with 30...Rc1. But Pillsbury--who had set this nasty trap--had seen further: If 30...Rc1?? 31. RxR the seemingly crushing 31...Bxd4 actually loses to the following remarkable combination (pointed out, I should note, in both the Tournament Book and in SW) 32. Rc8+ Kg7 [not 32. Kh7 33. f6 checkmate!) 33. f6+! (the point!) Bxf6 (forced) 34. Kg2 leaving White a Rook up. This amazing combination might have worked against a lesser player, but Schlechter saw through Pillsbury's scheme: 30... Rc3
31. Kg2
Getting off the potentially fatal diagonal.
31... Kg7
32. Rd2 h5!
Providing another escape square for his King. Pillsbury was again in dire jeopardy--but hung in there! 33. Bc2
33. Rd1 was a good alternative.
33... h4!

click for larger view34. gxh4 gxh4
35. Rd3
"He must now give up the Pawn, but 35...Rg3+ was threatened." (SW) 35... RxR
36. BxR

click for larger viewIt now looked--at first sight--like clear sailing for Schlechter here. Just play 36...Bxd4, right? [Obviously 36...Qxd4 would lead to a drawn Bishops of opposite color ending after 37. QxQ BxQ 38. Be2]. But as I will discuss in my next post on this game, Pillsbury had yet another little trick up his sleeve here in the event of 36...Bxd4--a trick which the alert Schlechter carefully side-stepped. |
|
Jun-24-19
| | KEG: Post V
36... Qc3!
Once again, Schlechter saw through one of Pillsbury's schemes. Had he immediately played to win the d-pawn with 36...Bxd4, Pillsbury no doubt had planned 37. Qf4! (forcing the Black Queen to lose a move and allowing Pillsbury to wreak havoc on the King-side and thus save the game, e.g., 37...Qb6 [best] 38. Qxh4 Bf6 39. Qg4+ with a likely draw). This is better than the SW's proposed 37. Qxh4 (which may also be sufficient) Qd2+ 38. Kh1 Be4 (SW's 38...QxB allows White to escape with a perpetual beginning with 39. Qg5+; Sw's altertnate move 38...Qd1+ is also not best, since it too leads to a seemingly simple draw after 39. Kg2 Qg1+ 40. Kf3). After Schlechter's actual move, 36...Qc3, the position was still dangerous for Pillsbury: 
click for larger view37. Be2 Qc2!
The position may not be a win for Schlechter, but he certainly made Pillsbury sweat. 38. Bg4 Qe4+
39. Qf3
39. Bf3 was better, since it allows counterplay with 40. Qd2 after 39...Qxd4. After the text, Schlechter had more serious winning chances. 39... Qxd4
"Black has now won the Pawn; but a draw is all that is in sight." (SW) 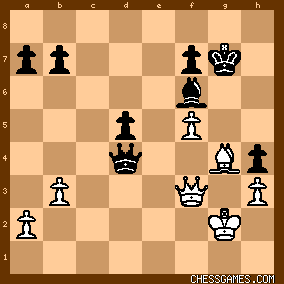
click for larger viewI agree that--with best play--the game may be a draw. But Bishops of opposite colors can allow attacking possibilities (as well as drawing chances) with Queens on the board. Thus, the game at this point was far from over. 40. Qd1
Seeking to trade Queens which would lead to a dead draw. 40... Qe5
Trying for Qg3+
41. Qd3
Uh-uh. [Actually, Pillsbury might have gotten away with something like 41. a4 and allowed Qg3+, but his actual move was more precise]. 41... Bg5
42. Kf1 d4
Getting his extra pawn moving:

click for larger view43. Bf3
I played around with 43. f6+ ?! Qxf6+ 44. Qf5 d3 45. QxQ+ KxQ which may allow White to wriggle out with a draw though two pawns down,but 43...Bxf6 seemingly puts an end to all this nonsense. In any case, there was no need for Pillsbury to be melodramatic here. 43... b6?
This gave Pillsbury the chance he was seeking; i.e., to force Schlechter either to trade Queens or allow him counterplay. 43...Qf4 was the best chance for Schlechter to continue to try for a win. I;m sure that in a position like this Bobby Fischer or Magnus Carlsen would have tortured Pillsbury for a while after 43...Qf4. 44. Qe4!

click for larger viewWith this move, Pillsbury pretty much had put an end to Schlechter's winning chances. As I will discuss in my next post on this game, after 44. Qe4 Schlechter was unable to accomplish much of use, and the game soon ended in a draw. |
|
Jun-25-19
| | KEG: Post VI
44... Qb5+
44...Qc5 was a better try, but probably would not have changed the outcome. Now Pillsbury had a path to a completely drawn ending. 45. Be2 Qc5
46. Bc4 b5

click for larger viewWhite to play and draw.
47. Qd5
"!"--(Tournament Book)
Now Black must trade Queens, after which the Bishops of opposite colors ending was a clear draw. 47... QxQ
48. BxQ d3

click for larger viewPillsbury now only had to set up a blockade to cinch the draw. 49. a4
49. b4 was simpler, but the game was still a draw. 49... b4
50. Bc4 d2
51. Ke2

click for larger viewPillsbury's King was headed for d1, after which there was no way for Schlechter to make progress. 51... Kf6
52. Kd1 Ke7
Trading pawns (i.e., 52...Kxf5 53. Bxf2) would obviously serve no purpose for Black. 53. Kc2 f6
Getting his f-pawn out of reach of Pillsbury's Bishop, but now Pillsbury could draw by simply posting his Bishop on g4. 54. Be2

click for larger view1/2 -- 1/2 |
|
|
|
|


