| Oct-20-07 | | Calli: Somehow in a drawn position, Alekhine finds himself in a desperate situation after 30...Qb2. He sees, however, the line 31.Rd8+ Kh7 32.Qd3+ g6 33.Rd7?? Kg7 34.Rxf7+ Kxf7 35.Qd7+ drawing. The problem is that Black has 33...Rc3 pinning White's Queen. Therefore, Alekhine simply moves the king first 32.Kg4! Rxh2 33.Qd3+ g6 34.Rd7 Kg7 35.Rxf7+ ½-½ It turns out that Black can't stop the combo with the extra tempo after Kg4. A narrow escape! |
|
| Oct-21-07 | | RookFile: Yes, these queen and rook endings are different than other types of endings. Material is not nearly as important as king safely. Nor is material as important as the ability to get one of your pawns running to queen. Here, this is a situation where Alekhine was able to get enough play against black's king to force a draw. |
|
| Mar-11-08 | | whiteshark: Can you spot why <34...Rh4+> doesn't work ? |
|
| Mar-11-08 | | brankat: <whiteshark> <Can you spot why <34...Rh4+> doesn't work ?> Just off the FEN here, I'd say because of <35. Kf3>, then Black still has to play, <Kg7>, and looses a Rook on <h4>. |
|
| Mar-12-08 | | whiteshark: <brankat> Right, the double threat after 35.Kf3 wins! But white couldn't take the ♖ either way on move 35 (35.Kxh4? Qh2+ 36.Kg4 Qh5#; or 35.gxh4? Qg2+ 36.Qg3 h5+ winning the white ♕). |
|
Aug-10-09
 | | Phony Benoni: There's a humorous little story here.
In the game P Romanovsky vs Levenfish, 1920 from round 1, Alekhine made a comment during the game that led Levenfish to sacrifice a rook and drive White's king to g4--where it was safe. So what does Alekhine do five rounds later, against Levenfish? He moves his king to safety on g4! Well, I think it's funny. |
|
Nov-28-20
 | | KEG: Quite an exciting game to play over, so long as you don't consult a computer (which demonstrates that all the critical points in the contest were in each case nothing beyond a forced draw). There have been extravagant claims by celebrated analysts that Levenfish missed a win or that plausible variations would have lost brilliantly. As I will attempt to show, all these claims are baseless. (It is, needless to say, much easier to be confident about such matters when one can check one's variations with computers. As is so often the case, it is best and most fun to play over this game WITHOUT computer assistance, since being told that every exciting looking position is 0.00 saps much of the fun out of viewing the game). All in all, quite a well-played game by both players. Remarkably, and although their respective careers had decades to go, this proved to be the final game between Alekhine and Levenfish. As always with Alekhine, and even though he only drew here, the game is an excellent example of how he was able to insert tension into even seemingly simple positions and make the game nightmarishly difficult for his opponent. Here, Levenfish was every bit up to the task of holding the game against his ultra-aggressive opponent. 1. d4 d5
2. Nf3 c5
3. c4
Best. I note this only because I have recently been commenting on games played at Monte Carlo 1901 and Buffalo 1901 in which such moves as 3. c3 and 3. e3 were played here instead of the rather obvious text. 3... e6
3...cxd4 is perhaps simplest for Black.
4. e3
I am surprised that Alekhine did not play 4. cxd5 which seems the best chance of playing for an advantage and for an attack with White. In fairness to Alekhine, however, there is nothing much wrong with the text provided he is satisfied to reach a symmetrical position with a move in hand (i.e., not much of an edge here). 4... Nc6
5. Nc3 Nf6
6. Bd3 Be7
As Alekhine noted, this is one way to avoid symmetry. 6...dxc4 and 6...cxd4 were also both, of course, playable. 7. 0-0
Again bypassing the chance to play 7. cxd5. Alekhine apparently wanted to retain tension in the center. 7... 0-0
8. b3
More complex than the simple and good 8. cxd5 or 8. dxc5. This may be why Alekhine chose this line. 8... cxd4
"!"--(Alekhine)
9. exd4

click for larger view9... b6
"Black tries to profit as quickly as possible from the insecure position of White's central pawns." (Alekhine) 10. Bb2
The risk of an isolated pawn notwithstanding, 10. cxc5 was much better. 
click for larger viewWhite has obviously not derived any advantage from the opening. 10... Ba6
"!"--(Alekhine)(Soltis)
Solits goes on to argue that the text was more "aggressive" than 10...Nb4. Both moves appear entirely reasonable to me.
11. Re1
"Now 12. cxd5 is threatened." (Alekhine)
11... dxc4
12. bxc4 Rc8
13. Nb5
Alekhine claimed this was "almost forced." But 13. Qa4 would also have been fine for White. 13... BxN
"!"--(Soltis)
14. cxB Nb4

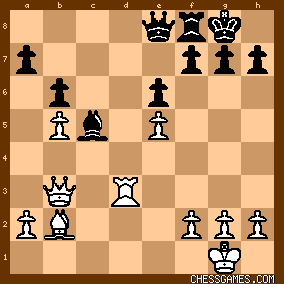
click for larger viewAn unbalanced position with chances for both sides, White's two Bishops being balanced by his isolated d-pawn. The sort of position in which one would expect the superior player to prevail no matter which side of the board he or she was playing. The immediate question presented was whether White should try to keep his two Bishops or try for some immediate opportunity to attack. |
|
Nov-28-20
| | KEG: Post II
15. Ne5
"!"--(Soltis)
Soltis claimed that Black would "obtain the edge" after 15. Bb1. But his analysis was badly flawed:
15. Bb1 Qe8 (weak, since White would now be better with 16. a3; Black would be at least equal with 15...Nbd5) 16. Qe2 (White would be better with 16. a3) a6 (Very bad. Black would be fine with 16...Nbd5. Now, White obtains a clear and close to winning advantage on Soltis' own line; 17. a3 Nbd5 18. bxa6 Qa4 and now after 19. g3 White with his two Bishops sweeping the board is definitely for choice. I'm not knocking 15. Ne5, but the choice between that move and 15. Bb1 is in fact a close one. 15... Nd7
Alekhine and Soltis both claimed that 15...Bd6 was stronger, but Soltis only reached that conclusion by considering only 16. Ba3? as a response, whereas after 16. Bb1, White is quite OK. After Soltis' 16. Ba3, by contrast, White would be in after 16...BxN (16...NxB is also good for Black) 17. RxB NxB. And if White played instead 17. BxN as suggested by Soltis, Black would be close to winning with 17...Qxd4 18. BxR QxR 19. QxQ BxQ leaving Black a clear pawn to the good with a likely winning endgame. In fact, after 15. Ne5, best for Black would be 15...Qd5 or 15...NxB. But none of the suggested moves for Black, or Levenfish's actual move for that matter, could be deemed mistakes. The position after 15...Nd7 was:

click for larger view16. Re3
"!"--(Alekhine)
As a theoretical matter, White has several decent choices here, in addition to the text: 16. Be4; 16. Nc4 or even 16. Ng4. But Alekhine's move creates attacking chances, and is typical of his play. He did not fear having one of his vaunted two Bishops being traded off (not to mention a pair of Knights) if he could rustle up an attack in the process. 16... NxB
17. RxN NxN
18. dxN Qe8

click for larger view19. Qb3
"19. a4 was simpler and better." (Alekhine)
Probably right, although the text was also fine and 19. a4 would not have conferred any major advantage on White. 19... Rd8
20. Rad1 RxR
21. RxR Bc5
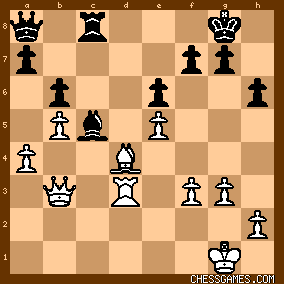
click for larger viewAn easy draw you say? But not with Alekhine at the board. Here, the fun was just beginning. It is amazing how complicated the position soon became, and how many seemingly dreadful risks Alekhine seemed to have been taking when in fact--as computer analysis confirms--he never was (theoretically at least) in any danger of losing. 22. g3
This opens the a8..h1 diagonal for Black's Queen and therefore appears risky. In his commentary on the game, Alekhine said that 22. a4 was best. According to Kotov, he discovered (or so he claimed) handwritten analysis from Alekhine claiming an easy draw for White without putting his King in jeopardy with 22. h3. In fact, all of these moves are theoretically fine. The text, however, created the greatest complications, and certainly helped make the remainder of the game the fascinating struggle if now became. 22... h6
"!"--(Alekhine)
Once again, Black had many good options. In addition to the text, he coud have played 22...g6; 22...Qa8; or 22...Qc8. 23. a4 Qa8
"!"--(Alekhine)(Soltis)

click for larger viewThe game was still theoretically a draw, but in over-the-board play Black seemed about to pounce. The finale was thrilling. |
|
Nov-29-20
| | KEG: Post III
24. Bd4 Rc8
Suddenly, Black's heavy pieces look dangerous.
25. f3
A doubtful choice and probably Alekhine's weakest move in this game. Rather than fearing the a8...h1 diagonal, Alekhine should just have played 25. Rd1 After 25. f3, the position was:
click for larger view25... Qd8
"!"--(Soltis)
I do not share Solti's enthusiasm for this move, which let (and even urged) Alekhine to equalize. Better were 25...a6; 25...BxB+ or 25...g5. 26. f4

click for larger view26... Qc7
"!"--(Soltis)
Soltis claimed that 26...Qa8 would let White "escape." While his line after that move seems correct [27. BxB RxB 28. Qd1 Qe4 29. Rd8+ [Soltis' "29. Qd8+" is obviously a typo] Kh7 30. Qd3! does indeed seem to lead to a drawn Rook and pawn endgame. But the text does not seem to promise anything much better for Black. 27. BxB
A simpler route to equality and a likely draw was 27. Qd1. But White is also ultimately OK after the text. 27... QxB+
28. Kg2
click for larger viewAs <RookFile> has reminded us, in Queen and Rook endings of this type, King safety is more important than material superiority. 28... Qc1
"!"--(Alekhine)
While this move led to some lively and exciting play, it promises only a draw with best play. While there are no winning lines for anyone here, Black could have created more options for his King with 28...g5 or 28...g6. 29. Qd1
"!"--(Alekhine)
29... Rc2+
30. Kf3

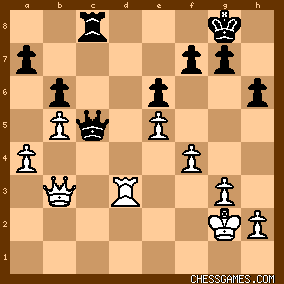
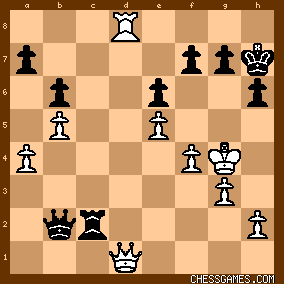
click for larger view30... Qb2
"!"--(Alekhine)
As Calli notes, the situation certainly looked "desperate" for Alekhine. But, as so oftem, he found a remarkable tactical solution. 31. Rd8+
He could also have played 31. Kg4 here immediately. 31... Kh7
click for larger viewThe climax of the game--about which much ink had been spilled--had been reached. |
|
Nov-29-20
| | KEG: Post IV
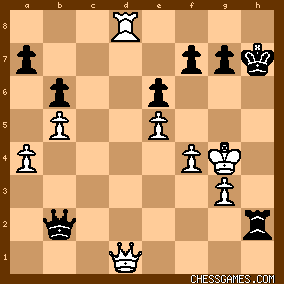
32. Kg4
"!!"--(Alekhine)
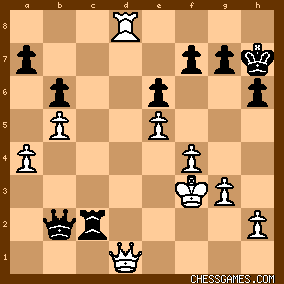
There have been all sorts of comments made concerning this move. The best of the lot is by <Phony Benoni> on this site, who has pointed out the humor in the move in light of what happened to Levenfish in Round 1 against Romanovsky in light of Alekhine's comment during the game. The other comments all seem fanciful, even though they were by renowned analyists. Alekhine and Kotov both claimed that 32. Qd3+ would lose. Alekhine contented himself with the cryptic comment that after 32. Qd3+ 32...g6 "would prevent the escape of the White King." Kotov did Alekhine one better, and supplied a line by which he purported to prove the 32. Kg4 was "The only way to draw." In fact, Kotov's line is horribly flawed, and 32. Qd3+ was--like the text--sufficient to draw. Let's examine Kotov's line: 32. Qd3+ g5 33. Kg4. So far, so good. With 33...Rc3 or 33... Kg7 or 33...Rxh2 the game should end in a draw. Kotov, however, claims a win for Black with 33...f5? Not only does this not win for Black, it actually loses. Let's follow Kotov's line further: 34. exf6 e.p. h5+ 35. Kg5 Rc5+ But here, where Kotov claimed a win for Black, the periodical 64 proved it was a win for WHITE: 36. f5 ["!"--64] Rxf5+ [36... Qc1+ would prolong the struggle, but not change the outcome--KEG] 37. QxR [!!--64] exQ 38. Rd7+ Kg8 [38...Kh8 was no better--KEG] 39. Kg6 and White--though down Queen for Rook--must mate shortly. Pretty neat, huh?
Soltis, however, claimed that even Alekhine's 32. Kg4 allows Black to win. Let's examine his analysis. The position after 32. Kg4 was:
click for larger viewSoltis claims a win for Black here with 32...h5+ Alekhine had in fact disposed of this in his commentary years ago: "If 32...h5+, then simply 33. Kxh5 [Not 33. Kg5 f6+-- as noted by Soltis] Rxh2+ 34. Kg4 This would leave:
click for larger viewSoltis claims this is a win for Black. He is correct that 35. Rd7? would lose to 35. Rh6!. But what Soltis calls an "improvement" for White, 35. Qd3+, does indeed save the game. Let's follow Soltis' line from here: 35...g6 36. Rd7 does indeed lose to 36...Kh6. But Soltis missed the saving 36. Kg5! Kg7 [36...Rh5+ would lose to 37. Kf6!] 37. Qa3! [the only move, but a good one] Rh5+ (forced) 38. Kg4 Qh3+ [38...Qe2+ 39. Qf3 also draws] 39. Kf3 Qf1+ 40. Kg4 and draws since Black must keep checking the White King to stave off mate. So, returning to the actual position after 32. Kg4:
click for larger viewThe game now concluded:
32... Rxh2
This is no better or worse than 32. h5+. Now Alekhine drew brilliantly: 33. Qd3+ g6
34. Rd7 Kg7
34...Rh4+? would actually lose to 35. Kf3! as was pointed out on this site years ago. 35. Rxf7+

click for larger view1/2 -- 1/2
If 35...KxR White draws by perpetual check with 36. Qd7+ followed by Qd8+ Quite a finish! |
|
|
|
|


