Jun-18-23
 | | KEG: Not a terribly good or even interesting game (rare to say this about a game in which Tchigorin was involved). Tchigorin was somewhat outplayed by Marco for most of the game, but managed to reach a Rook and Pawn ending that seemed a likely draw. But then Tchigorin blundered with 41...h6? leaving Marco a fairly simple endgame win. But Marc immediately blundered away his win with 43. fxg5, and then committed what should have been a fatal blunder with 44. Rf1? But Tchigorin misplayed his winning hand and gave Marco a potential life-line. But Marco in turn blundered with 51. Rd5? and 52. Kd1? Fittingly, the game ended abruptly when Marco blundered into mate in 1, but by that time he was dead lost anyway. 1. e4 e5
2. Nf3 Nc6
3. Bb5 a6
4. Ba4 Nf6
5. 0-0 Be7
6. Nc3

click for larger viewA completely sound line that has long gone out of style in favor of 6. Re1. At or around the time of Monte Carlo 1902, the text was popular and was played from time to time by nearly all the best players, including Lasker, Pillsbury, Schlechter, Teichmann, Tarrasch, Marshall and Janowski (who employed it at least three times). 6... b5
7. Bb3 d6
8. Bd5
A novelty at the time, but not a true improvement over the then more popular 8. Nd5, 8. d3, and 8. a4. 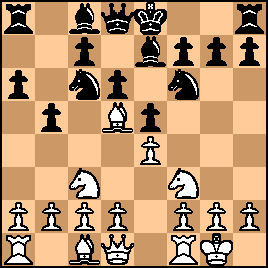
click for larger view8... NxN
Looks best, but--given Tchigorin's preference for Knights over Bishops, I would have expected 8...Bb7 from him. 9. NxN 0-0
10. d4
Knowing Tchigorin's wizardry with the initiative, Marco (who had been thrashed in most of their prior encounters) tried to seize the initiative himself with the moderately ambitious text in lieu of the more solid and arguably better 10. d3. 10... Bg4
10...f5 was perhaps slightly stronger, but the text worked out well for a time because of Marco's inccurate response, the position now being: 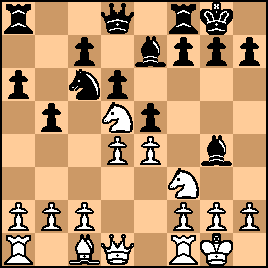
click for larger view11. dxe5?
This could have led to trouble for White. Marco should have tried to maintain the balance with 11. c3. 11... Nxe5
12. Bf4
12. a4 looks marginally better. The text left:

click for larger viewTchigorin had emerged from the opening with much the better chances. But here---for reasons I cannot fathom--did not played the seemingly obvious 12...BxN (ruining White's King-side pawn structure), and--with further weak play, had turned the advantage over to Marco. For the next approximately 25 moves, Tchigorin was fighting an uphill battle until he finally managed to achieve a decent endgame by about move 38 (after which play by both sides became truly sloppy). |
|
Jun-18-23
 | | KEG: Post II
12... Ng6?
What was Tchigorin thinking? Either 12...BxN+ or 12...NxN+ would have given him a clear advantage. After the text, Black's edge was gone. 13. h3 BxN
14. QxN Bf6
And here, why not 14...NxB.
The position was now:

click for larger view15. c3
Marco, given his prior beatings by Tchigorin, appears happy to play for a draw, else he would surely have tried to exploit his small edge beginning with 15. Bc1 15... Be5
And Tchigorin still seems to have been on another planet. While the text is far from a blunder, 15...c6 or even 15...NxB seem clearly better. 16. BxB
Marco liked endgames, so further trades surely suited him just fine, especially against one of the most dangerous tactical players of all time. 16... NxB
17. Qe2 Nd7
Given Tchigorin's storied wizardry with Knights, I am generally loather to doubt his use of his steeds. But here 17...Re8 seems plainly superior. 18. Rad1
Right square, wrong Rook. 18. Rfd1 or perhaps 18. a4 were better. The text left:
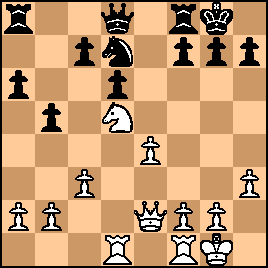
click for larger viewHowever reached, the players had achieved a position with plenty of opportunities for both sides. While White has more space and a better positioned Knight, the game was very much up for grabs. With Tchigorin in 4th place, seeking to stay ahead of Teichmann, Janowski, Tarrasch, and Schlechter who were just barely behind him, and with 2nd and 3rd places (occupied at the time by Pillsbury and Marshall far from out of reach), Tchigorin had every reason to play for a win. 18... Re8
19. Rfe1 Rc8
20. Qd2 Qh4
Trying to make something out of nothing.
21. f3 Ne5
Again pressing to find anything approaching winning chances. 22. Qf2
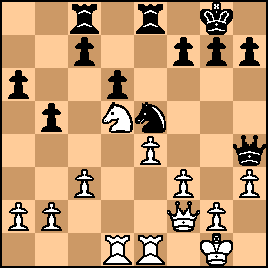
click for larger view22... QxQ+
While there is nothing theoretically wrong with this move, I would have expected 22...Qd8 from Tchigorin seeking middle-game opportunities. Marco was a strong endgame player, so trying to win from here in the endgame looks futile. But given what finally occurred in this game (after some madness), I guess Tchigorin's move turned out for the best. 23. KxQ
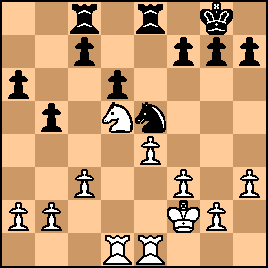
click for larger viewI remain astonished--even knowing the result--that Tchigorin chose to play for a win in this ending. What followed was hardly a model of strong endgame play, but it WAS exciting. |
|
Jun-19-23
 | | KEG: Post III
23... Kf8
Not awful, but 23...f6 seems an easier way to hold the position. But that, of course, was not Tchigorin's intention, and he had no intention of assuming a defensive posture--even here. 24. f4
24. g4 looks even stronger for White. My guess is that Tchigorin was happy to see 24. f4, since it meant the ending might get sharp. 24... Nd7
25. Kf3 Nc5
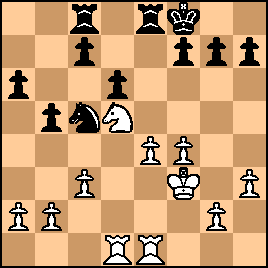
click for larger view26. Nb4 a5
27. Nd3 Na4
Ignoring the more drawish 27...NxN and trying to retain tension in the game. 28. Rc1 c5
29. b3 Nb6
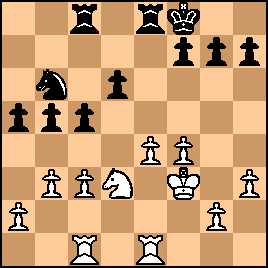
click for larger view30. c4
Best, though it gives White two isolated pawns on the Queen -side. Marco probably didn't relish this, but the text was the only way to play for any edge for White. 30... bxc4
31. bxc4 Red8
32. Re2
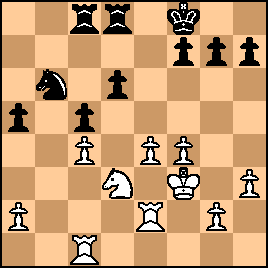
click for larger viewMost players with Black here likely would have tried to hold the balance (and aim for a draw) with 32...Nd7 or perhaps 32...Rb8. But White's Queen-side weaknesses led Tchigorin to seek more with: 32... Na4
The problem with the text is that it allowed Marco to go for a Knight trade and then a highly favorable (for him) double-Rook ending. 33. Nb2 NxN
33...Nb6 was no improvement, but it would have kept the Knights on the board. 34. RxN
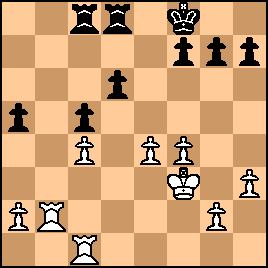
click for larger viewDespite his isolated Queen-side pawns, White has the better chances in this endgame, especially in light of Black's backward d-pawn. Most players with Black would be satisfied with a draw. 34... Rb8
Best.
35. Rb5

click for larger viewTchgorin now faced a critical choice: (A) 35...a4; or 35...RxR. Tchigorin chose the latter: 35... RxR
36. cxR a4
Preventing a4 by White and thus stopping Marco from obtaining a protected passed b-pawn. But the ending, though likely a theoretical draw with best play by both sides, obviously favored White. 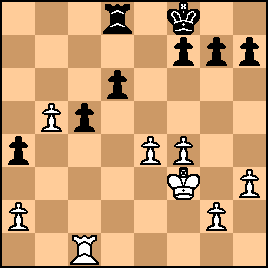
click for larger viewIf Magnus Carlsen or Bobby Fischer were playing White here, they would doubtless torture Black for a very long time before allowing Black to draw. But from here, as I will discuss in my next post on this game, things got weird. |
|
Jun-20-23
 | | KEG: Post IV
37. g4?
Missing the line that would have brought him at least close to victory: 37. e5! If then 37...dxe5? Marco would have had excellent winning chances with 38. Rxc5 exf4 (perhaps 38...Rd4 was a better chance) 39. b6! Rb8 (forced) 40. Rc6 and Black would have his work cut out for him to try to save the game. The best response to 37. e5! would be 37...Ke7. But even then White has serious winning chances: e.g., 38. Rc4 Rb8 39. Rxa4 Rxb5 40. Ra7+ Ke8 41. exd6 Rb6 42. a4 Rxd6 43. a5 [or 43. Ke4} with a better endgame for White that Black may be able to hold. After the text, White's winning chances should have been at an end. But lots more was soon to happen: 37... Ke7

click for larger view38. Rb1 Kd7
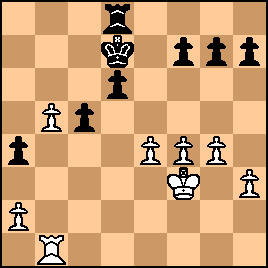
click for larger viewThis difficult Rook and Pawn ending should probably result in a draw with best play by both sides. But here Marco got careless: 39. Rb1
White probably had a safe draw with 39. Rc1 followed by 40. Rc4. The text was hardly a blunder and shouldn't lose, but it gave Tchigorin opportunities he failed to seize: 39... Kc7
40. Kd3
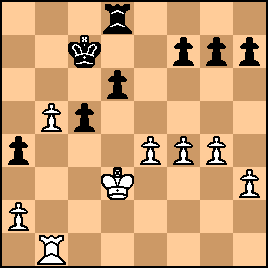
click for larger view40... Kb6
40...Re8 might have made White sweat a bit. After the text, White should have no problems and can even make Black work to achieve a draw: 41. Kc4

click for larger viewTchigorin here---speaking objectively--should have played it safe with 41...Re8. But Tchigorin needed a win to keep pace with his closest rivals, and--perhaps because the move-45 time control was approaching--came up with what turned out to be a winning blunder: 41... h6?
As will be seen, Marco should--again speaking objectively and ignoring the probably time trouble issues--have won easily: 42. Rd1!
Black is busted. But that's not how this game turned out: 42... g5!
A final trick by Tchigorin which--with a little help from Marco--turned the game on its head. The position was now: 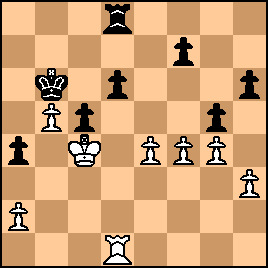
click for larger view43. f5! now wins for White. But Marco was confused by Tchigorin's last move, and in his next two moves first threw away the win that was now there for the taking and then blundered away the game. More proof, if such were truly needed, that Rook and Pawn endings can be devilishly difficult. |
|
Jun-20-23
 | | KEG: Post V
As mentioned in my last post, Marco had a clear win with 43. f5! (e.g., 43...d6 [I see nothing better] 44. e5! fxe5 [forced but hopeless] 45. f6 [passed pawns must be pushed] Kc7 [once again, I see nothing better] 46. Kd5 [ouch] Kd7 [everything else is hopeless as well] 47. f7 [47. Rf1 also wins] Rf8 48. Rf1 e4 [a final desperate attempt] 48. b6 [White's two passed pawns are lethal] e3 [why not?] 49. b7 c4 [the best try, but again hopeless] 50. Rb1 e2 51. 51. b8(Q) RxQ 52. RxR e1(Q) 53. f8(Q) and White's extra Rook is, obviously, decisive. But instead, Marco allowed himself to be distracted by Tchigorin's last move and played: 43. fxg5? hxg5

click for larger viewThis Rook and Pawn ending is still complex. But White seems just fine, so long as he keeps his Rook on the d-file. But Marco (perhaps because of time pressure) faltered and was instantly lost: 44. Rf1?
Tchigorin now had a clear win, but almost blew this opportunity with some sloppy play: 44... Re8!
45. Kd3
Forced.
46... Kxb5
46. Rf7 Rh8

click for larger viewWhite's defensive task is ultimately hopeless, with best play by Black. 47. Rf3 Kb4
48. Kc2 Kc4
49. Rd3
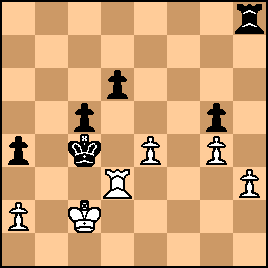
click for larger viewMarco had been doing the best he could after his move 44 blunder, but now 49...Re8 would be curtains for him. But now, even with the move-45 time control passed, Tchigorin again got sloppy: 49... Rh6?
There was no defense for White after 49...Re8 [ e.g., 50. Rc3+ Kb6 51. Kd3 Rf8 52. Ke3 Rf1 [this invasion by the Black Rook is decisive] 53. Rd3 [the best try] Rh1 [ouch!] 54. Rxd6 Rxh3+ 55. Kd2 Ra3 and wins. After 49...Rh6, however, White suddenly had at least a fighting chance: 
click for larger view50. Kd2 Rf6
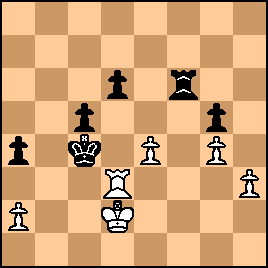
click for larger viewTrying to hold this position might not have been much fun for Tchigorin, but it was now far from clear that he was still lost. After his blunder on his very next move, however, Marco was--as I will cover in my next post on this game-- quickly wiped out by Tchigorin. |
|
Jun-21-23
 | | KEG: Post VI
What I meant to say at the conclusion of my last post is that the position after 50...Rf6 would not have been much fun for MARCO to struggle to hold. His next move, however, made all that entirely moot: 51. Rd5?
51. Ke3 or 51. Ke2 were the only plausible chances. Marco had to anticipate 51...Rf2+ , which now proved entirely lethal. 51... Rf2+
Game over.
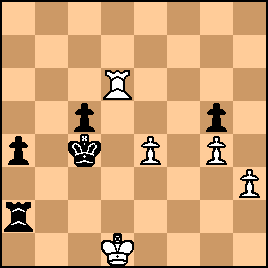
click for larger view52. Kd1
Making matters worse. But, in fairness to Marco, he would not have lasted long even after the "better" 52. Ke3. 52... Rxa2
52...a3 was faster, but the text was also quite lethal. 53. Rxd6
53. Kc1 might have extended the game for a few more moves, but it would not have changed the result. After 53. Rxd6, the position was:

click for larger viewAmong other things, Marco was in a potential mating net, a fact he forgot two moves later. 53... a3
54. Ra6
54. Rc1 was the only way to prolong the game at all. 54... Kd3
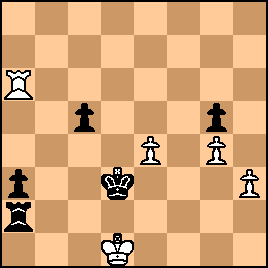
click for larger viewMarco couldn't survive long here, but he shortened matters with: 55. Kc1
This allowed:
55... Ra1#
Ouch |
|
|
|
|


