| Jan-27-19 | | zydeco: A classical Pillsbury win - constantly finding active possibilities in the endgame. Around move 32, in a basically equal position, Mason starts conceding space, which Pillsbury happily takes. 33.Qe2 seems like the start of a bad plan. If he wants to play e4, he could do right away. If 52.Qe5+ black escapes from the checks on the queenside: 52....Kd3 53.Qd5+ Kc3 54.Qc5+ Kb3 55.Qd5+ Kxa3 |
|
Nov-14-21
 | | KEG: Pillsbury had done well since his opening round loss to Maroczy. To catch up to the leaders, Pillsbury needed to beat Mason, who was near the bottom of the standings at this point (and who ended up in 13th place out of 20). Mason seemed clearly aiming for a draw against his celebrated opponent, and indeed a draw looked likely despite Pillsbury's efforts to complicate until Mason's poor 35th and 42nd moves. Even then, he seemed almost certain to be able to hold until his losing 43. Ne2? After that error, Pillsbury reduced to an easily won Queen and Pawn ending that he converted quickly. His winning technique at the end is most satisfying to behold. 1. c4 e6
2. e3
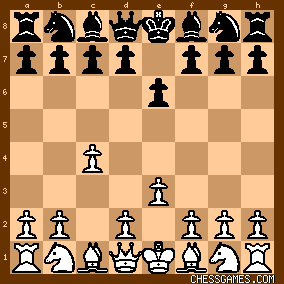
click for larger viewThis position as White was a Mason favorite. It gives away nothing, gives White a tiny edge, and is a good line for a player hoping for a draw as White. 2... Nf6
3. Nf3 d5
4. Nc3 c5
5. d4 Nc6
6. Be2
While hardly a serious mistake, the text loses a tempo, allowing Black (Pillsbury) to reach a symmetrical position with Black--rather than White--to move. 6... a6
7. 0-0 dxc4
8. Bxc4 b5
9. Bd3 Bb7
10. dxc5 Bxc5
11. a3 0-0
12. b4 Bd6
13. Bb2

click for larger viewAs noted above, thanks to White's extra move with his Bishop, Black is not to move in a symmetrical position. The position is so balanced the tempo, as Mason probably had decided, is of little or no significance. The position--including the pawn structures--are entirely balanced making this a fine line for a player such as Mason here whose goal was only to secure a draw. 13... Qe7
14. Qe2
Rather than going for symmetry by rote, Mason might have tried the stronger 15. Ne4. But even after the text White is nearly equal. 14... Rac8
15. Rfd1
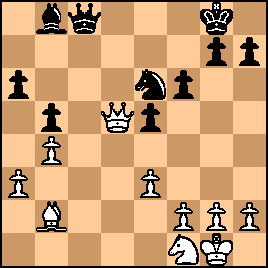
Once again, Ne4 was better; and once again Mason's marginally inferior move did not create any major difficulties for him. After 15. Rfd1, the position was:

click for larger viewHere, Pillsbury could have obtained a small edge with 15...Ne5. But this could have been drawish, and Pillsbury wanted to create complications and imbalances. Accordingly, he played: 15... e5?!
This could have given White chances to seize a clear advantage had Mason been playing for a win, the position now being: 
click for larger view16. Nd2
Even stronger was 16. Ng5! But Mason's ambitions were limited and he seemingly wanted to avoid complications as much a Pillsbury welcomed them. 16... Bb8

click for larger viewWhite was still better, but--as will be seem--Mason's unambitious play allowed Pillsbury to obtain about even chances and then bide his time until Mason did something that gave him an opportunity to pounce. |
|
Nov-14-21
| | KEG: Post II
17. Rac1
In his effort to maintain as much symmetry as possible, Mason missed his last chance to obtain a significant edge; this time with 17. Nde4, 17. Nce4, or 17. Bf5. After the text, White's advantage was nearly gone. 17... Nd8
18. Nce4
One move too late to get any real advantage.
The position was now:
click for larger view18... NxN
18...Ne6 or 18...RxR were somewhat better.
19. BxN
Instead of this reflexive recapture, Mason could have gotten a small edge with 19.RxR BxR 20. BxN. 19... RxR
19...Ne6 was perhaps somewhat better.
20. RxR Ne6
click for larger viewThe game was almost certainly going as Mason had hoped. The strongest part of his game at this stage of his career was the endgame. The fly in the ointment is that Pillsbury was an endgame wizard, almost certainly among the strongest (along with Lasker, Rubinstein, and Capablanca) during the early part of the twentieth century. 21. BxB
"After this important exchange the position is very drawish." (Tournament Book) 21... QxB

click for larger viewThe position most certainly did appear drawish, but it was in such simplified position that Pillsbury could be extremely dangerous, as this game would once again show. 22. Qf3
True to form, Mason sought an exchange of Queens, believing he would be able to draw the ending with ease. But Pillsbury was not interested in a draw, and besides the trade of Queens would favor White. 22... Qd7
"22...QxQ would be unwise as Black would be unable to parry the two the attacks on the weak points at e5 and c6." (Tournament Book). White would indeed be considerably better after 22...QxQ 23. gxQ followed by Ne4. But the ending would have been far from hopeless for Black. In any case, Pillsbury's decision to reject the offered Queen trade was a fine decision for a number of reasons, most important of which was that he still intended to play for a win. 23. Nf1 Rc8
24. RxR+ QxR
click for larger viewMason still had somewhat better chances, and he could have tried to press his small edge with 25. Qa8! But, as noted several times above, his ambitions were limited to playing for a draw. Thus here he played: 25. Qd5
Solid but conferring no edge on White.
25... f6
I am surprised that Pillsbury here didn't play the stronger 25...Qc2 or 25...Nf8. After 25...f6, the position was:
click for larger viewA draw now certainly appeared to be in the cards. But Pillsbury kept trying, and ultimately Mason gave him the opportunity he was awaiting, as I will discuss in later posts on this game. |
|
Nov-14-21
| | KEG: Post III
26. Nd2
Mason continued to play safe and solid chess, taking no chances and making no effort to press for some advantage. Had Mason been interested in trying to squeeze out something from this position other than a draw, he would likely have played the (slightly) more enterprising 16. Ng3. 26... Kf7
27. Qb3 Ke7
28. Qd3 g6
Pillsbury, by contrast, wanted to play for a win. Otherwise, he could have played 28...Qd7 or 28...Qd8 and looked to trade Queens, thus reaching an almost certainly drawn minor piece ending. 29. Ne4 Qc6
30. Nc3 Nc7
31. h3 Ba7
32. Kf1
32. Qd1 looks simpler, but White was also fine after the text: 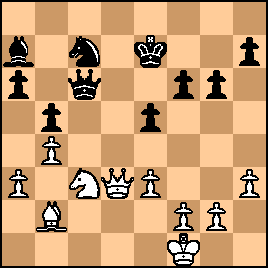
click for larger view32... f5
Trying to create some action while taking no serious risks. 33. Qe2
<zydeco> calls this the "start of a bad plan." While 33. Ne2 looks simpler for White, the text move hardly looks like any kind of mistake. 33... Ke6
34. Kg1 Ne8
click for larger viewTo this point, Pillsbury had not made much if any of a dent in Mason's armor, and a draw still seems the likely result. But in this position Mason lost patience and gave Pillsbury his first real chance in the game to try to make something happen. 35. e4
"?"--(Tournament Book)
"After this move White does not have an adequate defense." This assessment in the Tournament Book is a serious overstatement perhaps based on the result. I agree that White could almost certainly drawn by playing possum with any of a number of non-committal moves (e.g., 35. Ba1 or 35. Qd1, or even with more direct efforts such as 35. a4 or 35. g4). But the notion what Mason was in any serious jeopardy after the text is simply wrong, the position after 35. e4 being: 
click for larger view35... Bd4
"!"--(Tournament Book)
This idea eventually worked out splendidly for Pillsbury, but on the face of it 35...Nf6 or 35...Qc4 (offering a Queen trade White could not dare accept) look like better ways to exploit Mason's last move. 36. exf5+ gxf5
37. Nd1 Qc4!
"!"--(Tournament Book)
A neat idea by Pillsbury, making progress by offering a trade Mason could not accept: 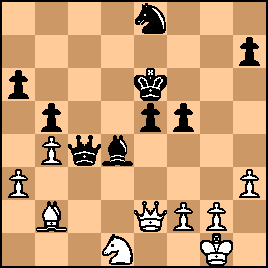
click for larger view38. Qd2!
The only way to maintain the drawn position he had tried so hard to achieve. 38... f4?!
Playing for complications. Objectively, keeping his Bishop with 38...Bb6 was probably better. But Pillsbury--with the move 45 time control approaching--had an idea on how to put Mason under pressure. On paper this should not have worked and Mason should have drawn with relative ease after the text. But over the board with the clock ticking, Pillsbury's idea worked wonders. 39. BxB QxB
click for larger viewAs will be seen, Pillsbury's idea was to exploit Mason's slight disadvantage by offering trades of Queens that White could not accept and then bringing his Knight into play and forcing a trade of Knights and reaching a won Queen ending. Against proper play, none of this would have worked, but in practice it lead to a won game for Pillsbury within just four moves, after which Pillsbury demolished Mason in short order. |
|
Nov-14-21
| | KEG: Post IV
40. Qc2!
Not 40. QxQ? exQ after which Pillsbury's passed d-pawn would allow him to win the Knight and Pawn ending. 40... Nd6
Watch how the advance of this Knight, coupled with Pillsbury's earlier f4 making f5 available, caused Mason to crack. 41. Nc3 Qc4
"!"--Tournament Book)

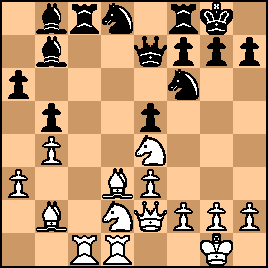
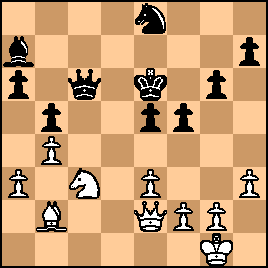
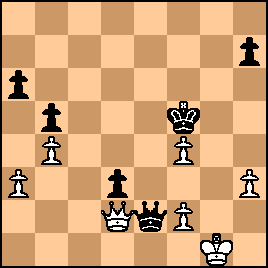
click for larger viewSpeaking purely objectively, White is fine. But the threatening appearance of Black's forces certainly appeared menacing, and Mason now succumbed to either fear or time pressure (there was a move 45 time control at Monte Carlo 1902). 42. Qb2?
A sloppy but not yet losing move. 42. Qd2 holds relatively easily. But Mason probably saw ghosts and worried that after 42. Qd2 42...Qb3 would be a problem with the White pawn on a3 undefended. In fact, White can simply ignore the "threat" with 43. Kh2, since if then 43...Qxa3? Black would probably be lost after 44. Qd5+ After the text (42. Qb2?), the position was:

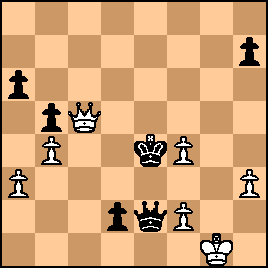
click for larger view42... Nf5
47...Qd3 looks even stronger, though White should still be able to hold. But Pillsbury's move set a little trap into which Mason fell instantly, the position now being: 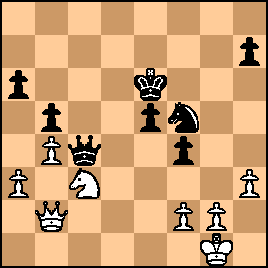
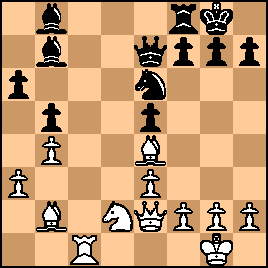
click for larger viewMason here could hold with 43. Kh2 or 43. Qd2 or even 43. a4. But Mason was still seeing ghosts, and erred fatally with: 43. Ne2?
The losing move, after which Pillsbury demolished the White position with amazing rapidity. 43... Nd4!

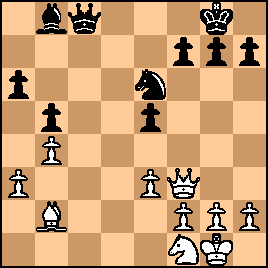
click for larger viewMason now had to trade Knights. If instead 44. Nc3 or 44. Nc1 Pillsbury takes the White Knight followed by a vicious Knight fork (45...Ne2+) since the White King is on g1. If instead 44. kf1 then 44...f3! 45. gxf3 Qd3 is murder. But trading Knights was also fatal for White, as Pillsbury immediately demonstrated: 44. NxN+ exN
45. Qd2
Anthing else is even worse.
45... d3!
Ouch!
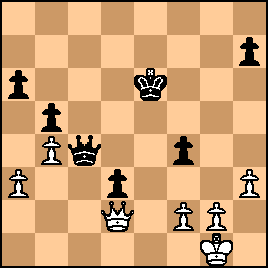
click for larger viewThe passed d-pawn is crushing, and Mason was dead meat at this point. Amazing how Pillsbury, yet again, converted a clearly drawn position into a clear win by presenting problems his opponent could not solve. What followed, as I will discuss in my next post on this game, was a massacre. |
|
Nov-14-21
| | KEG: Post V
46. Kf1 Ke5
46...Kd5 was even faster.
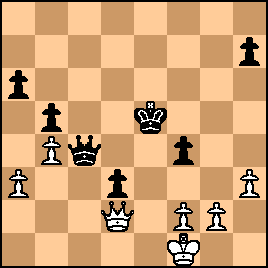
click for larger view47. g3?!
Desperation. The Tournament Book is correct that 47. Ke1 would not have saved the day, though its analysis of that moved was flawed: "47. Ke1 Qe4+ [47...Qd4 was the killer, though the Tournament Book's move also wins] 48. Kd1 Qd4!! and Black wins easily." In fact. 48...Qd4 lets White off the hook after 49. Qc1 since 49...Qxf2 allows White to draw with 50. Qc7+ and 49...Qc4 (best) is probably also a draw after 50. Qb2+ Ke4 51. Kd2. The winning move in the Tournament Book's line after 48. Kd1 is 48...Kd4 (e.g., 49. Kc1 Kd5 50. Qd1 Qd4 with Qxf2+ to follow. 47... Kf5
47...Kd4 is more accurate, though the text also wins easily, the position now being: 
click for larger view48. gxf4?
The only way to offer any resistance was with 48. Kg1, but even then after 48...Ke6! 49. Qd1 Qc2 50. Qg4+ Kd5 51. Qf5+ Kc4 52. Qxf4+ Kb3 53. Qf3 (53. Qf7+ Kxa3) Ka2 the game would be over. 48... Qe4!
49. Kg1
Forced
49... Qe2!
click for larger viewNow Pillsbury's only problem was avoiding perpetual check. 50. Qc3 d2
51. Qc5+ Ke4
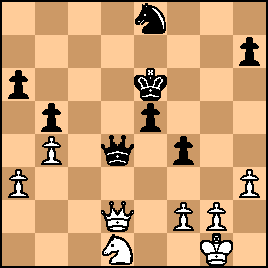
click for larger view52. Qc2+
As <zydeco> has shown 52. Qe5+ is no better: 52...Kd3 53. Qd5+ Kc3 54. Qc5+ Kb3 55. Qd5+ Kxa3 after which White's checks are over the Black Queens his d-pawn. 52... Kd4
53. Qb2+
53. Qc5+ is no better.
53... Kd5
54. Qb3+ Kd6

click for larger viewPillsbury had skillfully maneuvered so that White's checks were at an end and his Pawn could Queen. 0-1 |
|
|
|
|


