| Jan-17-13 | | Articcircle: Intresting rookendgame. Statistics culled from numerous tournaments reveal that rookendings comprise 50 per cent of all endgames, and it is for this reason that a study of them is og great pracital value. |
|
| Jan-17-13 | | Articcircle: 49.Ra6! was a good move forestalling Kf6
The ending after 53.- Kxg4 54.Rxf6  Ke4 55.Ra6 is lost for Black, as the white king gets to b7. No better is 53.- Ke4 54.Kc5-f5 55.Ra4+ and white wins. Ke4 55.Ra6 is lost for Black, as the white king gets to b7. No better is 53.- Ke4 54.Kc5-f5 55.Ra4+ and white wins. Also winnig was 54.Kb5-f5 55.Ra4-Rxa7
56.Rxa7-Kxf4 57.Kc4. |
|
| Jan-17-13 | | Articcircle: Sorry I mean 53.-Kxf4.
Instead of 54.Kd4...Kb5 winns |
|
| Jan-28-19 | | zydeco: Good tough win by Maroczy. Marco was hell-bent on a kingside attack that, when it finally got going, only led to loss of material. If 16...Qxd2 17.Qg6+ Kh8 18.Qxh6+ Kg8 19.Rad1 Qxc2 (or Qa5) 20.Qg6+ Kh8 21.Bxf7 Rxf7 22.Qxf7 and white's attack wins. If 21...Bxd3 22.Rxd3 Rxd3 23.Qxd3 Qxb2 24.Rb1 Qxa2 25.Rxb7 with more than enough play for the pawn. Maroczy didn't like 31.Qxg4 Rxh3 when he gets the queens off but is stuck with doubled c-pawns. Lots of finesses in the endgame. Of course if 53...Kxf4 54.Rxf6+ K moves 55.Ra6 and white's king reaches b7. If 59....Ra8 60.Re7 R moves 61.Rg7+ K moves 62.Kxf5 |
|
| Dec-06-21 | | ndg2: Somehow Marcoczy had Marco's number. Geza almost always won in the endgame against this opponent. |
|
Jan-25-22
 | | KEG: Maroczy's marvelous handling of this Rook ending was recognized by Levenfish and Smyslov in their classical "Rook Endings." The win is not all that difficult, but Maroczy's play is aptly presented as a model of how to win equal pawn Rook endings where the winning side has the Rook behind a passed pawn and is obstructed solely by the defending side's Rook. The portion of the game leading up to the pretty endgame is a good example of Maroczy's style: playing for a small edge, taking no chances, and not pursuing plans that he could not evaluate over the board. This can be a winning formula for one with Maroczy's talent and incredible patience. Following up on the comment by <ndg2>, at the time this game was played, Marco had never won a game from Maroczy. After this win, Mazoczy's record against Marco stood at four wins in eight games with no losses. In their subsequent 12 games, Marco did slightly better: with Maroczy winning 6, losing 3, and drawing 3. 1. e4 e5
2. Nf3 d6
Philidor's Defense, which is better than its reputation. Maroczy here proceeded leisurely against this passive opening, satisfied with maintaining a sound position rather than trying to storm the barricades. 3. d4 Nd7
A very passive looking variation of the Philidor but one not easy to beat (as I have learned to my chagrin when facing grandmaster opposition). 4. Bc4 c5
More popular and probably superior to the alternatives. 5. 0-0
Maroczy in his commentary on this game strangely called this "an error." His proposed alternative, 5. dxe5, is less popular and probably no better or worse than the text. 5... Be7

click for larger viewBy any measure, White is better. 6. dxe5 or 6. a4 are the strongest ways to try to exploit this edge. But, as mentioned above, Maroczy was in no hurry. 6. Nc3 Ngf6
7. h3
Maroczy later called this "risky," presumably because it slightly weakened his King's-wing and led Marco to attempt a King's side attack. As Maroczy correctly stated, 7. a4 (anticipating b5 by Black) was better, as would have been 7. Re1. 7... h6
7...b5, a move that Marco never got around to playing, would have been much better. 8. Be3
8. a4 was still best. Perhaps Maroczy knew that Marco would be reluctant to play b5. 8... g5?!

click for larger view"Now Black has no problems." (Maroczy)
Loathe as I am to go head-to-head with the great Maroczy about positional considerations, I am constrained to disagree. Black's attack is surely premature (White's h3 notwithstanding), and 8...b5 was far better. What I will acknowledge is that Marco's move was playable, raised defensive issues for White, and proved no immediate refutation. 9. Nd2
Very much in Maroczy's cautious style.
9... Nf8
Going all-in on his King-side attack notion. 9...b5 still looks better to me. Alternatively, if Marco was hell-bent on a King-side attack, he might have tried 9...Rg8. 10. Ne2 Ng6

click for larger viewThe respective plans of the two veterans were taking shape. |
|
Jan-25-22
| | KEG: Post II
11. Ng3 Nf4?!
"Intending to continue his attack by h5." (Maroczy) The best way to "continue his attack" was with g4. After the inferior text, Maroczy could have retained a significant edge. 12. dxe5 dxe5

click for larger view13. BxN?
Maroczy's worst move of the game, inspired no doubt by his preference for avoiding danger even at the expense of pressing an advantage. 13. c3 and 13. Nf3 and perhaps even 13. a4 were much better. 13... exB!?
13...gxB, opening the g-file, seems more consistent with Marco's attacking scheme. 
click for larger view14. Nh5
"Forcing Black to play 0-0 and thus paralyzing the pawn storm. In addition, White has the opportunity to simplify the position. The game is very interesting and both sides are playing to win." (Maroczy) Ir Maroczy were truly playing to win, as he claims he was, why not 14. e4 here. That would have led to truly "interesting" play. (e.g. 14. e5 Nd7 15. e6! fxN 16. exN+ Kxd7 [best!] 17. fxg3 Kc7 18. Rxf7 Rf8 19. Qe2 RxR 20. BxR leaving White better placed but far from winning. 14... 0-0
15. e5
Nowhere nearly as strong as if played on the last move. Best for White here was probably 15. Re1, leaving White with a tiny edge. 15... NxN
16. QxN

click for larger viewDid Maroczy hang a Knight here?
Nope. As <zydeco> has pointed out, 16...QxN?? loses almost instantly to 17. Qg6+ (exploiting the pin) Kh8 18. Qxh6+ Kg8 19. Rad1 Qxc2 (19...Qa5 20. Bd3 is even worse for Black--KEG) after which 20. Bd3 cleans house (20. Qg6+ suggested by <zydeco> hangs the Queen, but his variation is nonetheless superb despite this final oversight). 16... Kg7
Now, after all the excitement, we have an approximately even position. 17. Qe2
17. Rad1 was a bit stronger, but the game would still be basically level. 17... Bf5
18. Nf3 Qb6
19...Qc7 was more accurate.
19. c3 c5

click for larger view"Preventing Nd4 which would have been very troublesome." (Maroczy) 20. Rad1 Rad8
21. Bd3

click for larger view |
|
Jan-25-22
| | KEG: Post III
21... Be6
Simpler was 21...BxB, despite the condemnation of this move by Maroczy and on this site. After 21...BxB, Maroczy gives the following line: 22. RxB RxR 23. QxR Qxb2 24. Qd7 [not 24. Rb1? as suggested by <zydeco> which leads to an even position after 24...Qab2 25. Rxb7] after which Black is indeed lost. But 23...Qxb2 is a bad mistake. Black would, if anything, be better after 23...Rd8. 22. b3 Rh8
Still going all-in on his King-side attack. 22...Bc8 may have been slightly better here. 23. Bc4

click for larger view23... h5?!
Still with his eye on the White King. 23...Bf5 look simpler, but that was not part of Marco's game-book here. 24. RxR
Meanwhile, Maroczy was continuing with his risk-aversion stratgey. 24. BxB was probably best. 24... BxR
"24...RxR was more natural." (Maroczy)
Indeed it was, and superior to the text as well. Now, suddenly, Maroczy was better again, though Marco's attack was far from done: 
click for larger view25. Rd1 Be7
26. Ne1
"White must defend with great care." (Maroczy)
Perhaps, but 26. h4 was surely stronger, as--most likely--was 26. Nd2. The text move, however, accomplished Maroczy's primary goal--safety at all costs. 26.., g4?!
Meanwhile, Marco was still off to the races. 26...Qc6 or 26...BxB were more prudent. 27. Nd3
"!"--(Maroczy)
Yet another super-safe move. But the best chance to try to punish Marco for his temerity lay in 27. Qe4. But from a practical perspective, Maroczy's move was better since it tempted Marco to self-destruct, the position now being: 
click for larger view27... f3?
"There was nothing better." (Maroczy)
Oh yes there was. Black survives after 27...BxB. By contrast, after the text he was in trouble--if not actually lost. 28. gxf3 BxB
29. bxB

click for larger view29... Qg6?
If there is a way to hold the game, 29...Qc6 was the beginning of possible plan. After the text, Marco was almost certainly lost with best play. 30. fxg4 hxg4
31. Nf4 Qg5
The Tournament Book called 31...Qc6? interesting, but it leads to disaster after 32. Qxg4+ Kf8 33. Nd5 (33. Kh2 is even simpler and stronger than the Tournament Book's suggested 33. Nd5 (which also wins) Rg8? (33...Bh4 offers better chances, though Black is still almost certainly lost) 34. QxR+ and wins since Black's forces get eliminated after 34...KxQ 35. NxB+ The text (31...Qg5) was surely best, but it was not sufficient to hold the game against best play by White, the position now being: 
click for larger view"Black has played well and succeeded in achieving a drawing position." (Tournament Book) The above comment--not seconded by Maroczy, is clearly wrong. As I will attempt to show in my next post on this game, White had a winning line in the above-diagrammed position. |
|
Jan-25-22
| | KEG: Post IV
32. Qxg4?
Consistent with his style, Maroczy sought an advantageous endgame rather than a complicated middle game. But here that was a mistake, since after the text Black has excellent drawing chances whereas White wins with little sweat via 32. Qe4! (e.g., 32...Rh4 [best, after 32...gxh3+ White wins immediately with 33. Kh2 because of the control Black has just ceded of the g-file] 33. Rd3! with Rg3 to follow). 32... Rh4!
A clever intermediate move than Maroczy may have overlooked. 33. QxQ+
White obviously now has no choice.
33... BxQ
click for larger viewMaroczy was obviously better and had good winning chances, but converting this--if indeed the position is an objective win for White, looks like a tough chore. 34. Ne2 Rxc4
35. Rd7 Re4

click for larger view36. Kf1?
Now, Black should be able to hold the game. By contrast, 36. Ng3! would have posed more difficult problems for Black to solve: e.g., 36. Rxe5 37. Rxb7 a5 38. Kg2 Bd2 39. c4 with very real chances to win with his extra (passed) h-pawn. Maroczy's actual move gave Marco drawing chances, the position now being: 
click for larger view36... Rxe5?
Even small slips in these sorts of complex endgames can be fatal. Here, Black's best chances lay in 36...b6 (e.g., 37. Rxa7 Rxe5 38. Ra6 Re6, or maybe better still, 38...Bd8, in either case leaving White at best a long very difficult win, and probably a draw with best play. After the text, with the Black b-pawn loose, White should clearly win. 37. Rxb7 Bh4?!
A little tactical by-play by Marco, but the simple 37...Re7 or maybe 37..a6 or 37...a5 would have offered more onerous resistance. 38. Rxa7 Rf5
Marco's idea in playing 37...Bh4, but Black must now clearly lose against best play. 
click for larger view39. f4
This move should have foiled Marco's plan and led to a relatively easy win for so skilled an endgame player as Maroczy. 39... Rd5!
The best chance:
click for larger viewIn this position, and with the move 45-time control approaching, Maroczy erred and nearly blew the win that was at hand for him. |
|
Jan-26-22
| | KEG: Post V
40. a4
"?"--(Maroczy)
"White could have retained his advantage with 40. Rb7, whereas, after the text, only a draw is available." (Maroczy) As the players got closer to the move 45 time control, play--even with such strong endgame players--became ragged. In fact, and while it was far from best, the text probably did not blow the win. As we shall see, Maroczy's error that nearly blew the win came two moves hence. But Maroczy was correct that this pawn push was premature and that 40. Rb7 was better. But even stronger was 40. Rc7, and best of all was 40. Ra5! paralyzing Black. The above being said, White's task was--at a minimum--now much harder than it should have been, the position after 40. a4 now being: 
click for larger view40... Rd3
41. Rb7 Rxh3
click for larger view42. Kg2?
This should have allowed Marco to save the game. With 42. a5 or 42. Rb2, the game with best play is probably a win for White. 42... Re3
The only move to avoid immediate defeat. It probably saves the game with best play. 43. Rb2
One move too late.
The position was now:

click for larger view43... Be1?
?--(Maroczy)
"An error which costs the game. 43...d8 leads to a comfortable draw." (Maroczy) The text was indeed a serious mistake. And 43...Bd8 should almost certainly lead to a draw. But I would hardly call Black's task after 43...Bd8 a "comfortable" one. I'm pretty good in the endgame, but I definitely would not fancy trying to hold this position as Black against a Carlsen or a Fischer, who would almost certainly grind me to dust. But now:
44. a5!
"!"--(Maroczy)
44. Ra2 also likely wins, but the text is most accurate. From this point on, Maroczy's play is a model. The position was now:

click for larger view44... Bxc3?
From here Maroczy neatly dissected the Black position. The only move that held out even a remote chance for Black was 44...Re6. 45. NxB RxN

click for larger viewThis position appears in Rook Endings by Levenfish and Smyslov, who give Maroczy's subsequent play as a classic example of "establishing the rook behind its own passed pawn" where "the pawn has to be obstructed by the opponent's Rook instead of [its] King." The win is not all that difficult, but Maroczy's accurate play is indeed both a model and beautiful to behold. |
|
Jan-26-22
| | KEG: Post VI
46. Ra2
click for larger view"!"--(Levenfish/Smyslov)
"The situation has clarified and despite the equal material, White has a won game. Black's own passed pawn prevents his Rook from reaching a8 and his king is too far away.The ending is instructive." (Maroczy) With White's Rook behind the a-pawn, the winning plan is now clear and is demonstrated to perfection by Maroczy despite desperate efforts by Marco to complicate. 46... Rb3
47. a6 Rb8
48. a7 Ra8

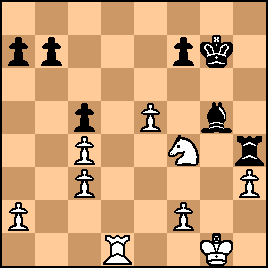
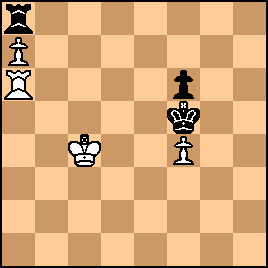
click for larger view49. Ra6
"!"--(Maroczy)(Levenfish/Smyslov)(<Articcircle>) "A good move, forestalling Kf6." (<Articcircle>) 49... f6
Allowing the Black King to operate on the 6th rank. But this plan is far too slow to hold up White. 50. Kf3
The march of the White King to attack the Black Rook on a8 begins. 50... Kg6
51. Ke4 c4

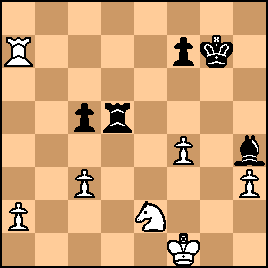
click for larger view52. Kd4 Kf5
Also futile is 52...c3 53. Kxc3 Kf5 54. Kc4 Kxf4 55. Rxf6+ Ke4 56. Ra6 Ke5 57. Kb5 53. Kxc4
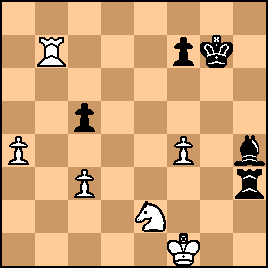
click for larger view53... Kg4
"53...Ke4 was no better. 54. Kc5! [54. Kb5 is just as good--KEG] f5 [if 54...Kxf4 55. Rxf6+ Ke5 56. Ra6 and wins--KEG] 55. Ra4+ Kf3 56.Kb6 (Marco). Also unavailing is 53...Kxf4 54. Rxf6+ Ke5 55. Ra6. 54. Kd4
"Also winning was 54. Kb5 f5 55. Ra4+ (Levenfish/Smyslov) (with 56. Kb6 to follow--KEG) 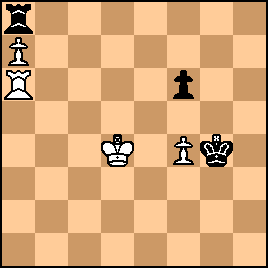
click for larger viewWith White's King poised to attack the Black Rook, Marco had to try desperate measures. As I will show in my next post on this game, these last gasp attempts all proved hopeless. |
|
Jan-27-22
| | KEG: Post VII
54... Rd8+
Trying something different, but the ending is indeed hopeless for Black. 55. Ke4
Obviously 55. Kc5 also wins.
55... Re8+
56. Kd5 Ra8
A virtual admission that the game is gone. Marco continued to play until the move-60 time control had been reached, the position now being: 
click for larger view57. Ke6
Nice to have a choice of how to close out the game. Or perhaps Maroczy was biding his time until he had made 60 moves. 57... f5
57...Kxf4 58. Kxf6 was no better for Black.
58. Ke5
A little zugzwang to spice up the finale:

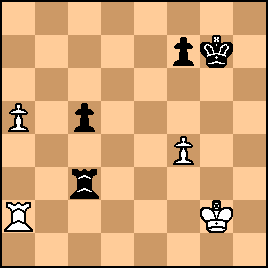
click for larger view58... Re8+
59. Re6

click for larger viewA pretty way to finish
59... Rf8
If 59...Ra8 then 60. Rg6+ Kf3 61. Ra6 Kg4 (61...Re8+ 62. Kxf4 Rf8+ 63. Ke6 is likewise hopeless for Black) 62. Ra4 Re8+ 63.Kd6 is the end. 60. Re7
60. Rg6+ is even more efficient, but the text is lovelier: 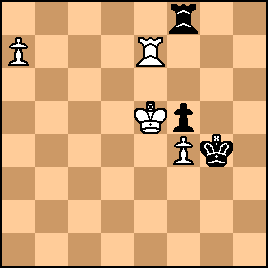
click for larger view60... Kh5
Or 60...Rg8 61. Rg7+!
61. Rf7!
Finishing off with a pretty Rook sacrifice:

click for larger view1-0 |
|
|
|
|


