Sep-11-21
 | | KEG: Maroczy was known for his careful precise play. In this game, against the unpredictable Mason, Maroczy pushed this attribute to an extreme. He had the superior position for much of the game and had numerous opportunities to press for a win. But with Mason as his opponent--who could on occasion beat even the best (his thumped Janowski at Monte Carlo 1901, here, and in their next encounter) and lose to nearly anyone--Maroczy decided to avoid risk whenever possible. Meanwhile, Mason played bizarre chess, at one point shuttling his Bishop back and forth (as Black) between c8 and d7. The most interesting part of the game came at the very end in a seemingly dry drawn minor piece ending. Mason carelessly gave Maroczy a chance which Maroczy did not seize. Since there probably was no win there, Maroczy may have decided not to bother. Given how close the finish was in this tournament, Maroczy's failure to beat 13th place Mason might have cost him. In the end, Maroczy won the tournament anyway. Had he lost this game, he--all other things being equal--would have finished behind Pillsbury. So maybe Maroczy's often boring strategy in this game may have been best. 1. e4 e5
2. Nf3 Nf6
3. Nxe5 d6
4. Nf3 Nxe4
5. d4 d5
6. Bd3 Be7
7. 0-0 0-0
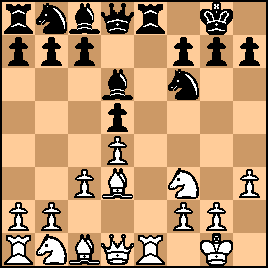
7...Nc6 is usual. But the text was a Mason specialty. But he did not do well in these games, apart from this encounter, Mason won 1,lost 5, and drew 2 with this variation. Nonetheless he repeated the line, absorbing one defeat after another. After 7...0-0, the position was:

click for larger view8. Re1
The more usual 8. c4 looks better, though both Lasker and Tarrasch were content to get a small edge with the text when they faced 7...0-0 in this variation. 8... Nf6
9. h3
Again declining to play the more forceful c4. Maroczy surely knew what he was doing. Mason at this stage of his career often self-destructed. So Maroczy was seemingly content to nurse a tiny advantage and wait to see if Mason collapsed. Perhaps a sensible strategy, though it did not pay dividends in this game. 9... Re8
Mason remained reluctant to develop his Knight to c6, which looks natural here. 10. c3
Remaining hyper-cautious, else he would surely have played 10. c4. 10... Bd6
Inviting a trade of Rooks.
click for larger view11. Nbd2
Trading Rooks looks better, but--yet again--Maroczy was in no hurry to do anything in this game except maintain an edge, no matter how small. 11... Nbd7
12. Nf1 Nf8
The Rooks continued to face off, each side waiting for the other to initiate the trade. 13. Bg5 RxR
Finally exchanging.
14. QxR Ne6
click for larger viewMaroczy still had a small advantage, but nothing more. He was waiting patiently to see what would develop. In this case, what developed was a fairly boring game, but one that held no risks for Maroczy. |
|
Sep-11-21
| | KEG: Post II
15. Qc1?
A hard move to understand. Why allow Mason to trade Knight for Bishop? 15. Bh4 looks obvious. Was Maroczy playing head games with Mason. In any case, it all didn't matter because Mason played: 15... h6
Mason, for whatever reasons, declined to play 15...NxB. 16. Bd2
Another mystery move. 16. Bh4 looks clearly better. But it again appears that Maroczy was in no hurry and just biding his time. 16... c6
Mason was also being hyper-cautious. Otherwise, why not 16...c5. It looks as if he had decided to wait and see how Maroczy would try to beat him. 17. Ng3 Qc7
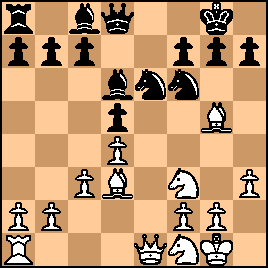
More hyper-cautious play. Mason would be fine after 17...BxN or 17...Bd7. He could also have tried for some initiative with 17...c5. After 17...Qc7, the position was:

click for larger viewHere, Maroczy had an interesting chance. 18. Bxh6! BxN (18...gxB would be very much to White's advantage) 19. fxB Qxg3 20. Be3 would leave White better placed. But Maroczy may have decided not to trust over-the board calculations in this tricky line. 18. Ne2
More over-cautious play. This avoids 18...BxN but had little otherwise to recommend it. 18... Bd7
Yet again declining to play c5.
19. Nh4 Re8
20. Nf5 Bf8
21. Neg3 Qd8
And once again c5 looked like a decent alternative. 22. b4
So much for the c5 idea for Black. The position after 22. b4 was: 
click for larger viewBeginning here, Mason decided to start shuttling his Bishop back and forth between d7 and c8. Not a very interesting spectacle to observe. But Maroczy had no effective answer, and so the game slowed to a snail's pace: 22... Bc8
23. a4 Bd7
Beginning here, both sides had what looked like a good opportunity to play a5. A good offensive try by Maroczy and a decent defensive move for Mason. But the White pawn stayed on a4 and the Black pawn on a7 for the next 23 move until Maroczy played 46. a5. 24. Be3 Bc8
25. Ra2 Bd7

click for larger view26. f3
Looks like a needless weakening. 25. a5 seems indicated. But--at the risk of sounding like a broken record--Maroczy was in no hurry. 26... Bc8
Continuing to shuttle instead of the seemingly best 26...a5. 27. Nf1
Another nothing waiting move, and still declining to play a5. 27... Nh7
Breaking the pattern! But 27...a5 was surely better. 28. Rf2 Neg5
29. h4
The closest thing to an aggressive effort by Maroczy thus far in this game. 29... BxN
30. BxB Ne6
31. g3

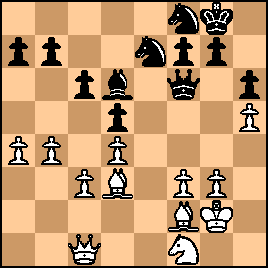
click for larger viewAn approximately even complicated position. Maroczy had a habit of winning from these sorts of positions. Simply put, his opponents were more likely to err than he was. At this stage, my guess is that Maroczy fancied his chances. |
|
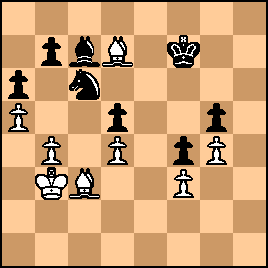
Sep-11-21
| | KEG: Post III
31... Qf6
Creating needless problems for himself. Maroczy no doubt was waiting for carelessness by Mason. Black is fine with 31...Bd6 or 31...Qc7 or 31...Nf6. Black's game is hardly all that bad after the text, but blocking his Knight's escape to f6 looks silly. 32. Bd3
Still in no hurry. Maroczy might have tried to create some pressure on the b1...h7 diagonal after Mason's last move with 32. Qc2 or 32. Qb1. 32... Bd6
He could have repaired the (admittedly small) damage caused by his 31st move with 32...Qd8 or 32...Qe7. 33. Kg2
Again declining to build up on the b1..h7 diagonal. 33... Nef8
Defending the h7 Knight but leaving his Queen in its clumsy position on f6. 34. Re2 Ng6
Accomplishing little while yet again failing to address the one significant problem with his position. 35. Bf2
Pushing caution to an extreme and proposing a Rook exchange rather than trying to exploit the aforesaid diagonal or--alternatively--trying something on the Queen-side beginning with b5. 35... RxR
Mason must have been delighted to be able to trade off a second pair of Rooks. 36. BxR

click for larger viewWith his two Bishops, Maroczy was still somewhat better. but the symmetrical pawn structures seems to portend a draw. 36... Nhf8
37. h5
37. Ne3 looks somewhat stronger, but it's nice to see Maroczy--finally--making an effort to create some action. 37... Ne7
38. Bd3
click for larger viewMaroczy had held the edge for nearly the entire contest but had little to show for it. But now, Mason made gave him a new opportunity. 38... Qg5?!
Mason loved endgames, but giving Maroczy (no mean endgame player himself) a chance to play a minor piece ending with two strong Bishops doesn't sound like my idea of fun. 39. QxQ
Of course!
39... hxQ

click for larger viewThe technicians will say this is a theoretical draw. But obviously all the chances practical chances lie with White. 40. Ne3
Preparing to attack with this Knight or trade it off favorably. 40... g6
A sad necessity, but anything else was worse.
41. hxg6 Nfxg6
42. Nf5 NxN
43. BxN

click for larger viewWith best play, Black should be able to hold the position. But this is just the sort of endgame in which players such as Fischer and Carlsen have shown the ability to torture their opponents until they crack. Indeed, the most interesting part of the game was approaching (spoiler alert--Maroczy was finally going to play a5) and anyone playing Black here would have to brace himself/herself for an arduous task. |
|
Sep-12-21
| | KEG: Post IV
43... Ne7
44. Bd7 Kg7
45. Kf1

click for larger view45... f5
Deciding to come out of his cocoon and try to force play rather than see how Maroczy would try to exploit his two Bishops. 46. a5
At long last Maroczy played a5. Now the real battle could begin, the position now was becoming sharper: 
click for larger view46... a6
Mason should probably have just sat tight rather than weaken his Queen's side. Maroczy now had some practical chances. 47. Ke2 Kf6
48. Kd3 Kg6
49. Be1 Kf6

click for larger viewNow, the players came out of their shells.
50. g4?!
Probably premature, but Maroczy likely decided he would have to mix it up a bit to convert his edge to something at least approaching a winning edge. The text holds no risks of losing for White, but it-theoretically--makes Black's task easier. Over the board, however, it was easy for Black to go wrong here, as Mason did in playing: 50... f4
Now White has nothing to worry about on the locked King-side and can try to force play on the other wing. 51. c4?!
This shouldn't have gotten White anything other than a draw. Black only has to play 51...dxc4. But, instead of that, Mason played: 51... Kf7
click for larger viewNow White could obtain serious chances with 52. c5. But that doesn't ultimately win. Perhaps Maroczy realized all that and played the waiting: 52. Kc3
Even 52. cxd5 looks better than this. But there is no clear way to win after 52. cxd5, so Maroczy kept things fluid. 52... Bc7
52...dxc4 looks like a better way to hold the position. 53. cxd5
53. c5 definitely seems stronger, but it doesn't quite seem to win. So Maroczy decided to try something else. 53... cxd5

click for larger view54. Kb3 Nc6
55. Bc3
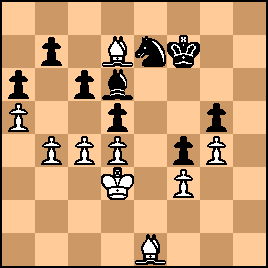
click for larger viewThe stage was now set for the exciting--if not always entirely correctly played--finale. As is obvious, 56. b5 is looming. How should Black defend and how should White try to squeeze out a win? |
|
Sep-12-21
| | KEG: Post V
55... Na7
Correctly anticipating and preparing to meet 56. b5. 56. b5
This left:

click for larger view56... axb5?
56...Nxb5 was the clearest way to draw. The text does not actually lose, but it makes Black's task harder. 57. Bb4!

click for larger view57... b6!
The only possible way to offer resistance. If, for example, 57...Bb8?, White wins with 58. Bc5. But even after the text, Black was far from out of the woods: 
click for larger view58. axb6?
Now Black is off the hook. The critical lines arise after 58. a6!. Black is then very much back on his heels, though--after trying and checking with software--there is still no way for White to break through with correct play by Black. But over the board, 58. a6 should have been tried. Perhaps both players were worried about the approaching move 60 time control. 58... Bxb6
59. Kc3
On any other move, it would be White who would have to watch out to avoid trouble. After the text, the final critical position was reached: 
click for larger view59... Kf6!
Forced. Perhaps Maroczy was banking on Mason faltering here with 59...Kg6 which seems to lose after 60. Be7! Ba5+ 61. Kd3 Bb6 62. Be8+ Kh6 63. Bf8+ Khy 64. Bf7 Bc7 65. Bxd5 Nc8 66. Kc3 Ba5+ 67. Kb3 Kg6 68. Be6 after which--though it will still take considerable time--White should probably win. After the text, there was nothing much to play for. 60. Bd6 Kf7

click for larger viewDrawn |
|
|
|
|


