Jan-16-23
 | | KEG: An up and down game that ended in a not-so-well played draw. At first, the game seemed to revolve around the age-old question of whether an isolated d-pawn is a strength or a weakness. After some careful maneuvering by both sides, Mason chose to change his opponent's situation from an isolated to an isolated c-pawn, and then to doubled f-pawns. Little by little, Marco was getting the better game until he erred on move 25, overlooking an intermediate move that allowed Mason to win a pawn. The last dozen or so moves were sloppy, as Mason missed winning chances and Marco missed saving possibilities until Mason's final errors on moves 42 and 43 which enabled Marco to draw by perpetual check. Both players finished with negative scores, and the game had no bearing on any of the prizes for Monte Carlo 1902. 1. c4 c5
2. Nc3 e6
3. e3
At the outset, Mason (who had little success against Marco after winning their first game many years earlier) seemed content with a symmetrical line in the English that promised little edge to either side. 3... d5
4. d4 Nf6
5. Nf3

click for larger viewBlack could achieve total symmetry with 5...Nc6. But Marco, who had beaten Mason three times after their initial encounter, decided to mix things up a tiny bit. 5... cxd4
6. exd4
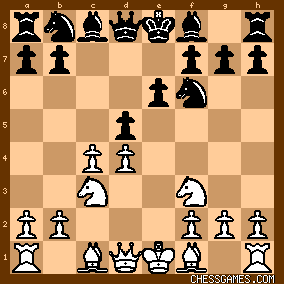
click for larger viewMason could have avoided the isolated d-pawn by playing 6. Nxd4, but that would have yielded White no meaningful edge. The text, at the cost of being saddled with an isolated d-pawn, gave Mason the freer and arguably better game. Interestingly, this same position--reached after a Caro-Kann--arose in the 1996 Karpov-Kamsky match (nominally for the FIDE World Championship after the defection of Kasparov and Short from the FIDE world championship match) at least twice. 6... Be7
7. cxd5 Nxd5
8. Bd3 Nc6
9. 0-0 0-0
10. a3 Bf6
11. Be4

click for larger viewThe game was still shaping up to one in which the positive and negative merits of the islolated d-pawn would be tested. 11... a6
Not very useful for Black here. 11...Nce7 (played a few moves later by Marco anyway) or 11...Qd6 look best, though Black is still basically fine after the text as well. 12. Qd3
The mating threat does not give White much provided Black is awake. Probably best for White was to continue to develop naturally with 12. Re1. 12... g6
Marco could also have played 12...h6. The weakness created in the Black King-side, even with the text, was not all that serious. 13. Bh6 Re8
Marco could also just have played 13...Bg7.
14. Rfe1 Nce7
15. Rad1
Since Mason was planning on playing Ne5, probably simplest to play Ne5 immediate;y. 15... Bd7
16. Ne5

click for larger viewThe by now famous Pillsbury method of attacking this sort of Black formation. In the present situation, it does not give White much of an edge. Beginning here, however, Mason and Marco opted to change the nature of the position drastically, and the themes that had dominated to this point ceased to be factors. |
|
Jan-17-23
 | | KEG: Post II
In my opening comment in my last post, I obviously took my eye off the ball. What I meant to say was that Mason was able to change the game from one in which he (Mason) had an isolated d-pawn to one in which Marco got a corresponding isolated c-pawn to one in which both sides ended up with isolated d-pawns but Black had doubled f-pawns. 16... Bc6
17. Qf3
This does not give White much. 17. BxN followed by 18. Ne4 or maybe 17. Ng4 appear the only ways for Mason to retain any sort of advantage or any major compensation for the isolated White d-pawn. But this all became moot after Marco's next move. 17... Nf5

click for larger viewAllowing wholesale exchanges that result in near equality but with White having the sounder pawn structure once both sides had isolated d-pawns but Black had doubled f-pawns. 18. NxB bxN
19. BxN(f5) exB
20. RxR+ QxR
21. NxN cxN

click for larger viewWith the board considerably cleared, it was time to take stock. White is obviously somewhat better, having an extra pawn on the Queen-side balanced only by Black's doubled f-pawn. Simplest for Mason here was 22. Qxd5 Rd8 23. Qa5 Bxd4 24. h3, ridding the board of the isolated d-pawns and leaving White with no important weaknesses and the extra b-pawn on the Queen-side. Perhaps not enough to win, but a pleasant position in which White could play on for a long time with some chances to try to win and no risk of losing. But, for whatever reason, Mason took a different tack, and quickly allowed Marco to equalize and then get the better game: 22. Be3? Qe6
23. g3
Pointless. White would be fine (though with no edge to speak of) with 23. Rc1. 23... Rc8
Happily seizing the c-file which Mason left available to him with 22. g3. 24. Qe2
Mason seemed to be drifting aimlessly at this point. He had many better moves (e.g., 24. Rd3; 24. Bh6; etc.). The text was not a blunder, but it's confused nature may have caused Marco to over-reach. 24... Rc4
25. Qd3

click for larger viewBlack, if anyone, is better here. Marco, however, got careless here and--in an effort to play for a win--overlooked a tactical point and threw away a pawn: 25... f4?
"?"--(Tournament Book)
Mason now found the tactical refutation:
26. b3!
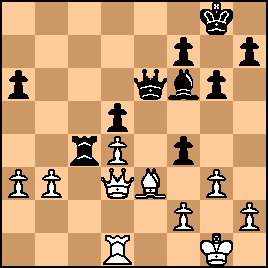
click for larger viewAs the sequel strongly suggests, Marco had overlooked this intermediate move. Having had this oversight, Marco did what so many of us do under similar circumstances: he panicked and made the situation much worse than it had to be. 26... Rc6?
Now Black just loses a pawn and will have to struggle to stay afloat. Viewed objectively, Marco could almost certainly saved himself by doing what Petrosian did so well so often: he should have given up the exchange for a pawn: 26...fxB! 27. bxR exf2+ 28. Kxf2 dxc4 29. Qf3 h5. With Black's Bishop bearing down on the isolated White d-pawn and with a King-side pawn majority, Black has nearly equal chances despite the loss of the exchange. After the text, by contrast, Black has no compensation for the lost pawn: 27. Bxf4
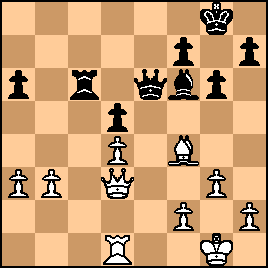
click for larger viewThis may not be objectively a win for White with best play, but Black faces a long hard grind to save the game. In fact, what followed was far from "best play," and there would be many ups and downs as both sides--perhaps facing time-trouble as the move-30 time control neared, and later as the player approached the move-45 time control. |
|
Jan-17-23
 | | KEG: Post III
To save the game, Marco had to remain alert to all his chances to complicate White's task. One recurring concept that lingered for much of the rest of the game was the possibility of Black playing h5 threatening h4, potentially compelling White to lock the King side by h4. But instead of playing 27...h5 here, Marco decided to try to utilize the c-file. This might have led to trouble for Black had Mason responded a bit more forcefully: 27... Qc8
28. Qf3
The more flexible 28. Bd2 (to stop Rc3 by Black) was arguably a better choice. 28... Qf5
A double-pronged idea: allowing for an invasion on c2 while defending the Black d-pawn (which, being on a White square, cannot be protected by Black's remaining--dark square--Bishop). 29. Qd3
Stopping Rc2 or Qc2 and offering trade of Queens: 
click for larger view29... Qg4
Still intent on counter-play, but Marco had nothing better than to swap Queens. After the text, Marco was probably lost. 30. Re1 h5
Belatedly trying this idea, but Mason had a simple rejoinder--and the time control had been reached: 
click for larger view31. h4 was probably winning for White here, but Mason, with plenty of time to consider his options, played: 31. Be5?

click for larger viewNow Marco had an excellent opportunity to save the game with 31...h4! But instead, he decided to trade Bishops immediately: 31... BxB
32. dxB

click for larger viewWhite no longer has an isolated d-pawn, and Black--in addition to being a pawn down--had two isolated pawns. What to do? 32... d4!
The best chance.
33. Rd1

click for larger viewThis may or may not be objectively a win for White, but Black--at best--faces a tough task to try to save the game. But now, as I will discuss in my next post on this game, play became spotty and sloppy for both sides, and all sorts of chances were missed. |
|
Jan-18-23
 | | KEG: Post IV
33... Rc3?
Easing White's task. The most onerous resistance would be offered by 33...Qe6. If then 34. Qxd4 (34. Qe4 was probably the best winning chance) Qxb3 35, Rd3 Qb1+ 36. Kg2 Re6 and Black's blockading Rook makes winning difficult if not impossible. Now, however, Marco's plight became desperate:
34. Qxd4 Rxb3
35. Qd8+ Kh7
36. Qd5!

click for larger view36... Rf3
37. Kg2 Rf5
38. f3
An unnecessary weakening that makes White's job more difficult. Simplest for White here were 38. Rd2 or 38. Re1 38... Qa4
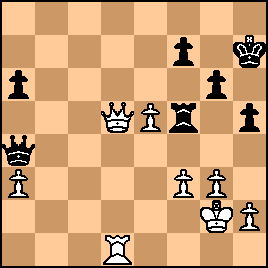
click for larger view39. Rd3?
The only real winning chance now lay in 39. h4 (giving the White King options and stopping h4 by Black). 39... Qc2+
40. Rd2

click for larger view40... Qc3?
Having gotten a break from Mason, Marco again blew his drawing prospects. He had to play 40...Qc7 here. But after the text, Mason had a clear path to victory: 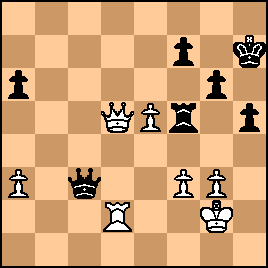
click for larger viewWhich he promptly flubbed:
41. f4?
The simple 41. Re2 wins. But now White had new weaknesses, and Black once again had a way to draw: 
click for larger view41...h4! probably holds for Black. But Mason erred again and played: 41... Qxa3?
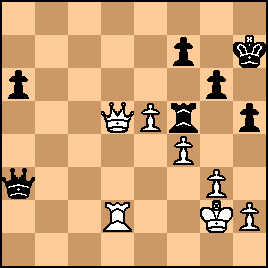
click for larger viewIn fairness to Mason and Marco, it must be noted that the move-45 time control was approaching. This may explain the extremely sloppy last few moves...and the even sloppier next few moves by Mason that finally and irrevocably forfeited his winning chances, as I will discuss in my next post on this game. |
|
Jan-19-23
 | | KEG: Post V
42. Qa8?
Hard to believe, putting the Queen away from where it needed to be; but time pressure can induce all sorts of mistakes. 42. Qe4 or 42. Ra2 both appear to win easily. The text gave Marco a way to save himself, but he had to find the right move, the position now being: 
click for larger view42... Qe3!
The only chance to survive. Was there still any way for White to try to win? 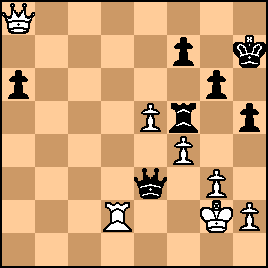
click for larger view43. Rd8?
Now Black has a draw by force. The only even practical chance was 43. Rf2. After the text, Marco again had to find the single saving move. But this time this was not very hard, the position now being: 
click for larger viewNow Black has a perpetual check, and the game came to a sudden end: 43... Qe2+
With Mason's Queen and Rook on vacation on the other side of the board, the White King could not escape the coming checks. 44. Kh3
44. Kg1 Qe1+ was no better for White. The game is now an obvious draw: 44... Qg4+
Drawn |
|
|
|
|


