Sep-20-18
 | | KEG: A beautiful endgame finish by Pillsbury.
Going into this fifth round game, Pillsbury was a half-point behind Maroczy and tied for second with Schlechter and Marco. Since all his nearest competitors won, Pillsbury had to win as well to keep pace. Three things made this problematic: (a) Pillsbury had Black in this game; (b) Cohn was playing for a draw; and (c) Cohn played extremely well until his error on move 35. Pillsbury constantly sought ways to create imbalances, while Cohn opted for simplicity wherever possible. Interestingly, as in sharp contrast to Janowski's play against Showalter in the same round, Pillsbury's efforts to complicate were all sound moves. Never once in this game did he play what could be called a poor move simply to create complications. Even when an approximately even Rook and Knight against Rook and Knight ending was reached, and even as he pressed hard for a win, Pillsbury avoided wild maneuvers that could have landed him in trouble. The closing ending in which Pillsbury exploited a mis-step by Cohn is a joy to behold. 1. e4 e5
2. Nf3 Nf6
Pillsbury had great success with the Petroff, and invites Cohn to try that opening. 3. Nc3
Cohn would have none of this and sought refuge in a symmetrical Four Knights Game. 3... Bb4
Pillsbury, however, did not want a symmetrical drawish opening, so he tried a variation of the "Three Knights Game" (which usually refers to 1. e4 e5 2. Nf3 Nc6 3. Nc3 Bb4). 4. Bc4
4. Nxe5 is White's "most aggressive" reply (Sergeant-Watts) and is probably White's strongest option here. But Cohn selects another good move that involves fewer complications. He seeks a set-up similar to what White can get in some lines of the Giuoco Piano. 4... d6
4...BxN or 4...0-0 may be slightly better.
5. d3
5. Nd5 would be the best way for White to seek an edge, but Cohn was--as throughout this game--quite satisfied to keep the game simple and drawish. The text, while not as enterprising as 5. Nd5, is fine and presents no dangers for White. 5... Nc6
6. a3 BxN+
7. bxB 0-0
7...h6 was another good alternative.
8. Bg5 Be6
9. Nd2 h6
10. BxN
If Cohn were playing to win, 10. BxB or 10. Bh4 would have been better choices. 10... QxB
11. 0-0 Ne7
12. g3

click for larger view"The struggle for the initiative is keen" (Sergeant-Watts). From where I sit, only Pillsbury seemed "keen" on seizing the initiative. 12... Bh3
13. Re1 Qg5
14. Nf3 Qh5
15. Nh4
Offering to trade Queens.
15... Bg4
Pillsbury is playing to win, so he tried to avoid a Queen trade. 16. f3 Be6
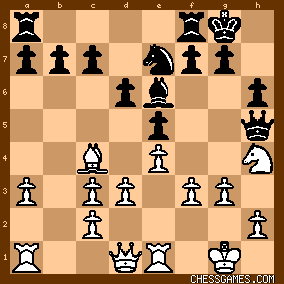
This left:

click for larger view"On the whole Black has come [out] best...White's king-side being disarranged." (Sergemt-Watts). Both sides have played well and Pillsbury here had at most a tiny edge. As I will discuss in my next post on this game, Pillsbury continued to try to sharpen the struggle, but Cohn held tough and managed to trade Queens and get an approximately even endgame. Of course, as the subsequent course of the game confirmed, Pillsbury (like Magnus Carlsen today) was very dangerous even in theoretically level endgames. |
|
Sep-20-18
 | | KEG: Post II
Pillsbury continued to press for an advantage, and Cohn continued his careful play in search of a draw against his celebrated opponent. 17. Bb3 Kh7
18. Rf1
18. d4 or 18. Ng2 were somewhat better and would avoid the need to move the Rook on his next turn. 18... Bh3
19. Rf2 Ng6
20. Ng2 Qg5
21. Qd2
Again seeking to trade Queens.
21... QxQ
No doubt reluctantly, Pillsbury accepted the offer. "This makes a draw possible, but if the Queen retired White will soon become active on the King-side." (Sergeant-Watts). 22. RxQ
This left:

click for larger viewThe game looks about even, but Pillsbury's zeal to win remained. 22... f5!
23. exf5 Bxf5
24. Bd5
Seeking further exchanges by getting his Bishop to e4. 24... c6
25. Be4 d5
26. BxB RxB
With the Bishops gone, the position now was:

click for larger viewPillsbury's chances of winning seemed to be diminishing, but he persevered. 27. Rf2 Raf8
28. Raf1 d4
"!"--Tournament Book.
28...b5 or 28...R5f6 were also good.
29. c4
29. g4 was perhaps a simpler route to equality.
29... c5
30. Rb1
The closest thing to a true "mistake" in this game to this point. 30. h4 or 30. g4 were better. The text, however, successfully seduces Pillsbury into a trade that brings the draw Cohn craved closer, the position now being: 
click for larger view30... Rxf3!?
This wins the f3 pawn but allows Cohn to win the b7 pawn and obtain attacking chances of his own and obtain equal chances. Stronger were 30...e4 or 30...b6. But as will be seen in due course, Pillsbury had a nasty trick in mind in playing the text. 31. RxR RxR
32. Rxb7
This left:

click for larger viewA superficial glance at the position might suggest that Pillsbury was in trouble here since his a7 pawn seems to be hanging. In fact, and as I will discuss in my next post on this game, Pillsbury had everything well in hand here, and was contemplating not only his 32nd move (which avoided loss of a pawn) but also his 34th move (which led Cohn astray and allowed Pillsbury to unleash one of his classic endgame combinations). |
|
Sep-20-18
 | | KEG: Post III
Time to watch an endgame genius at work:
32... e4
"!"--Tournament Book, Sergeant-Watts.
This move was so lovely I present another diagram: 
click for larger viewRemarkably, Pillsbury's move defends the threatened a7 pawn, for if 33. dxe5? Pillsbury would reply 33...Rxa3! (much stronger than 33...Rc3 as suggested by Sergeant-Watts in their book on Pillsbury) protecting the a7 pawn. But clever as Pillsbury's move was, Cohn was still fine, since he found the one and only good reply: 33. Ne1!
Nicely played. Had Pillsbury now carelessly played 33...exd3 Cohn would have good winning chances with 34. Nxd3! After Cohn's excellent move, the position was:

click for larger viewPillsbury now had two good options to keep the game in the balance...and complicated: One option was the paradoxical 33...Rf8. If now 34. Rxa7? Pillsbury would play the very strong 34...e3! Best for Cohn after 33...Rf8 was 34. dxe4 to which Pillsbury would reply 34...Ne5 after which 35. Rxa7 Nxc4 36. Ng2 Rf3 37. Rc7 Ne3 (or 37...Nd2) with all sorts of chances for both sides. But instead of 33...Rf8, Pillsbury found another good (and even more complicated) move: 33... Re3
Cohn now had no choice:
34. Kf1
Forced.
34... Ne5
This was Pillsbury's plan in playing 32...e4! and left the position as follows: 
click for larger viewPillsbury has pressed hard to this point, and Cohn has countered every effort nicely. But, as I will discuss in my next post on this game, in the diagrammed position Cohn erred and was immediately lost. |
|
Sep-20-18
 | | KEG: Post IV
After 34...Ne5, Cohn could--as was noted in Tournament Book and by Sergeant-Watts in their book on Pillsbury-- have held the game in the balance with the simple 35. Rxa7. Then, as pointed out by Sergeant-Watts, if 35...exd3 [35...Ng4 was somewhat better, but also leading to no edge for Black] 36. cxd3 Nxd3 37. NxN RxN and then either 38. Ra5 (leaving Cohn with a slight edge) or 38...Rc7 (sufficient for a draw). But in the diagrammed position with which I ended my last post Cohn--who had played so well to this point-- blundered with: 35. Re7?
Now, Pillsbury was off to the races:
35... exd3
36. cxd3
36. Nxd3 was definitely better, but Pillsbury would still have won after 36...Nxc4 37. Rxa7 Nd2+ 38. Kg1 Nf3+ 39. Kg2 Ne1+ 40. NxN RxN with (though material would be equal) a likely won Rook and pawn ending for Pillsbury. After Cohn's actual 36. cxd3, the position was:

click for larger viewBlack to move and win:
36... Nxc4
"!"--Sergeant-Watts.
"!!"--Tournament Book.
The move was indeed so exquisite it deserves another diagram: 
click for larger viewIf Cohn wanted to play on, he had to try 37. Rd7 or perhaps 37. Rb7. But he erred badly again and the rest was carnage: 37. Rxa7? Nd2+
38. Kf2
This left:

click for larger viewHere Pillsbury played a killer:
38... c4!
Now, Cohn must lose a piece, and the game.
39. dxc4 Ne4+
40. Kf1 d3
The position was now:

click for larger viewI will cover the finale in my next post on this game. |
|
Sep-20-18
 | | KEG: Post V
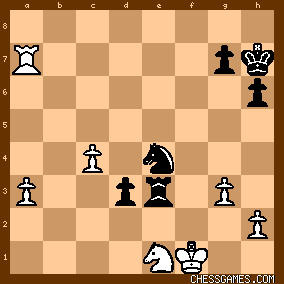
After 40...d3, Cohn had to lose a piece. So...
41. Nxd3
Cohn had nothing better. As Sergeant-Watts have pointed out, if 41. Rd7 Cohn would still lose a piece--and the game--after 41...Nd2+ 42. Kg2 (42. Kf2 Re2+ would be even worse for White) 42...RxN. After Cohn's actual move, Pillsbury still finished nicely: 41... RxN
This left:

click for larger viewIf Cohn thought that his two passed pawns on the Queen-side would give him a chance, Pillsbury quickly disabused him of any such notion: 42. a4
42. Ke2 or 42. Re7 might have been slightly better. 42... Rd4
42...Rc3 would also be crushing.
43. Ke2 Rxc4
44. a5 Ra4
44...Nc5 would be faster.
45. Ra8
45. Kd3 might have prolonged the game.
45... Nc5
Now the a-pawn must fall and the game is over:

click for larger view46. Kf3 Nb3
Or 46...Nb7
47. a6 Nd4+
The game is clearly over. Cohn in fact played on from here, but the rest of the score is apparently lost. 0-1
A magnificent endgame display by Pillsbury. |
|
|
|
|


