|
< Earlier Kibitzing · PAGE 4 OF 4 ·
Later Kibitzing> |
Aug-07-10
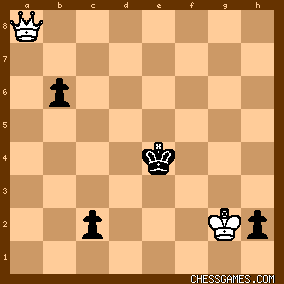
 | | Peligroso Patzer: One other feature of this endgame that I find fascinating is that in the following hypothetical position:

click for larger view
… which could have arisen if Akopian had played <56. … bxc5>, and play had then continued: <57. a5 c4 58. b6 axb6 59. a6 c3 60. a7 c2 61. a8=Q+ (See diagram.)>, White’s main winning idea is 62. Qa1 to control the promotion squares of both Black’s c- and h-pawns (for example 61. ... Kd3 62. Qa1  ); however, if Black (from the diagrammed position) plays 61. … Ke3, then White can also win by playing the Queen to the opposite corner, 62. Qh8, since 62. … c1=Q allows the skewer, 63. Qh6+, and if Black desperately tries the diversion, 62. … h1=Q, then White simply takes with the Queen, 63. Qxh1 ); however, if Black (from the diagrammed position) plays 61. … Ke3, then White can also win by playing the Queen to the opposite corner, 62. Qh8, since 62. … c1=Q allows the skewer, 63. Qh6+, and if Black desperately tries the diversion, 62. … h1=Q, then White simply takes with the Queen, 63. Qxh1  (but NOT 63. Kxh1??, allowing promotion with check, 63. … c1=Q+, when White has no time to play the skewer, and the resulting position is actually a tablebase win for BLACK). (but NOT 63. Kxh1??, allowing promotion with check, 63. … c1=Q+, when White has no time to play the skewer, and the resulting position is actually a tablebase win for BLACK). |
|
| Aug-07-10 | | messachess: This was not difficult at all. I usually do not get them immediately like this time. But, I was figuring on 56...bxc5. This problem lends itself to intuitive solutions. One way (as in game) or another (b takes), it's either, black cannot catch the pawns, or, as in the game, it's a Zugzwang. |
|
| Aug-07-10 | | ZUGZWANG67: Pawns are equal but W has a N. B has an easily stopable passed R-p on the 7th rank while W has a 3 vs 2 majority on the Q-side. Those 2 last considerations will dictate the final outcome: everything is settled for a pawn race obtained by means of a breakthrough. W's first order of business is to put the threat at h2 under control. But how? By bringing the K or the N? The N, of course, if we're planning to break by c5: B must be obliged to capture with his b-pawn and not the K. So the WK shall come to h2, sacrificing the N in the process. But after c5 and bxc5, who promotes first? Both promotes on the same move, since from c5 B needs 4 moves to do the job while W needs 4 moves as well, that is: a5-b6-bxa7-a8Q. The fact that B could interpose ...axb6 after b6 is irrelevant here, as he loses the one move that W uses for recapturing: 5-1=4. In the same manner, ...h1Q+ amounts to nothing. At the end, it's the fact that W promotes with check at b8 that decides, since he is the one who plays the first of the 4 requested moves. In terms of notation of moves, I think we should see something like 55.Kg2! Kxd4 (otherwise the N will capture the eventual B's passed pawn when this latter comes to c3) 56.c5 bxc5 57.a5 c4 58.b6 c3 (58...axb6 59.a6! (not 59.axb6? c3 60.b7 c2 61.b8Q c1Q is draw: promoting at the same without check is not enough for a win) 59...c3 60.a7 c2 61.a8Q+; 58...a6 lets W promote first: 59.b7 c3 60.b8Q c2 61.Qc8) 59.bxa7 c2 (59...h1Q+ 60.Kxh1 c2 61.a8Q+) 60.a8Q+ K-safe 61.Qc8. A nice one. Time to check if my delirium is just imaginary. XD ----------
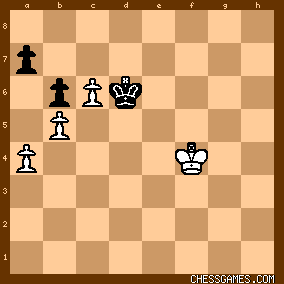
Hm. Interesting. I don't think this puts my analysis out of business, since the fact that W has the opposition is unimportant here. Let's suppose that W is on move here after 60.Kf4 and so, B has the opposition: 
click for larger viewThe BK is restrained in its mobility: it must watch for the c7 push. Furthermore at some point B is likely to lose the opposition since the d7-square is out of reach. So 61.Kf5! Kc7 (61...Kd5 62.c7; 61...Ke7 62.Ke5) 62.Ke5 Kc8 (62...Kd8 63.Kd6) 63.Ke6 Kd8 (63...Kb8 64.Kd7) 64.Kd6 Kc8 65.c7 Kb7 66.Kd7 Ka8 67.c8Q+ is mate. 
click for larger viewOverall I believe that the general theme of that puzzle (the one published by CG) is one of deciding which piece to be used by W to deal with the h2-pawn. |
|
| Aug-07-10 | | ZUGZWANG67: <Peligroso Patzer: <It is rather surprising that a strong GM such as Akopian would play <56. … Kd5?>, which obviously loses.>> I'm wondering whether the time will come when, instead of always questionning why a certain GM played this or that, we will start promoting time controls that allow players time for thinking about what they play during endgames... :) Peace! |
|
Aug-07-10
 | | OBIT: <Zugzwang>From your first diagram, after 61. Kf5 I think Black's best try is 61...a6, which leads to 62. Kf6 (62. ba?? Kxc6 draws) Kc7 63. Ke6 ab 64. ab Kc8. This is a position mentioned by <tacticalmonster> about a page back, which is won by 65. c7! Kxc7 66. Ke7 Kc8 67. Kd6 Kb7 68. Kd7 Kb8 69. Kc6 Ka7 70. Kc7 Ka8 71. Kxb6. By the way, I'm guessing this was the wishing thinking in Akopian's head when he played 56...Kd5, allowing 57. c6. He saw 56...bc was going to lose to a6!, then suddenly remembered there are stalemates in some of these positions where the king gets to the corner. A short time later, he remembered the c7! trick and realized the stalemate try wasn't going to work, so he resigned. Since we never got to see c7, his play ends up looking a little silly. Sometimes GMs should play a few moves longer, just to let the public know what is really going on. |
|
Aug-07-10
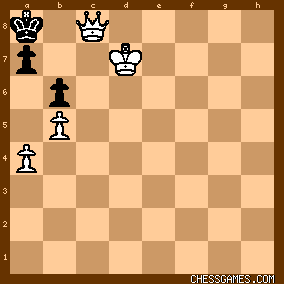
 | | Jimfromprovidence: <OBIT> <This is a position mentioned by <tacticalmonster> about a page back, which is won by 65. c7! Kxc7 66. Ke7 Kc8 67. Kd6 Kb7 68. Kd7 Kb8 69. Kc6 Ka7 70. Kc7 Ka8 71. Kxb6.> <tacticalmonster> <In the game continuation, I found a pretty interesting variation. One way to continue: 55 Kxe4 56 c5 Kd5 57 c6 Kd6 58 Kxh2 a6! (trading pawns in defensive position is good technique) 59 Kg3 axb5 60 axb5 Kc7 61 Kf4 Kd6 62 Kf5 Kc7 63 Ke6 Kc8 64 c7! (the key move! any other move draws) 64…Kxc7 65 Ke7 Kc8 66 Kd6 Kb7 67 Kd7 Kb8 68 Kc6 Ka7 69 Kc7 Ka8 70 Kxb6 with basic winning king and pawn ending> This is just a small point of order for the record, but the line posted by <tacticalmonster> you reference in your post needs some clarification. After move 63 by black, here is the position.

click for larger viewAt this point, any move by white wins in this position (not c7 only). However, c7 , sacrificing the pawn, does need to be played at some point for black to win. Below is the position after 70 Kxb6 in his diagram which proves his point.

click for larger viewSo, only those who saw this "trick" solved the puzzle fully. |
|
| Aug-07-10 | | tacticalmonster: <Jimfromprovidence> On move 64, you are right about the fact White can play any move and still wins but 64 c7! is the quickest way to victory. White can play 64 Kd6, Kd7 or even Kd5 but eventually all those moves would tranpose back to c7!. This pawn sac is simply the key to winning this ending. |
|
Aug-07-10
 | | Jimfromprovidence: <tacticalmonster> <This pawn sac is simply the key to winning this ending.> Yes, we are in total agreement.
You figured out the correct line if pawns are traded and <OBIT> summarized the overall position at move 56 nicely. I knew this puzzle was not that easy after 58 Kxh2. |
|
Aug-07-10
 | | OBIT: <Jim><tacticalmonster>Yes, and just to reinforce the point, the final position in the game requires the same pawn sacrifice to win. Play can continue 61...Kd6 62. Kf5 a6!? 63. Kf6 ab 64. ab Kc7 65. Ke7 Kc8 66. Kd6 Kd8 67. c7+ Kc8 68. Ke6! Kxc7 69. Ke7 and wins. As Jim and tacticalmonster have already said, there is no fancy triangulation maneuver to win that doesn't involve sacrificing the c-pawn. |
|
Aug-07-10
 | | Peligroso Patzer: <messachess: This was not difficult at all. *** > Well, it depends on whether you are judging difficulty on the basis of choosing the correct key move (here, <55. Kg2>) or on working through all the critical tactics. For example, if Black had played <56. … bxc5>, then the calculation required to prove the White win seems to me beyond the “not difficult at all” level. For example, after the further <57. a5 Kd5>, one needs to see that the only winning move is <58.a6!> (and that here 58.b6?? actually loses). Calculating this and several other critical variations from the position after 54. ....h2 may not have been as difficult as the usual Saturday puzzle, but it certainly was not easy. |
|
| Aug-08-10 | | patzer2: For the Saturday Aug 7, 2010 puzzle solution, 55. Kg2! simplifies to a won King and Pawn endgame. The posts by <agb2002> and <Peligroso Patzer> do a good job of analyzing the winning lines. |
|
| Aug-08-10 | | ZUGZWANG67: <OBIT: <Zugzwang>From your first diagram, after 61. Kf5 I think Black's best try is 61...a6, which leads to 62. Kf6 (62. ba?? Kxc6 draws) Kc7 63. Ke6 ab 64. ab Kc8. This is a position mentioned by <tacticalmonster> about a page back, which is won by 65. c7! Kxc7 66. Ke7 Kc8 67. Kd6 Kb7 68. Kd7 Kb8 69. Kc6 Ka7 70. Kc7 Ka8 71. Kxb6.> Thank you for pointing out! It is probable that different people may have a different opinion about what is obvious and what is not. To me, it was evident that the protected passed c-pawn was a winner, no matter B's play. It was a "no-need-to-give-oneself-a-headache-piece-of-play-
. You see it and you know it wins. But for others I agree it could not be the case. On the other hand, the real challenge to was to determine whether W could have a successful breakthrough, that is, one that promotes with check whatever Black plays. And for someone else, this could just be his/her piece of cake. :o) Peace! |
|
| Aug-10-10 | | Ferro: Spielmann es Shirov |
|
| Aug-10-10 | | Ferro: Portisch |
|
| Aug-10-10 | | Ferro: ¡Zukertort! |
|
| Aug-10-10 | | Ferro: ZUKERTORT |
|
| Aug-10-10 | | Ferro: Portisch no |
|
| Aug-10-10 | | whiteshark: ¿Cómo? |
|
| Aug-10-10 | | Ferro: Dónde? |
|
| Aug-10-10 | | Ferro: Aquí! |
|
| Aug-10-10 | | Ferro: Delete, porfa |
|
| Aug-10-10 | | whiteshark: ¿Y eso? |
|
| Aug-03-12 | | whiteshark: Shirov explains/analyses this endgame in depth: http://www.youtube.com/watch?v=4B_U... |
|
| Sep-01-16 | | Timi: 55? White to play and win. |
|
| Jun-18-18 | | Omnipotent00001: 58...Ke6 59.Kh3 ( mate in 28 ) Kd6 60.Kg4 Ke6 61.Kf4 Kd6 62.Kf5 Kc7 63.Ke5 a6 64.Kd5 axb5 65.axb5 Kc8 66.c7 Kxc7 67.Ke6 Kc8 68.Kd6 Kb7 69.Kd7 Kb8 70.Kc6 Ka7 71.Kc7 Ka8 72.Kxb6 Kb8 etc. white soon wins |
|
 |
 |
|
< Earlier Kibitzing · PAGE 4 OF 4 ·
Later Kibitzing> |
|
|
|


