| Jan-31-10 | | Dr. Funkenstein: I didn't understand Howell's Queen sac in the opening, it didn't seem to lead to anything but a lost position for black. However, in the resulting endgame, how does white make progress if black just shuffles the rook between f6, c6 and d6? Both wing pawns are defended and the opposing king is kept from advancing. |
|
| Jan-31-10 | | shalgo: Do you mean that black should leave the h-pawn on h6? One possibility in this ending is for white to play his king to b5 and then attack the b-pawn with his queen. He can then play 1.Qxb6 Rxb6 2.Kxb6. In the following pawn race the a-pawn will queen with the black h-pawn still on h2--a win for white. If black instead plays Rxf5 when white moves his queen away from its defense, then white wins the b-pawn and the a-pawn again marches forward. |
|
| Sep-09-11 | | cro777: As GM Ronen Har-Zvi takes a vacation through September from his regular weekly show at ICC (the “Ronen’s Opening Survey”), GM Akobian is filling his seat: " Varuzhan Akobian is known for being a resourceful theorist on the game. And for the next four weeks, he is going to reveal how to deal with the Grunfeld Defense by taking it head-on with 8.Be3 in the Modern Exchange variation - a system that Akobian himself plays and has had a lot of success with against top opposition!" (ICC). In the first video he is analyzing this game against Howell. |
|
| Sep-24-11 | | gaztelugatxe: Akobian analizes the game and indeed says that if Howell had chosen to move the rook instead of ...h5, he intended to win the game with 46.Qe6+ Re6 47.fe Ke8 48.Kb6, but after 48...Kd7, white can only get a draw and by means of a not so easy to see selfmate. |
|
Dec-16-12
 | | Peligroso Patzer: <Dr. Funkenstein: I didn't understand Howell's Queen sac in the opening, it didn't seem to lead to anything but a lost position for black. *** > This game is analyzed in <Amateur to IM>, by HAWKINS, Jonathan, Mongoose Press ©2012, at pp. 121-125. IM Hawkins’s comment on Black’s Queen sacrifice is: “As compensation for only having ♖ + ♗ for ♕ Black has clear targets on the queenside, the bishop pair, and very comfortable squares for his rooks.” <op. cit.>, at p. 122. |
|
Dec-16-12
| | Peligroso Patzer: <gaztelugatxe: Akobian analizes <sic> the game and indeed says that if Howell had chosen to move the rook instead of ...h5, he intended to win the game with 46.Qe6+ Re6 47.fe Ke8 (<sic>; presumably 47. … Kxe6 is intended; not only is it more obvious to take the pawn, after 47. … Ke8 – leaving a White pawn on e6 – it would be illegal to play 48. … Kd7) 48.Kb6, but after 48...Kd7, white can only get a draw and by means of a not so easy to see selfmate.> Interesting comment! I have a little trouble making sense of the move number references, since Black played … h6-h5 at move 43 in this position: 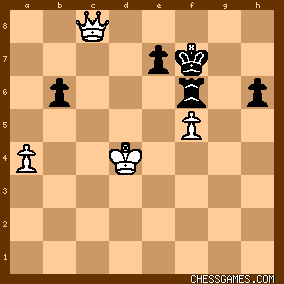
click for larger view
Thus, White’s first opportunity to give up Queen for Rook to get a pawn ending he believed he could win was with <44. Qe6+> (not at move 46). At that juncture, the sacrifice would indeed have thrown away the win, and would have left White barely able to draw: <44.Qe6+?? Rxe6 45.fxe6+ Kxe6 46.Kxb6 Kd7! 47. a5 Kc8 48.Ka7 h5 49.a6 h4 50.Ka8 h3 51.a7=>; White manages to save a half-point thanks to the stalemate trick, referred to in <gaztelugatxe>’s comment as a “selfmate”. The analysis with White playing the faulty sacrifice (<Qe6+> at move 46 was possibly intended after the variation with <43...Rd6+ 44.Kc4 Rf6 45.Kb5 Rd6> producing this position: 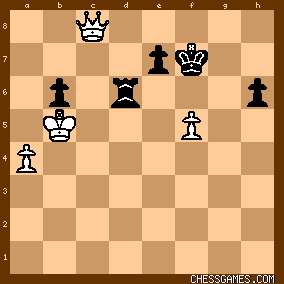
click for larger view (in which White can take on b6 immediately after the captures on e6 – as in the variation given by <gaztelugatze> - unlike the game position when Black pushed <43. ... h6-h5, when the White King stood at d4), when it does still fail to win (again barely drawing thanks to the stalemate trick) after <46.Qe6+?? Rxe6 47.fxe6+ Kxe6 48.Kxb6 Kd7!>. However, as pointed out by IM Jonathan Hawkins, White can still win if Black leaves the h-pawn at h6 and temporizes with his Rook along the sixth rank. The line given by IM Hawkins is: <43...Rd6+ 44.Kc4 Rf6 45.Kb5 Rd6 46.Qb8 Rf6> (if 46...h5 47.Qh8 Rd5+ 48.Kxb6 Rxf5 49.Qh7+ Ke6 50.Qxf5++–) <47.Qxb6 Rxb6+> (or 47...Rxf5+ 48.Kc4 Rf4+ 49.Kc3 and White's a=pawn wins; if 49...Rxa4 50.Qb3++–) <48.Kxb6 h5 49.a5+–> (White wins by one tempo.) (op. cit., at p. 125). |
|
Dec-16-12
| | Peligroso Patzer: One move in this game that is virtually incomprehensible to me is Howell’s <24. … g5>. I suppose the idea was to keep the Black King better sheltered than after the pawn exchange, but as IM J. Hawkins points out, better would have been <24...gxf5 25.Qxf5 Rxc3 26.Rxc3 Rxc3> "and Black has some hope of defending, although his weak king will make this difficult" – IM J. Hawkins (op. cit., at p. 123). |
|
|
|
|


