- exchange sacs in open positions
1 game, 1994 - Fischer-Spassky '72
20 games, 1972 - FORCE YOUR OPPONENT TO HAVE LOOSE SQUARES NEAR K
4 games, 1998-2010 - Fundamental Theorem of Threats, Part I
|
<<<FUNDAMENTAL THEOREM OF THREATS/ FUNDAMENTAL THEOREM OF CHESS / MAGNUS CARLSEN THEOREM>>> The number of times a square is attacked and defended cannot be properly calculated by simply
counting the number of pieces controlling that square. Rather, <<THE NUMBER OF TIMES A SQUARE IS ATTACKED AND DEFENDED CAN BE COMPUTED
-ONLY- AFTER -ALL- THE -THREATS- IN THE POSITION HAVE BEEN TAKEN INTO ACCOUNT.>> <Part I (++).> Being able to <-MAKE-> a threat (especially <CHECK> or a <MATE THREAT>) means that you control a square <-more-> times than
meets the eye (because you can <MOVE WITH TEMPO (FOR FREE)>). <Part II (--).> Having to <-MEET-> a threat means that you control a square <-fewer-> times than meets the eye
(<OBLIGATION RESTRICTS MOBILITY>). Maybe I can add attackers to the square with tempo, making a threat. Maybe you can add defenders to the square with tempo, making a threat. Maybe some of my attackers are tied down meeting threats. Maybe some of your defenders are tied down meeting threats. ---
Spassky vs O Averkin, 1973 White to play: 26 ?
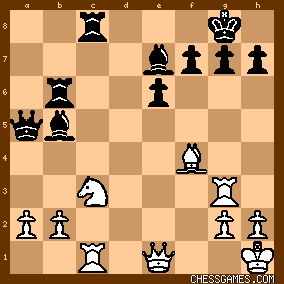
click for larger view<The beginner: White's 26 Bc7 is indeed a nice move. Not easy to see, but makes perfekt sence after all. The constalation of Rook, and Queen on same diagonal, should always ask the question is there someway to exploit it. Here spassky use the bishop as decoy :-) would make a nice puzzle> Position after 26 ♗f4-c7! +-

click for larger viewThe underlying factor which makes this excellent tactical blow possible by Spassky (White) is that there is <LOOSE SQUARE NEAR THE ENEMY KING>. The White g3-rook attacks the g7-square, and this square is <DEFENDED> only by the Black g7-king. So this <LOOSE> g7-square next to the Black g7-king makes an excellent <TACTICAL TARGET> for a <DOUBLE ATTACK/QUEEN FORK>. Spassky saw that if he played ♕e2-e5, he would do so <WITH TEMPO> since he now threatend the <SNAP MATE> ♕e2xg7#. <<<So -every- square that can be reached from the <TACTICAL BASE> the e5-square would make an excellent second <TACTICAL TARGET>>>>. This second square that can be threatened by the White queen from the e5-square is the c7-pinning square. So after 26 ... ♖c8x♗c7 27 ♕e2-e5

click for larger viewBlack has no time to meet the threat of 28 ♕e5x♖c7 because he must deal with the immediate mate threat 28 ♕e2xg7#. So Spassky wins the exchange (♖ for ♗). <RECAP>: In the original diagram, Spassky saw that he could move his White e2-queen to the e5-square <FOR FREE (WITH TEMPO)> by threatening mate on g7. Hence his queen is effectively -already- on the e5-square, meaning that the c7-pinning square is not 1-1 loose but rather 2-1 en prise. It's amazing how a mastery of basic tactical ideas can win games even at this GM level.
|
|
3 games, 1973-2008 - Harry Pillsbury's Best Games
15 games, 1895-1904 - Hook Mate Examples
|
ChessTempo.com calls both of these as Vukovic Checkmates. This game collection was gathered by ChessCoachClark. He also wrote the following notes: Vladimir Vukovic showed two versions of a particular kind of Knight and Rook checkmate pattern in his book, THE ART OF ATTACK IN CHESS, Chapter 4: Mating Patterns, under "Typical Mates with Enemy Pieces," page 72. It was not labelled with a name there, but several chess writers have identified it as the Hook Mate. IM Vukovic declares it to be "a typical mating pattern well worth remembering." I have managed to use it in OTB play and like to introduce it to students as well. One version of the Hook Mate, which I think of as a slash/swoosh, as given by IM Vukovic, is as follows:
click for larger view
I use the code <SW> for this version of the Hook Mate. Here is the other version, which seems to resemble a sickle or question mark (without the dot at the bottom), as provided by IM Vukovic:
click for larger view
I use the code <QM> for this version of the Hook Mate. Note that the Pawn could be on either diagonal "behind" the Knight (away from the opposing King). This point is significant because the SW and QM versions differ only by the positioning of this Pawn. The code <IV> is for Interesting Variations, those games which do not fit either of those previous types. Most often, a chess piece (not a Pawn) protects the Rook, even from a distance. This Hook Mate game collection only has games with the defending King and the attacking Rook in the same file, i.e., a vertical orientation. Of course, this mate could occur with King and Rook in the same rank-- horizontal configuration. For example, check out this game, if you can: Rouse, Philip vs Henke, Simon
Corr. 2001 23 moves 1-0
CG just doesn't have it in their database, yet.
Also, there is a game between two girls in the semi-finals of the Ukrainian championship for U14 that ends with the Hook Mate in the horizontal orientation. Again, it is not yet a part of the CG database: Poshivaylo, K. vs Breslavskaya, Galina
Lvov, Ukraine 1999 32 moves 0-1 <SW>
|
|
19 games, 1898-2013 - Isolated queen pawns
Games used by Maurcio Flores Rios in his book "Chess Structures A Grandmaster guide"
|
|
4 games, 2010-2013 - Ivanchuk's recent sacks
Knight or exchange sacks by Ivanchuk
|
|
4 games, 2015-2019 - Judit Polgar teaches chess tactics.
Baby Hawk's tactical collection for his student.
|
|
2 games, 1999-2003 - KING DEFLECTION: *TWO* LOOSE SQUARES NEAR KING
|
If the king keeps the enemy -queen- or -rook- out of an adjacent square, then it cannot perform any other tasks. ---
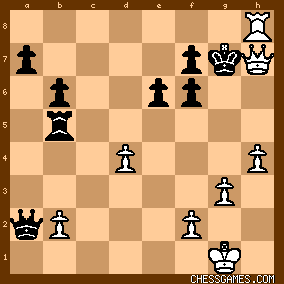
White to play: 29 ?

click for larger viewBlack's previous move was 28 ... ♖d5xb5??, grabbing a useless pawn
on the queenside.
Black overlooks two critical tactical points pertaining to his <KING SAFETY>: 1) Black g7-king is <STALEMATED> 2) <TWO LOOSE SQUARES NEAR HIS KING>: the h8-square is attacked by the White c8-rook
and the h6-square is attacked by the White e3-bishop and -both- of these squares are
<DEFENDED> -only- by the Black g7-king. But since -one- piece cannot <DEFEND> -two- squares
(in general), this tactical situation suggests that the Black g7-king is <OVERWORKED>
and can be <DEFLECTED>. White does not miss his chance, meeting the blunder 28 ... ♖d5xb5?? with 29 ♗e3xh6+!, Position after 29 ♗e3xh6+! 1-0

click for larger viewforcing Black's immediate resignation due to the forced mate 29 ♗e3xh6+! ♔g7x♗h6 <deflection from h8>
30 ♖c8-h8+ ♔h6-g7 31 ♕c2-h7#.
(VAR) 29 ♗e3xh6+! ♔g7x♗h6 30 ♖c8-h8+ ♔h6-g7 31 ♕c2-h7#
click for larger viewThis puzzle is also a great illustration of the power of the <LINE PIECES ♕♖♗> when
they are on <OPEN LINES> (files, diagonals, and ranks). Not one of the White c8-rook, c2-queen, or
e3-bishop is -anywhere- near the Black g7-king, yet they are able to perform a mate in 3
because they have <OPEN LINES> to the Black king. A big win for Jorge Sammur-Hasbun (White) on his way to retaining his Dos Hermanas ICC internet blitz
title in 2008.
[Event "FI32"]
[Site "Internet Chess Club"]
[Date "2008.04.05"]
[Round "15"]
[White "NECF-InSchools"]
[Black "Indiana-Jones"]
[Result "1-0"]
[ICCResult "Black resigns"]
[WhiteElo "3196"]
[BlackElo "3094"]
[Opening "English: symmetrical, hedgehog system"]
[ECO "A34"]
[NIC "EO.40"]
[Time "17:12:10"]
[TimeControl "180+0"]
1. c4 c5 2. Nc3 Nf6 3. Nf3 b6 4. g3 Bb7 5. Bg2 e6 6. O-O Be7 7. e3 O-O 8.
Qe2 d5 9. cxd5 Nxd5 10. d4 Ba6 11. Nb5 Nc6 12. a4 cxd4 13. exd4 Rc8 14. Rd1
Bf6 15. h4 h6 16. Ne5 Qe7 17. Ng4 Rfd8 18. Be3 Qb4 19. Bxd5 Rxd5 20. Nxf6+
gxf6 21. Rac1 Kh7 22. Rc4 Qb3 23. Rdc1 Ne7 24. R1c3 Bxb5 25. axb5 Qa2 26.
Qc2+ Kg7 27. Rxc8 Nxc8 28. Rxc8 Rxb5 29. Bxh6+ 1-0 ---
click for larger view

click for larger view
click for larger view<KING DEFLECTION: 17 ... Rf8xf3+!! 18 Kg3xRf3 <deflection from h4> Qd8-h4> This <KING DEFLECTION/DISTRACTION> that was overlooked(!) by the great tactician Nakamura is based on the -two- <LOOSE SQUARES> near the White g3-king, the f3- and h4-squares. In the brilliant game J Polgar vs J L Fernandez Garcia, 2003, Polgar's 24 ♖d1-d7!! is based on the -two- <LOOSE SQUARES> near the Black c8-king, the b7- and d7-squares. [Event "ICC 3 0"]
[Site "Internet Chess Club"]
[Date "2008.02.07"]
[Round "-"]
[White "pendex2008"]
[Black "Smallville"]
[Result "0-1"]
[ICCResult "White resigns"]
[WhiteElo "3090"]
[BlackElo "3272"]
[Opening "French: Tarrasch, closed variation"]
[ECO "C05"]
[NIC "FR.16"]
[Time "22:51:56"]
[TimeControl "180+0"]
1. e4 e6 2. d4 d5 3. Nd2 Nf6 4. e5 Nfd7 5. f4 c5 6. Ndf3 Nc6 7. c3 cxd4 8.
cxd4 Bb4+ 9. Kf2 f6 10. Bd3 fxe5 11. fxe5 O-O 12. Ne2 Ndxe5 13. dxe5 Nxe5
14. Bf4 Bc5+ 15. Kg3 Nxf3 16. gxf3 e5 17. Bd2 Qf6 18. Rf1 e4 19. fxe4 Qg6+ 0-1
|
|
29 games, 1889-2013 - Lasker's Secret Weapon
A collection of games where Lasker plays f4-f5, leaving a backward pawn on e4. Some annotators comment rather dramatically on Lasker-Capablanca 1914 when Lasker makes this move. In reality, the idea was part of his repertoire nearly from the beginning.
|
|
17 games, 1858-1934 - Look at what's left on the board
It is not what comes off the board that matters but rather what is left on the board because that is what determines who wins the game.
|
|
9 games, 1962-2010 - Material Imbalances
26 games, 1936-2015 - Material: R+N - Tactical Tangos
|
Müller/Lamprecht say that 15% of all games reach an ending of rook and minor piece vs rook and minor piece, so that you can expect to get such one in every tournament. Their statistics, with relative percentage frequencies, rounded: ♖♗ vs ♖♘ (45%)
♖♗ vs ♖♗ (22%)} with the same colored bishops
♖♗ vs ♖♗ (13%) with opposite colored bishops
<♖♘ vs ♖♘ (20%)> external lectures: http://roman-chess.blogspot.de/2012... "In endings with rook and knight against rook and knight a slight initiative usually weighs heavily" - GM Karsten Müller
|
|
375 games, 1896-2019 - Middlegame: 2 minor pieces for a Queen
....
Our final theme is a striking one: the sacrifice of a queen for two minor pieces, a bit of centralisation and...well, not much else, it seems. Leonid Yurtaev (RIP) is a major protagonist here; it seems he is only happy once he is a queen down.... The world has been understandably slow to recognise the merits of these queen sacrifice ideas. [...] check out --> Game Collection: pure queen sacrifices <The average value of the queen (if the opposing side does not have the bishop pair) is that of a rook, a minor piece and 1½ pawns. The knight is fractionally stronger than the bishop when supporting the rook in its struggle against a queen. The value of a queen and pawn is the same as that of two rooks, when no minor pieces are present. When both sides have 2 or more minor pieces, the queen does not need a pawn to equal the two rooks in value. In the situation of queen against 2 rooks with 5-8 pawns on each side, the advantage of the rooks is a tiny one; when there are at the most 4 pawns per side, the rook has an advantage of approximately ½ a pawn. A queen and half a pawn equals 3 minor pieces.> http://www.chessbase.com/newsdetail...
|
|
64 games, 1901-2014 - Middlegame: Black's Hanging Pawns
|
Like the isolani, the <hanging pawns> are a structural weakness and must not be entered into unless the piece position offers some compensation. The play revolves around Black trying to force one of the pawns to advance. If Black can establish a permanent blockade the game is positionally won. On the other hand, White aims to keep the pawns hanging, trying to generate a kingside attack leveraging off of their superior center control. Other themes for White include tactical possibilities and line opening breaks in the center. http://en.wikipedia.org/wiki/Pawn_s...
♙♙ - ♙♙ - ♙♙ - ♙♙ - ♙♙ - ♙♙ - ♙♙ - ♙♙ - ♙♙ - ♙♙ - ♙♙ - ♙♙ - ♙♙ - ♙♙ - ♙♙ "A pair of pawns on adjacent files that are separated from all other pawns are known as "Hanging Pawns" (a term coined by Steinitz).
Hanging pawns possess strengths and weaknesses. The elements of strength include the possibility of opening files through their advance and with this comes an increase in space, and the possibility of controlling key squares that can be used as outposts for Knights and Bishops. On the other hand they can also be weak. They can only be defended by pieces. This vulnerability can be exploited by attacking them with pieces, forcing the opponent to protect them with pieces. The defending pieces can then be attacked and exchanged at a suitable moment and this can often result in the win of a pawn or forcing another pawn weakness elsewhere. They can also be weakened by forcing the advance of one of them leaving the other one backward and a hole into which a piece can be placed. A third way of exploiting their weakness is to attack them with a pawn of your own, this can force a pawn exchange that results in an isolated pawn. >>The current view is that hanging pawns are weak if their side is behind in development but strong if their side is ahead in development."<< by User: Benzol , Game Collection: Hanging Pawns ♙♙ - ♙♙ - ♙♙ - ♙♙ - ♙♙ - ♙♙ - ♙♙ - ♙♙ - ♙♙ - ♙♙ - ♙♙ - ♙♙ - ♙♙ - ♙♙ - ♙♙
|
|
36 games, 1873-2017 - Middlegame: castling opposite sides
|
<Opposite Side Castling Attack.<>> Often in the game opponents castle their Kings in different directions. Playing with opposite castling is fundamentally different from one-side castling. When we castle on the same flank, we mainly develop our attack with the help of pieces: pawns are rarely involved in this case. It is quite different when we castle opposite way: here the attacker could push his pawns forward. Such a pawn storm with the opposite castling is the typical strategy: the pawns are "cheap" chess material, and is most advantageous to use them in order to destroy the enemy's position; even when we have to sacrifice pawns, that is done to achieve open files for our heavy pieces. < Here a few simple principles to remember :
< Attack will be successful when your storming pawns help you get the initiative, and force your opponent into following the defending strategy instead of counterattacking. < Planning your pawn storm, you must take into account two important factors :control over the center and pieces development. The attack won't be successful without our pieces fast mobilization. < Try to open files against your opponent's King rapidly, using the weak spots in your opponent's position. < If your pieces are far away from attacking the opponent's king, then try to bring them as close as possible to the position of the enemy king's, so that they can effectively use the results of the assault and the breakout. >> > > These are, of course, the main and general principles to follow. Each position has its own specific characteristics, but these considerations may help with solving problems arising during the struggle. other collections:
Game Collection: Holiday Present Hunt Solutions: 2014
Game Collection: Cross-checks
Game Collection: Best of the Best
|
|
5 games, 1887-1996 - Middlegame: IQP on d4
< "He who fears an Isolated Queen's Pawn should give up Chess." <>>
~ Siegbert Tarrasch
< "The isolated Pawn casts gloom over the entire chessboard." <>>
~ Aaron Nimzowitsch
<The essential disadvantage of the isolated pawn ... lies not in the pawn itself, but in the square in front of the pawn. <>>
~ Richard Reti
This collection shows how to take advantage of the dynamic possibilities of the isolated d pawn. If the isolani manages to advance, look out! On the other hand, if it is firmly blockaded, it tends to become a liability that leads to a lost endgame as pieces are exchanged. I find this strategic struggle utterly fascinating. The Isolated Queen's Pawn (or as google translated it from Portugiese <the Pawn Isolated Lady> - (L-O-L) can play a dangerous role in attack, espeically when it advances to disorient the enemy army. Most games in this collection examplify this theme. However, sometimes it can be properly blockaded and eventually captured. 'Understanding Pawn play in chess' by Drazen Marovic has a nice treatment of the subject of IQP. An equally good treatment is available in 'Pawn structure chess' by Andrew Soltis recommended/check:
Game Collection: IQP / http://www.chessgames.com/perl/ches... / Game Collection: IQP wins / Game Collection: IQP loses / Game Collection: IQP /
Game Collection: nexus IQP position /
Game Collection: IQP Wins. * Game Collection: PANOV BOTVINNIK ATTACK These games all reach the same IQP position after 7 complete moves. There are myriad move orders to reach the position, including lines of the following openings: Alapin Sicilian, Panov Caro-Kann, Symmetrical English, Semi-Tarrasch, Scandinavian transfer to Panov. Botvinnik believed that studying certain structures which could arise from numerous openings was a good way to prepare. The main structure which Botvinnik studied was the Panov. I don't know if this exact position was one that he studied, but it seems to be a nexus for many openings which result in IQP positions. Some examples of players who have followed the main line continuation from the nexus position most frequently on the white side are Judit Polgar and Jovan Petronic. On the black side we see the Caro-Kann adherents Anatoly Karpov, Allan Stig Rasmussen, and especially Eduard Meduna. I will cite instances where the nexus position is mentioned in books when I find them. Soltis=the book by Soltis titled Pawn Structure Chess. I don't own a database to search so I am relying on online tools. Andrzej Maciejewski v Marek Vokac, Prague 1990 is the only master game I can find which follows the Alapin Sicilian to a position which could have resulted from the nexus: 1 e4 c5 2 c3 d5 3 exd5 Nf6 4 d4 cxd4 5 cxd4 Nxd5 6 Nc3 e6 7 Nf3 Be7 8 Bd3 0-0 9 0-0 Nc6. George-Gabriel Grigore v Serban Neamtu, Romania 1992 is an example of the move order from the Slav Exchange 1 d4 d5 2 c4 c6 3 cxd5 cxd5 4 Nc3 Nc6 5 e4 Nf6 6 exd5 Nxd5 7 Nf3 e6. Here is another move order: Scandinavian, Kadas Gambit, transfer to Panov 1 e4 d5 2 exd5 Nf6 3 c4 c6 4 d4 cxd5 5 Nc3 Nc6 6 cxd5 Nxd5 7 Nf3 e6. These are the relevant ECO codes: A04, A15, A16, A17, A30, A34, A35, A40, A46, B01, B10, B13, B14, B21, B22, D02, D04, D10, D41, E10. 
click for larger view"Imagine the following pawn skeleton: White: pawns on a2, b2, d4, f2, g2, h2: Black: pawns on a7, b7, e6, f7, g7, h7. Despite its static weakness, the isolated pawn on d4 is filled with a certain dynamic power. We must distinguish with absolute accuracy between "static" and "dynamic" because this is the only way to understand completely. A static weakness shows up in the endgame and in two ways: firstly, the d4-pawn needs protection and, secondly, "neighbouring weak squares" show up clearly (e.g. the black king can try to get to c4 or e4 via d5). As far as dynamic strength is concerned, there is the pawn's lust to expand (d4-d5!) and in addition White can plan to leave his isolated pawn where it is and occupy one of the dynamically extremely valuable squares e5 or c5 which have been created by the d4-pawn." - Nimzowitsch, The Praxis of My System
♙ ♙ ♙ ♙ ♙ ♙ ♙ ♙ ♙ ♙ ♙ ♙ ♙ ♙
Baburin, Winning Pawn Structures leider zur Zeit nicht mehr erhältlich (Juni 2007) 256 S., kart., Batsford 1998/2001, Euro 25,00 " Zielgruppe: DWZ 1600-2350
Eine Zeitlang war dieses Buch nicht erhältlich, dann doch wieder nachgedruckt - aber der Autor bat, das Buch nicht zu kaufen, wegen ungeklärter Honorarzahlungen. Im Moment scheint aber wieder alles in Ordnung, und wir dürfen dieses Buch ruhigen Gewissens empfehlen.
Der erste Schwachpunkt eines sehr starken Buches ist - der Titel. Dieser sollte heißen Isolanistellungen. Denn Thema ist der klassische isolierte Damenbauer, entstehend aus Tarrasch-Verteidigung, Semi-Tarrasch, Caro-Kann/Panow-Angriff, Nimzowitsch-Indisch mit 4.e3, Sizilianisch 1.e4 c5 2.c3 d5 usw. Kürzer behandelt werden die verwandten Typen "Hängebauern" (z.B. nach Sd5xSc3 b2xc3 bei weißem Isolani d4) und "Widder" (sich gegenüberstehende Einzelbauern d4/d5).
Der irisch-russische GM Baburin illustriert in überzeugender Weise alle typischen Angriffs-, Verteidigungs- und Endspielpläne. Und beileibe nicht nur die naheliegenden Pläne,die "jeder kennt" bzw. zu kennen meint! (z.B. die Standardopfer auf f7 und e6). Da kommt auch mal die Isolaniseite auf der c-Linie, bringt den Turm auf der 3. Reihe zum Einsatz (z.B. Ta1-a3-h3 oder Td1-d3-g3) oder spielt einen Angriff mittels h2-h4-h5 - ein weniger bekanntes, aber mitunter effektvolles Motiv.
Das Buch ist mithin Pflicht für alle Spieler, bei denen Isolanistellungen eine wesentliche Stelle im Eröffnungsrepertoire einnimmt.
Ein kleiner Vorbehalt nichtsdestotrotz: In den (ansonsten hervorragend ausgewählten!) Beispielen gewinnt praktisch immer die Isolaniseite, wenn sie Angriff/Initiative im Mittelspiel hat. Bzw. in typischen Endspielen, wo naturgemäß die gegen den Isolani spielende Seite den Vorteil hat, verdichtet sie diesen Vorteil in praktisch allen Beispielen zum Gewinn. Dies entspricht nicht der Realität! Wie sowohl das Gefühl wie auch ein Spezialrecherche in Datenbanken zeigt, bleibt ein typisches Endspiel - sagen wir mit Läufer und Springer beiderseits - in der Mehrzahl der Fälle remis; nur seltener führt der Vorteil auch zum ganzen Punkt. Umgekehrt führt längst nicht jede Stellung mit starkem Königsangriff der Isolaniseite zum Erfolg; die notorisch komplizierten Opferwendungen führen auch gern mal zum Dauerschach oder zu unklaren Positionen.
Zwar zeigt Baburin jedesmal, wo die letztlich unterlegene Seite hätte besser spielen können. Trotzdem - ich habe ein bißchen Angst, daß solchermaßen im Kopf ein statistisch verzerrtes Abbild der Realität entsteht.
Trotz dieses kleinen Vorbehaltes ein starkes Buch, einwandfrei produziert und mit umfangreichem Inhalt, so daß der Preis nicht so sehr schmerzt - verglichen mit einigen anderen teuren, dünnen und letztlich billig gemachten Batsford-Produktionen.
Zur Zielgruppe: Obwohl die Arbeit an speziellen strategischen Formation (wie hier Isolanistellungen) erst ab ca. DWZ 1800 Sinn macht, scheint mir hier eine Ausnahme gegeben: Baburins Partiekommentare sind sehr eingängig und leichtverständlich. Auch der starke Turnierspieler (um 2200) kann zweifellos profitieren. Für Spieler ab IM-Stärke ist der Inhalt vielleicht doch wieder zu allgemein; wenig tiefe Analyse, wenig "Hyperpräzision", auch in Bezug auf die Eröffnungstheorie (hier würde ich mir z.B. noch präzisere Vergleiche in der Beurteilung verwandter Stellungen, die sich z.B. durch ein Tempo mehr/weniger oder eine andere Nuance unterscheiden, wünschen)."
http://www.kaniaverlag.de/htm/tarra...
|
|
238 games, 1877-2019 - middlegame: other material for a queen
10 games, 1953-2016 - middlegame: Positional Exchange Sacrifices
Interne Nummerierung:
1 = Petrosian
2 = Kasparov
3 = Kramnik
4 = Karpov
5 = Fischer
6 = Carlsen
7 = Andersson
8 = Anand
9 = Gelfand
10 = Aronian
11 = Botvinnik
12 = Tal
13 = Korchnoi
14 = Topalov
15 = Bronstein
16 = Smyslov
17 = Spasski
18 = Geller
19 = Alekhine
20 = Keres
21 = Tarrasch
22 = Lasker
23 = Capablanca
24 = Shirov
25 = Mamedyarov
26 = Ivanchuk
27 = Svidler
28 = Portisch
< No Sacrifice, No Victory! <>> http://www.damnlol.com/i/cf1b08fc97... " Petrosian introduced the exchange sacrifice for the sake of 'quality of position', where the time factor, which is so important in the play of Alekhine and Tal, plays hardly any role. Even today, very few players can operate confidently at the board with such abstract concepts. Before Petrosian no one had studied this. By sacrificing the exchange 'just like that', for certain long term advantages, in positions with disrupted material balance, he discovered latent resources that few were capable of seeing and properly evaluating." ~ Kasparov ♖ = ♘ = ♗ = ♖♗ = ♖♘ = ♖ = ♗ = ♘ = ♖♗ = ♖♘ = ♖ = ♗ = ♘ = ♖♗ = ♖♘ = ♖ = ♗ = ♘ Intro: http://en.wikipedia.org/wiki/The_ex... Related and recommended game collections: Game Collection: The Exchange Sacrifice ;
Game Collection: "Learn from the Legends" - Mihail Marin Section 5! ;
Game Collection: The Exchange Sacrifice ;
Game Collection: Deep Exchange Sacrifices, Part One: Petrosian ;
Game Collection: The Exchange Sacrifice: A Practical Guide ;
Game Collection: The Exchange Sacrifice: Part 2 ; google search on <Exchange sacrifices>: http://www.google.de/#hl=de&sugexp=... Series on <the exchange sacrifice> on YOUTUBE by User: cludi: <1> http://www.youtube.com/watch?v=nBVe... <2> http://www.youtube.com/watch?v=0N4E... <3> http://www.youtube.com/watch?v=rDp-... <4> http://www.youtube.com/watch?v=ndaX... <5> http://www.youtube.com/watch?v=bW-l... <6> http://www.youtube.com/watch?v=k9eo... <7> http://www.youtube.com/watch?v=rfaS... <8> http://www.youtube.com/watch?v=__2c... ♖ - ♖ - ♖x♗x♘ - ♖ - ♖ - ♖ - ♖ - ♖x♗x♘ - ♖ - ♖ - ♖ - ♖ - ♖x♗x♘ - ♖ - ♖ Lecture on Exchange Sacrifices with GM Ben Finegold http://www.youtube.com/watch?v=smTv... ♖ - ♖ - ♖x♗x♘ - ♖ - ♖ - ♖ - ♖ - ♖x♗x♘ - ♖ - ♖ - ♖ - ♖ - ♖x♗x♘ - ♖ - ♖ GM Alexander Ipatov shows one of his Exchange Sacrifices: https://www.youtube.com/watch?v=Nj1... ♖ - ♖ - ♖x♘x♗ - ♖ - ♖ - ♖ - ♖ - ♖x♘x♗ - ♖ - ♖ - ♖ - ♖ - ♖x♘x♗ - ♖ - ♖
Qualitätsopfer als taktisches wie auch positionelles Kampfmittel werden zu selten angewandt, wahrscheinlich aus Furcht vor der materiellen Einbuße; dies vermutet der ungarische Autor (im Vorwort S. 3), der im dritten Band seiner Reihe "Kombinationen lernen und lehren" eine systematische Übersicht zu diesem Thema präsentiert. Ausgehend von drei ausführlich analysierten Partien des verstorbenen Exweltmeisters Tigran Petrosjan, des "größten Qualitätsopferers" (Zitat S. 7), bietet der Autor zunächst jeweils 35 Testpartien leichteren Kalibers ("A") und gehobener positioneller Qualitätsopferkunst ("B") in Bezug auf aktiv durchgeführte Qualitätsopfer an, gefolgt von je 25 Beispielen ("A" und "B") für passiv angebotene Opfer (S. 13-59). Jede Partie, teilweise mit kurzen Anmerkungen im Informatorstil versehen, wird bis zum kritischen Punkt vorgeführt, und nach dem folgenden Stellungsdiagramm soll der Leser die Fortsetzung finden. Lösungen und Partieschlüsse finden sich dann im Anhang (S. 90-109). Ganz ähnlich konzipiert sind die beiden abschließenden Kapitel über Qualitätsopfer in der Sizilianischen Verteidigung (meistens sT x wSc3 bzw. wT x sSh5) und in anderen Eröffnungen, wiederum jeweils 35 Partien am Stück (S. 60-89). 43 Schach - Sinnsprüche lockern den Text auf; von diesen z. T. weniger bekannten Zitaten hat mir eines besonders gut gefallen: "Derjenige, der sich nicht so zum Schachspielen hinsetzt, daß er siegen will und siegen muß, sondern lediglich darauf hofft, daß ein Versehen des Gegners ihm später zu einem unerwarteten Punkt verhilft und der, der den Gegner für stärker hält, kann keine Erfolge erringen. Einem feigen Schachspieler bereitet das Wettkampf - Schach kein Vergnügen, sondern unangenehme, seelenquälende Anspannung (Maróczy)" (Zitat S. 51). Zudem findet sich im Anhang ein Register aller 190 aufgeführten Partien (S. 110-115), die aus einem Zeitraum von 150 Jahren bis hin zur Gegenwart ausgewählt wurden. Das Konzept des Büchleins erscheint bemerkenswert, liefert es doch in systematisierter Form auf knappem Raum eine Fülle von Material zum bisher in der Schachliteratur etwas stiefmütterlich behandelten Thema des Qualitätsopfers. Hie und da wäre jedoch weniger mehr gewesen, denn manchmal vermißt man schon tiefergehende Erläuterungen zum Spielgeschehen. Gleichwohl bildet der Band natürlich eine wahre Fundgrube an taktischen und positionellen Ideen, die mit dem Qualitätsopfer verbunden sind. Rochade Europa 11/99
Mit diesem Buch legt Imre Pál eine Abhandlung über ein Thema vor, das in den meisten Lehrbüchern ein wenig zu kurz kommt, nämlich das Qualitätsopfer. Als Einstieg zeigen 3 kommentierte Partien Petrosjans, der für diese Spezialität geradezu berüchtigt war, das Qualitätsopfer in Angriff und Verteidigung. Dann folgt der Haupteil des Buches: 120 Testpartien, die in zwei Schwierigkeitsstufen und in die Kategorien "aktiv" und "passiv" unterteilt sind. Zu jeder Partie gibt es die Notation (teilweise knapp kommentiert) bis zum Qualitätsopfer sowie das entsprechende Diagramm. Nun ist es Aufgabe des Lesers, sich den Sinn des Qualitätsopfers sowie die weitere Zugfolge zu erarbeiten, die Lösungen mit den wichtigsten Varianten befinden sich im Anhang. Im dritten Teil des Buches gibt es 70 weitere Beispielpartien, in denen jeweils das Qualitätsopfer eine wichtige Rolle spielt. Im Unterschied zu Teil 2 gibt es hier die komplette Partienotation, außerdem wurden diese Partien nach der Eröffnung geordnet. Den Abschluß bildet ein Register aller 190 enthaltenen Partien. Für Auflockerung sorgen einige Zitate berühmter Schachspieler. Fazit: Das Buch bereitet sein interessantes Thema sowohl inhaltlich als auch in der Gestaltung sehr ansprechend auf, und auch der Preis geht mit 22,80 DM in Ordnung. Schach-Markt 1/2000
http://www.schachversand.de/e/detai... ♖ - ♖ - ♖x♗x♘ - ♖ - ♖ - ♖ - ♖ - ♖x♗x♘ - ♖ - ♖ - ♖ - ♖ - ♖x♗x♘ - ♖ - ♖ [Event "Ho Chi Minh City ch-VIE"]
[Date "2010.??.??"]
[White "Bui Vinh, "]
[Black "Nguyen Huynh Minh Huy, "]
[Result "1-0"]
[WhiteElo "2480"]
[BlackElo "2469"]
[ECO "A28"]
1. c4 e5 2. Nc3 Nf6 3. Nf3 Nc6 4. d4 exd4 5. Nxd4 Bb4 6. g3 Ne4 7. Qd3 Nxc3 8. bxc3 Be7 9. Bg2 Ne5 10. Qe4 d6 11. f4 Nd7 12. O-O O-O 13. Ba3 Nb6 14. Qd3 c5 15. Nc2 Be6 16. Ne3 Qc7 17. Rab1 Rad8 18. f5 Bc8 19. f6 Bxf6 20. Rxf6 gxf6 21. Rxb6 Qxb6 22. Nd5 Qa5 23. Bc1 f5 24. Qe3 Kh8 25. Qe7 Rg8 26. Qf6 Rg7 27. h4 Be6 28. h5 h6 29.
Bxh6 Rdg8 30. Bxg7 Rxg7 31. h6 1-0
[Event "URS-ch27"]
[Site "Leningrad"]
[Date "1960.??.??"]
[White "Bronstein, David I"]
[Black "Petrosian, Tigran V"]
[Result "0-1"]
[ECO "B10"]
1. e4 c6 2. Ne2 d5 3. e5 c5 4. d4 Nc6 5. c3 e6 6. Nd2 Nge7 7. Nf3 cxd4 8. Nexd4 Ng6 9. Nxc6 bxc6 10. Bd3 Qc7 11. Qe2 f6 12. exf6 gxf6 13. Nd4 Kf7 14. f4 c5 15. Qh5 cxd4 16. Bxg6+

click for larger viewhxg6 17. Qxh8 dxc3 18. Qh7+ Bg7 19. Be3 cxb2 20. Rd1 Ba6 21. f5 exf5 22. Qh3 Qc2 23. Qf3 Bc4 0-1 check also the following collections:
- Game Collection: Exchange sacs - 1 - Game Collection: Exchange sacs - 2 - Game Collection: Exchange sacs - 3 - Game Collection: Exchange sacs - 4 150 = pre WWI
160 = 1914-1944
174-177 = 1945-1979
180 = 1980-1989
190 = 1990-1999
200-209 = 2000-2009
300-306 = 2010-2016
= = =
People in Greenland can differentiate between 36 kinds of snow; the Swedish IM <Ari Ziegler> will teach you to differentiate between <20 kinds of exchange sacrifice>. His systematic approach to exchange sacrifices will rapidly enhance your understanding of one of the most exciting and difficult aspects of chess. Your widened horizon will help you to be able to follow the games of top GMs better and also to see more options in your own positions, which in turn will improve your chess results. https://shop.chessbase.com/en/produ... Der schwedische IM <Ari Ziegler> behandelt auf dieser DVD Möglichkeiten, Stellungsbewertungen durch ein Qualitätsopfer plötzlich zu verändern. In den meisten Schachspielern ist die Wertigkeit der Figuren fest verankert, man weiß, dass ein Turm mehr wert ist als eine Leichtfigur, er beträgt ungefähr das Äquivalent zu Leichtfigur und zwei Bauern. Somit kommt es nicht oft vor, dass man in seinen Partien so ein Qualitätsopfer überhaupt andenkt, spielt doch einfach die Angst vor dem Verlust einer Schwerfigur eine zu große Rolle. Zudem erscheinen die Möglichkeiten und Konsequenzen eines solchen Opfers oft nicht überschaubar. Welche Stellungen erlauben eigentlich so ein Qualitätsopfer? Wie kann man die Chance zu solch einer Spielweise in den eigenen Partien überhaupt erst erkennen? Reicht die Kompensation für den Verlust des Turmes aus oder führt der Tausch einfach schnell in ein verlorenes Endspiel? Diese und viele Fragen mehr beantwortet Ziegler auf dieser ausgesprochen gut gelungenen Mittelspiel-DVD. Der Autor zeigt nicht nur eine Ansammlung von Beispielen aus der Großmeisterpraxis, sondern er bespricht die Partien systematisch: Wie kann man die Qualität opfern, um eine Festungsstellung zu erlangen? Falls man eine Leichtfigur auf e3/e6 oder d3/d6 etablieren kann, ist dies oft mehr wert als der Verlust der Qualität. Trifft dies immer zu oder gibt es Ausnahmen? Wie kann man mittels eines Turmopfers die gegnerische Königsstellung ins Wanken bringen? Wieso kann Schwarz so oft in der sizilianischen Verteidigung einen Turm für den Springer auf c3 opfern? Warum ist das Läuferpaar + Bauer in der Regel genauso stark wie Turm und Springer des Gegners? Diese und etliche andere Fragen beantwortet Ziegler umfassend. Die gezeigten Beispiele sind meist aggressiver Art, d.h. die Partei, die das Material hergibt, bekommt dafür in der Regel eine sehr aktive Position mit Initiative und Angriffsmöglichkeiten, in der der zweite Turm des Gegners zumeist passiv ist und seine numerische Überlegenheit gegenüber der Leichtfigur des Gegners nicht ausspielen kann. Mich hat diese systematische Herangehensweise an dieses komplexe Mittelspielthema sehr angenehm überrascht. Hat man in der Vergangenheit öfter über Qualitätsopfer in Großmeisterpartien gestaunt und sich gefragt, wie man überhaupt auf so einen Gedanken kommt und wie sich der Spieler sicher sein kann, dass diese Spielweise in der Stellung funktioniert, erhält man hier selbst das Rüstzeug, um die Wertigkeit des Turmes neu einzuschätzen. Wenn man die Beispiele auf der DVD gesehen und verstanden hat, wird man sein Verständnis des Mittelspiels nachhaltig verbessern. Gewisse Stellungen werden dann unter einem anderen Blickwinkel gesehen werden, da man die Möglichkeit eines Qualitätsopfers in Betracht zieht, was einem womöglich sonst niemals in den Sinn gekommen wäre. Ziegler gibt dem Zuhörer einige Richtlinien an die Hand, damit dieser die Partie auch nach dem Qualitätsopfer richtig weiterspielen kann. Oft ist es nämlich derart, dass nach so einem unerwarteten Opfer der Gegner völlig aus dem Konzept gebracht wird und es nicht schafft, sich der neuen Situation anzupassen. Das macht Fehler sehr wahrscheinlich. Dieser psychologische Effekt, der ja mit einer zum Teil radikalen Stellungsänderung einhergeht, könnte im Prinzip nur mit einer neuen objektiven Betrachtung der Stellung neutralisiert werden, was aber oft nicht gelingt. Der Autor zeigt ein ums andere Mal Beispiele, die das belegen. Tatsache ist, dass man nicht auf das Material achtet und die scheinbar stärkere Figur opfert, sondern im Prinzip nur die Stellung in eine überlegene Position verwandelt. Wie man dann diese Positionen zum Sieg ausspielen kann, erklärt der Autor natürlich auch ausführlich. Ari Ziegler präsentiert die Stellungen meist in angenehm langsamer und ruhiger Art, sodass man den Kern der Sache versteht und dem Gesagten gut folgen kann, auch wenn er manchmal das Tempo anzieht und durch die Partien sprintet, aber dies ist natürlich auch der Menge des Materials geschuldet. Eine ausgezeichnete Darbietung eines schwierigen Mittelspielthemas, welches jedem Schachfreund einen Entwicklungsschub für sein eigenes Spiel geben sollte. Sehr empfehlenswert! Schach-Zeitung https://www.schachversand.de/d/deta... DrGridlock: In "Secrets of Modery Chess Strategy," John Watson writes, "The increasing frequency of the exchange sacrifice is probably the most widely-acknowledged change in modern chess technique." In some instances, the exchange sacrifice is not only a tactical tool, but what the position demands. Keres did not sac the exchange, and Petrosian was able to develop an overwhelming attack.
|
|
485 games, 1834-2019
|

