Nov-12-03
 | | Honza Cervenka: Very interesting fight! Maybe 19...Qxe2 deserved attention. |
|
| Mar-07-04 | | InspiredByMorphy: Great job Mieses! The most unique Albin Counter gambit game Ive seen yet. |
|
May-20-18
 | | KEG: As InspiredByMorphy aptly notes, this Albin Counter Gambit is a delight to play over. Mieses, as always, shines in tactical struggles. Schlechter's play here, however, was uncharacteristic. Having achieved the better position as a result of Mieses' hyper-aggressive play, Schlechter--rather than slowly consolidating his advantage--embarked on the sacrifice of a piece that at best should have resulted in a draw. Then he went astray in the web of complications that ensued.
Perhaps Schlechter was worn out at the end of this long tournament in which draws had to be replayed. Or perhaps--knowing he had three games (including two draws to replay) where other contestants only had one game remaining--he wanted to avoid another long struggle. Indeed, Schlechter had won his prior game in 27 moves, lost this game in 31 moves, and won his final two games in 28 and 18 moves respectively. Schlechter did better in his next tournament (Munich 1900--in which draws were not replayed) and tied for first with Pillsbury and Maroczy. 1. d4 d5
2. c4 e5
The Albin Counter-Gambit, which is well-suited to Mieses' style. 3. dxe5 d4
4. Nf3 Nc6
5. g3
5. Nbd2 and 5. a3 are other good options for White. 5... Be6
5...Nge7 is most usual, and arguably best.
6. Qa4
The first sign that Schlechter was seeking a quick and decisive skirnish rather than playing in his more usual subtle positional style. 6. Nbd2 (or perhaps 6. Qb3) was most usual and probably best. The text does, however, have the merit of precipitating an immediate crisis. 6... Qd7?!
6...Bb4+ was probably best here (6...Bc5 was another good choice) but Mieses is apparently keen to castled long and go for broke. 7. Bg2 0-0-0
7...Nge7 was a good developing move, but Schlechter would then have had excellent chances with a pawn plus while Mieses had yet to develop his King-side pieces. 8. 0-0
Rosenthal in the Tournament Book recommended 8. Ng5, putting the question to the e6 Black Bishop. While that move has merit, the text is a good choice as well, and brings Schlechter's King to what should be a safe venue (if not for the wild attack Schlechter chose to initiate on his next two turns). 8... Bh3
Though half his army is undeveloped, Mieses begins an attack on Schlechter's King. A less confrontational player might have safeguarded his own King with 8...a6 and then brought out his King-side pieces first. 9. e6
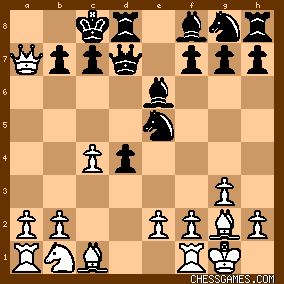
Called "premature" by Rosenthal in the Tournament Book, who recommended 9. Rd1. Rosenthal's move was a reasonable way for White to bolster his superior position. Also good was 9. Nbd2, developing his b1 Knight, a piece that remains on its original square throughout the entire course of this game. The text does not lose the game for Schlechter, but it does forfeit most of his advantage when he should have (and in other tournament circumstances probably would have) been simply developing his pieces. 9... Bxe6
"Of course if 9...Qxe6 10. Ng5 and wins." (Rosenthal). The position after 9...Bxe6 was:

click for larger viewWhite, whose plan is to attack on the Queen-side has yet to develop his own Queen-side pieces; while Black, whose plan was to attack on the King-side, has yet to develop his King-side pieces. As I will discuss in my next post, Schlechter from here began a combination involving the sacrifice of his f3 Knight in return for a gaggle of pawns. If Schlechter was seeking immediate complications, he got what he wanted. |
|
May-20-18
 | | perfidious: At the finish, the knight at b1, having played the role of looker-on the entire game, is about to enjoy the sublime pleasure of watching his king be rendered horsie de combat. |
|
May-20-18
| | KEG: Post II
<perfidious> Well put! Picking up the analysis after 9...Bxe6 as shown in the diagram at the end of my last post, Schlechter had various good plans at his disposal to strengthen his hold on the position: e.g., 10. Na3 (getting the slumbering b1 Knight into the game) or 10. b4 (beginning Queen-side operations against the Black monarch). Also reasonable was 10. Rd1 as suggested by Rosenthal in the Tournament Book. Instead, Schlechter played: 10. Ne5?!
This very uncharacteristic move for the usually positionally apt Schlechter involves sacrifices a Knight for a speculative attack plus the gain of several pawns. As the following analysis suggests, it was--after the resulting complications--probably good for nothing more than equal chances. 10... NxN
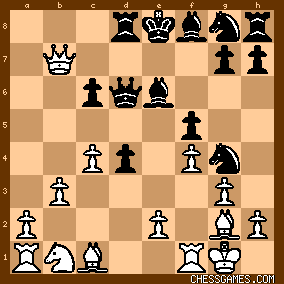
11. Qxa7
The position was now:
click for larger view11... Qd6
Rosenthal in the Tournament Book called this move "forced." It does seem best, but Rosenthal's claim that Black would be lost after 11...c6 is an exaggeration and Rosenthal's analysis is flawed. After 11...c6 12. Qa8+ Kc7 13. Qa5+ Black should play 13...Kb8 or 13...Kb7 allowing White to win back the sacrificed piece but after 13...Kc8 14. QxN Qc7 15. QxQ+ KxQ 16. Bf4+ Kd8 Black has compensation for his pawn minus. After Rosenthal's 13...Kd6 White would indeed have something close to a won game with 14. b3, but would in fact be lost on Rosoenthal's proposed 14. Bf4 f6 15. Nd2 (15. Rd1 would be somewhat better) Qc7. 11...c5 was also possible, though I must agree with Rosenthal that 11...Qd6 as played by Mieses was almost certainly best. 12. Qxb7+ Kb7
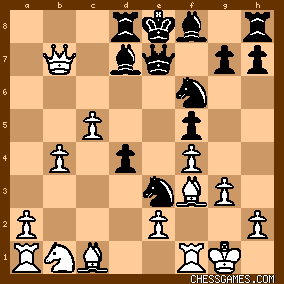
13. f4 Ng4
Leaving:

click for larger viewThe game is very definitely in the balance here. Black is up a piece for two pawns. White has running pawns on the Queen-side and possibilities of attack. Schlechter had various ways to press forward his attack. Given that he was a piece down, he obviously could not afford to be complacent. However... 14. b3
Instead of merely defending his c-pawn, Schlechter could have gone all out with a sacrifice of his c-pawn with 14. f5?! or driven away the pesky Black Knight at g4 with 14. h3. In either case, both sides would have chances and the evaluation unclear. 14... f5
True to form, Mieses chooses the most active and aggressive continuation. 14...Ke8 was perhaps best (I bet a great defensive player such as Petrosian or Karpov would have played this). 15. Qb5+
Schlechter's usual excellent positional judgment seems to desert hinm here. He should have played 15. h3 15... c6
16. Qb7+ Ke8
The position was now:
click for larger viewBlack's pawn on c6 is hanging, and Schlechter had two ways of capturing it immediately, either of which would have kept him very much in the game. From this point on, however, and as I will discuss in my next post, Schlechter seems to have lost his usually strong tactical bearings and (although Mieses gave him another chance or two to claw his way back in the game) was soon hopelessly lost. |
|
May-20-18
| | KEG: Post III
In my last post, I said that 15. Qb5+ was a mistake. When I first played over this game, I thought the move was fine because--while 15. h3 was indicated--I thought that Schlechter could transpose to that same line by played 17. h3 here, reaching the same position after 17...Ne3 that would have occured after 15. h3 Ne3 16. Qb5+ c6 17. Qb7+ Ke8 [followed by 18. BxN dxB 19. Bxc6+]. What I overlooked--and only discovered with the help of my good friends Fritz 15 and Stockfish--is that 17. h3 here would run into d3!! (and then if 18. Qxc6+ QxQ 19. BxQ Kf7 White cannot play 20. hxN because of 20...dxe2 and wins. All this shows that 17. h3 doesn't work here. Thus in the diagrammed position with which I ended my last post, Schlecther should have played either 17. Qxc6+ or 17. Bxc6+. He would still be down a piece, but with three connected passed pawns on the Queen-side for the sacrificed piece Schlechter would still be in the game. Instead, Schlechter--perhaps thinking he was laying a trap for Mieses, played the inferior: 17. c5?!
Perhaps Schlechter thought Mieses would be tempted to snatch the c-pawn with 17...Qxc5. Rosenthal in the Tournament Book claims this would lead to a win for White after 18. Ba3. But Rosenthal missed the best response: 18...Qc2, after which--given Black's threats, he still has the better chances. But Mieses found a much better move than 18...Qxc5 that left Schlechter on the verge of defeat: 17... Qe7!
Schlechter can now win the c-pawn, but Mieses has had a chance to consolidate his defenses and is ready to proceed with his own attack. 18. Bxc6+
18. Qxc6+ was better, but Mieses would still have had the upper hand. But now it was Mieses' turn to err, the position now being: 
click for larger view18... Bd7
Now Mieses' pieces are tangled up. The simple 18...Kf7 was much better. 19. b4
Stockfish much prefers 19. Bf3 here, and that move has the obvious merit of defending the e2 pawn, but I like the text. Schlechter is a piece down and it is clearly time to press forward with his one major edge: his three passed Queen-side pawns. The text seems the best way of beginning this operation. Fritz disagrees with Stockfish here, and prefers the text. The position was now:

click for larger view19... N8f6
It does seem that the players should begin developing their pieces before someone gets checkmated, but--as Honza Cervenka noted on this site over 14 years ago--how about 19...Qxe2. Indeed, 19...Qxe2 was best, and would have left Schlechter with a very difficult position to defend. (Another option was 19...BxB). Sad as it may seem, Mieses didn't have time for the text. Now, Schlechter was very much back in the game. 20. Bf3
Defending the e-pawn looks sensible, but 20. BxB+ followed by 21. Qf3 looks even better. 20... Ne3
A very complicated and difficult position to judge. The alternative to be considered was a King-side storm beginning with 20...h5. The position after 20...Ne3 was:
click for larger viewI suppose Black is theoretically better here (Fritz rates the game as -0.59 and Stockfish as -0.68). But both sides have major threats and I would rate the game as "unclear." From this point, however, Schlechter fell apart and got crushed in short order. I will relate this sad story (I am a Schlechter fan so this hurts) in my next post. Following up on Perfidious' comment, note the sad position of the White Knight sitting pathetically and uselessly on b1. |
|
May-22-18
| | KEG: Post IV
After Mieses' 20. Ne3, Schlechter had two plans: (A) Trade off Black's e3 Knight but submit to the incursion of the Black Queen, or (B) counterattack with 21. c6 at the cost of the exchange. Both plans appear to have merit. Schlechter's choice was: 21. BxN
Fritz thinks the choice of moves is close, but opts for Schlechter's move. Stockfish does not think the chocie was close, and opts for 21. c6. According to Schlechter, the text is a blunder. I am with Fritz and Schlechter on this one. White has ample chances for attack without giving up the exchange. 21... QxB+
The position was now:

click for larger viewHere Schlechter--inexplicably erred with:
22. Kh1?
22. Kg2 (defending the f1 Rook and keeping off the h-file was essential. After the text Schlechter never really had a chance, though he definitely made things worse for himself even after this mistake. 22... h5!
Mieses immediately takes advantage of the precarious position of the White King. 23. a4
Schlechter had a number of plausible options here, none of which were likely to save the game. In addition to the text (which is Stockfish's choice), he might have tried 23. h4 (to halt the advance of the Black h-pawn) or the counterattacking 23. c6 (Fritz' choice). 23... h4!
Mieses h-pawn continues on its devastating march. 24. Ra3
This ugly looking move has the merit of getting Black's Queen out of White's hair for at least a few moves. The only plausible alternative was 24. gxh4, which allows Black's h8 Rook to join the attack at once. 24... Qe6
25. Rg1?
Schlechter had to try 25. Kg2 or 25. gxh4 (or maybe 25. Kg1). After 25. Rg1?, the position was: 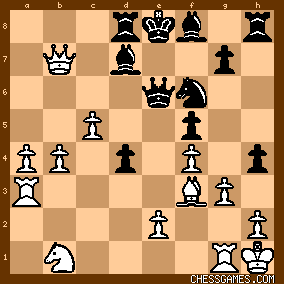
click for larger viewThe balance was target practice for Mieses, as I will discuss in my next and final post on this game. |
|
May-22-18
| | KEG: Post V
Mieses made short work of the balance of the game after Schlechter's 25. Rg1?: 25... hxg3
This opens the h-file for Black and leads to victory. Perhaps even stronger, however, was 25...Ng4. As is apparent, Mieses has a variety of ways to win from this point. The method he selected was more than sufficient. 26. Rxg3 Ng4
Another powerful option was 26...Ne4. Either move wins. 27. Rg2?
Schlechter was in desperate straits already, but he must have felt shell-shocked to play the text, which looks more like a move in a helpmate problem than a real move by a great player like Schlechter. If Schlechter wanted to play on, he had to play 27. h3, sad as the consequences would be. 27... Ne3
This does the trick, but even stronger was 27...Qc4! 28. Rg5?
It is hard to believe Schlechter was playing White at this stage. If he wanted to continue, he might as well have tried 28. Nd2. 28... Be7!
This only looks like a pawn sacrifice by Mieses. 29. Rh5
Perhaps Schlechter had thought Mieses could not play 28...Be7 because of 29. Qxg7 and noticed just in time that Mieses would now have a winning fork with 29...Qh6. The text, however, was almost as bad. The best moves at White's disposal in this most resignable position were 29. Rg2 of 29. c6. 29... RxR
30. BxR+ g6
Even more murderous was 30...Kf8, but the text also wraps up the game. 31. Bf3 Qc4
This left:

click for larger view0-1
"White can no longer save the game due to the threat of 32...Qc1+." (Rosenthal in the Tournament Book). Definitely Schlechter's weakest performance in the Paris 1900 tournament. |
|
|
|
|


