| May-19-07 | | Paladin88doug: I believe I found my new love! I am an advocate of the f-pawn (almost so much I want to play e4 f5!) but this looks good to me! Schieleman rocks! |
|
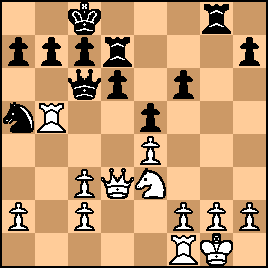
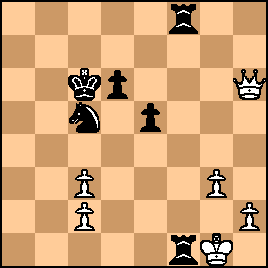
| Nov-19-07 | | notyetagm: Position after 38 ... ♖f2-f4+!:

click for larger viewFine said that Marshall was the strongest player that there was at pure tactics, stronger than Spielmann and Alekhine(!). Here 38 ... ♖f2-f4+! 39 g3xf4 forces open the g-file for 39 ... ♖h2-g2+, <SKEWERING> the White g4-king and White g6-queen. Position after 39 g3xf4 ♖h2-g2+ 0-1:

click for larger viewOf course 39 ♔g4-g5 is worse as after 39 ... ♘c5-e4+ White is forced to give up the queen to stop mate. (VAR) Position after 39 ♔g4-g5 ♘c5-e4+:

click for larger view |
|
Apr-08-23
 | | KEG: I read the comment of <notyetagm> with interest. Marshall was indeed a superb tactician and was perhaps superior even to Spielmann in this respect. But, Fine notwithstanding, I cannot agree that Marshall was the equal of (much less better than) Alekhine as a tactician. |
|
Apr-13-23
| | KEG: Going into this game, Marshall was in third place hot on the heels of 2nd-place Pillsbury and Teichmann was in fourth place, just ahead of Janowski, Tchigorin, Gunsberg, Tarrasch, Schlechter, and Albin. Until Teichmann's collapse, this is a thrilling game to play over. Marshall was trying hard to make this a tactical battle by playing the Schliemann Defense to the Ruy Lopez, while Teichmann tried the opposite by seeking to avoid complications and restrict Marshall's chances. Through move 25, this was a close struggle. Teichmann and Marshall were closely matched. This was their first encounter. They ultimately played 28 times with Teichmann ending up with a small edge of eight wins against six losses and 14 draws. The close struggle here shifted on move 26 (as the players approached the move-30 time control). Teichmann erred badly on move 26, Marshall gave away his chances with his poor 27th move, and the Teichmann's wild and unsound combination beginning on move 29 left his hopelessly lost, losing material and falling into a brutal mating net shortly thereafter. 1. e4 e5
2. Nf3 Nc6
3. Bb5 f5?!
The Schliemann Defense.
4. Nc3

click for larger view4... Nf6?!
Normal is 4...fxe4. The text, however, was a Marshall favorite, and has since been played by Tarrasch, Tartakower, Nimzowitsch, Rudof Spielmann, Spassky, and even Teichmann himself. it leads to a potentially double-edged position: 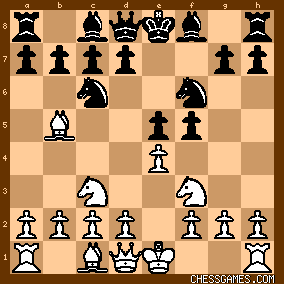
click for larger view5. d3?
Worried about engaging Marshall in a tactical shoot-out, Teichmann sought to defuse the potentially explosive formations. Strongest was 5. exf5!, but that was obviously not Teichmann's cup of tea. Marshall could now have achieved a decent and safe position with the simple 5...fxe4. But Marshall, playing what was to become one of his pet lies, went for a brutal battle with the wild: 5... Bb4?!
This left:
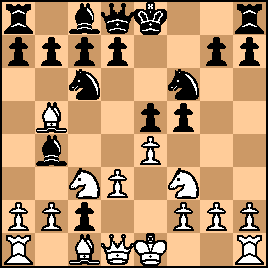
click for larger viewTeichmann could not obtain a modest edge with 6. exf5, but instead continued with his safety-first policy: 6. 0-0
Now, Marshall shifted tactics and played to wreak Teichmann's pawn structure, even at the cost of trading off one of his two Bishops: 6... BxN
7. bxB fxe4
8. dxe4
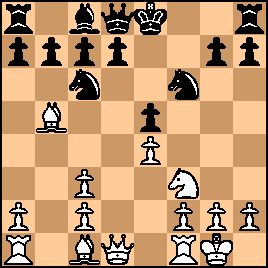
click for larger viewTeichmann at this point was better developed but had a shattered Queen-side. This unbalanced position provided chances for both side. 8... d6
9. Qd3 Bd7
9...0-0 was safer, but Marshall was marching to a very different beat. 10. Rb1

click for larger viewA very difficult and potentially exciting position. |
|
Apr-14-23
| | KEG: Post II
10. Na5
Other moves (i.e., 10...Qe7 or 10...a6) may be simpler, but Marshall wanted to deal immediately with Teichmann's White-square Bishop. 11. BxB+
Seemingly happen to trade Bishops in order to cut down Marshall's opportunities for creating complications. But if Teichmann were pressing for an opening edge, 11. Ng5 or maybe 11. Bg5 seem better choices. The text, however, was safe and sound and at worst left approximate equality. 11... QxB
12. Bg5
Still avoiding enterprising lines and playing for simple equality, else he might have considered 12. Nh4 or 12. c4 (his only significant weakness). 12... Qc6
Better were 12...b6 or just 12...0-0-0 immediately. 13. BxN
Still seeking exchanges, but I see nothing better here for White. Thanks to Marshall's doubtful last move, this exchange yielded a small edge to Teichmann. 13... gxB
click for larger view14. Nh4
Eyeing f5.
14... 0-0-0
Now Marshall had obtained the type of position he adored: unbalanced with chances on both sides of the board. 15. Nf5 Rd7

click for larger view16. Ne3
16. Rb4 was likely more promising, but Teichmann was still playing it safe and was now eyeing d5. 16... Rg8
Marshall now wanted to go all out on the King-side, but this plan does not seem promising at this point. 17. Rb5
click for larger viewTeichmann also had plans: doubling up on the b-file in conjunction with Nd5. Like Marshall's scheme, however, Teichmann's idea seems dubious. 17... b6

click for larger view18. R1b1
Consistent. Perhaps 18. c4 was better.
But the move that immediately caught my fancy was 18. RxN?! The engines are not crazy about this notion, and Teichmann may have decided not to venture into tactical shoot-outs with Marshall. But after 18. RxN bxR 19. Rb1 Rdg7 20. g3 a6 21. Nd5 White's position looks fun to play. I would have bet that Marshall would have played 18. RxN had he held the White pieces here. 18... Rdg7
I prefer 18...Nb7. Perhaps Marshall saw the possibility of 19. RxN and was daring Teichmann to jump down that rabbit-hole. After the text, however, the RxN idea was once again in the air: 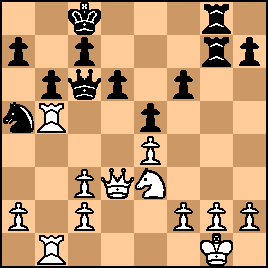
click for larger view |
|
Apr-15-23
| | KEG: Post III
19. g3
Playing for maximum safety, Teichmann again declined the exchange sacrifice. This time, the engines give a small nod to 19. NxB bxR 20. g3. These sorts of positions are always difficult to evaluate, and I am not surprised that over the board Teichmann decided not to enter this thicket. The text, on any reckoning, cannot be considered a mistake. 19... Nb7!
With Teichmann having played 19. g3, this was a wise choice. I have no doubt that Marshall saw the RxN idea. This left:

click for larger view20. Nd5
This superficially looks best but fails to apply any real pressure. Superior were 20. Nf5 or 20. a4. 20. R5b4 or 20. f3 were also probably stronger. In any case, the game remained basically in the balance. 20... Rf8
Marshall decided to focus on an eventual advance of his f-pawn instead of trying alternatives such as 20...h5 or 20...Nc5. These options, like the text, were all reasonable. 21. a4
Again pursuing his Queen-side attack.
21... Rgf7
Again declining to play 21...Nc5 or 21...h5. Like his last move, all of these options for Marshall have their points and demerits. The idea of bolstering an f-pawn push is quite in Marshall's style. 22. R5b4
22. Nb4 seems indicated, but Teichmann seems to have been intent on keeping the game fluid. 22... Nc5
A good multi-purpose attack and defend move.
23. Qc4 Kd7
It is no surprise that Marshall wanted to get his King off c8. But 23...Kb7 seems simpler. The text left:

click for larger viewThe preliminaries were over and both sides were set to attack; Teichmann on the Queen-side and Marshall on the other wing. 24. a5
Best.
24... f5
Also best.
25. axb6 axb6

click for larger view26. f3?
In addition to weakening his King-side, Teichmann here overlooked the plainly indicated 26. Ra1 Marshall should now have been in his element and seems poised for victory. 26... fxe4
Prying open the f-file for his Rook battery.
27. fxe4

click for larger viewMarshall had played well to this point, and--with the exception of his doubtful 26th move--so had Teichmann. Beginning here, however, time trouble (as the move-30 time control approached) must have been rearing its ugly head, and now first Marshall missed a likely win and then Teichmann blundered away the game. |
|
Apr-15-23
| | KEG: Post IV
27... Rf2?
Through over-exuberance, Marshall missed the winning 27...Ne6! Now, Teichmann had a seemingly obvious opportunity to right his ship: 
click for larger viewTeichmann would now have had saving counter-chances on the Queens-side with 28. Ra1. But he fell under the spell of what must have appeared to him to be a winning combination and instead played a wild, crazy, and totally losing move: 28. Rxb6+?
I'm not exactly sure what Teichmann was thinking. After this howler, White loses a piece and is finished. A shocking ending to what had been an interesting struggle. This sort of losing sacrifice was entirely uncharacteristic of Teichmann, especially at this stage of his career. A gift of a full point to Marshall. 28... cxN
click for larger view29. Rxb6
29. Ra1 might have provided slightly better chances, but even with that Teichmann was just plain lost. Now Marshall finished briskly:
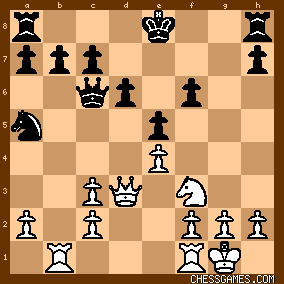
29... Qxe4

click for larger view30. Rb7+
If Teichmann was counting on this move, he obviously miscalculated badly. 30... QxR
31. RxQ+ NxR
click for larger viewTwo Rooks and a Knight being much better than a lone Queen, all Teichmann had left were some face-saving checks. Of course, any such position with disparate forces can be tricky to convert, but Marshall had no difficulties. 32. Qe4
This only made Marshall's task easier. 32. Qg4+ might have allowed him to prolong--but not save--the game. 32... Nc5!
The loss of the h-pawn is of no significance.
33. Qxh7+ Kc6

click for larger viewNow the Black King was safe and Marshall was able to finish neatly. |
|
Apr-15-23
| | KEG: Post V
34. Qh6
Now it is just a matter of hunting down the exposed White King. This was mother's milk for Marshall. 34... Rf1+
click for larger view35. Kg2 R8f2+
36. Kh3 Rh1

click for larger viewA pretty, quiet killer.
37. Qg6 Rhxh2+
38. Kg4

click for larger viewAnd now Marshall finished with Rook sacrifice.
38... Rf4+!
Neat!
39. gxR Rg2+
click for larger view0-1 |
|
|
|
|


