| Sep-11-04 | | Helloween: I really enjoyed this game and its chaotic material imbalance. 7.0-0?! gives White some temporary pressure and is difficult to refute. Notice the spiteful 39...Rf8. |
|
| Sep-11-04 | | Knezh: Why not 30. e6+ Bxe6 31. Rxe6 Kxe6 32. Qxg4+ ? |
|
| Sep-11-04 | | Knight13: This game is fun to watch and fun to study. |
|
| Sep-15-04 | | Helloween: <Knezh> I see 30.e6+ Bxe6 31.Rxe6 Ra1+ 32.Re1 Rxe1+ 33.Qxe1 Re8 34.Qd2 as  , also. , also. |
|
| Jan-18-05 | | SouCapi: <Knezh> After 30.e6+ Bxe6 31.Rxe6 Kxe6 32.Qxg4+ black plays 32...Rf5 and it seems to me that the game is far from over. |
|
| Jul-15-05 | | Benzol: "Marco the Beast". Hope his number wasn't 666. |
|
| Jul-15-05 | | Granite: <Helloween> I'm not certain it's fair to assume that Rf8 is spiteful since it seems to be just at the right moment to be in time pressure especially after all the complications of this game. :) Does anyone know the time control in this game? |
|
| Jul-15-05 | | ajile: Looks like 7...D5 would be a better choice for Black to stay out of trouble. Taking the bishop gives up a crucial tempo plus weakens Black's Q-side badly. Black needs to get his king into safety. I'm not sure what the main line of this is but White's 4.D4 looks very good as a sharp response to F5. |
|
| Jul-15-05 | | Green Bishop: A rare game. Marco is very kind in the opening with 7.0-0?! and Marshall got mate in a lost position. It seems to be like a rapid game. |
|
| Jul-15-05 | | Knight13: I believe 7.O-O is a okay move.
I think that after move 22 Black's position is better. But he blew it with few pawn loss and letting white have the dang ol' passed pawn. |
|
| Jul-15-05 | | EmperorAtahualpa: Nice game.....I don't get the pun though? |
|
| Jul-15-05 | | white pawn: It's supposed to be like "Mark of the Beast," which is 666 which is what <Benzol> had mentioned. |
|
| Aug-06-05 | | Whitehat1963: This game serves as a great preview of the jaw-dropping moves to be found in the later masterpiece: Marshall vs G Marco, 1904 |
|
| Jan-12-07 | | Total Blunder: Or is Marshall the beast here? |
|
| Feb-13-07 | | sfm: LOL! Good old svindler, Marchall! Lovely last move. He knows he is beaten, but there's juuust a microscopic change that White would be surprised and confused and grab his rook...
Great game! |
|
| Jan-24-09 | | WhiteRook48: Perhaps 39...Rxd8 was better, but then white will have the Q over R advantage anyway. Poor Marshall. (Wait, was he rich?) |
|
| Jun-17-12 | | vinidivici: wow 7. O-O, and sacrificed the bishop. Is it sound? |
|
| Jun-18-12 | | RookFile: It can't be good. Maybe white has some drawing method, but you don't just throw a bishop out the window without getting something concrete in return. |
|
| Jun-18-12 | | vinidivici: yeah,i think so let alone it was just at the opening. needs some guts to do that, but at least it works in this game. |
|
Oct-29-23
 | | KEG: A very strange game. Marco--generally known as a defensive player--sacrificed a piece on move 7! While he got some compensation, as a theoretical matter it was inadequate. But Marshall, more accustomed to be the hunter rather than the hunted, faltered and allowed Marco to pull a rabbit out of the hat and win the game. Whatever its technical merits, this game was thrilling from beginning to end. Going into this 17th round game, and with five games to play, Marshall stood third: Maroczy--11.5
Pillsbury--11
Marshall--10
With Maroczy losing in this round, and with Pillsbury later losing replays first to Tchigorin and then to Gunsberg, Marshall had a chance to win this tournament by winning his last three games. But he lost this game--which he might have won--defeated Reggio, and then lost his final three games to Wolf, Janowski, and Pillsbury. As a result, Marshall not only failed to win the tournament, but was passed in the standings by Janowski, Teichmann, Schlechter, Tarrasch, Wolf, and Tchigorin. He ended up in 9th place. Marshall would have to wait until 1904 for his great triumph--at Cambridge Springs 1904. 1. e4 e5
2. Nf3 Nc6
3. Bb5 f5
The Schliemann Variation which Marshall employed for much of his career. He had used in here at Monte Carlo 1902 three rounds earlier in defeating Teichmann. It served him well at Cambridge Springs 1904, but he scored only a draw in the three games he tried it against Capablanca in their 1909 match. 4. d4?!

click for larger viewMore usual and better are 4. Nc3 or 4. d3. The text is the first indication that Marco wanted to be on offense in this game. Marshall had blown Marco off the board in 23 moves at Paris 1900, and Marco apparently decided he was not going to be a punching bad again for the young American. Whatever his thinking, Marco ended up plus two for his career against Marshall. This game was the first time in four tried in which he beat Marshall (he had drawn two and lost one in their previous games). The text, though hyper-aggressive, is certainly playable. 4... fxe4
5. Nxe5
Though the most usual choice here, the text was rightly criticized by Bachmann in the Tournament Book as inferior to 5. BxN (and then 6. Nxe5). After 5. Nxe5, White no longer enjoys any opening edge. 5... NxN
6. dxN c6

click for larger view7. 0-0?!?!
Zooks!
Players sometimes try a piece sacrifice here with 7. Nc3?!--perhaps on the theory that Black will be better after any defensive retreat of the Bishop. Play then might continue 7...cxB 8. Nxe4 Qh4 [best] 9. Qd4 Be7 10. 0-0 Nh6 11. Nd6+ Kf8 12. QxQ BxQ 13. BxN gxB 14. Rae1 after which White, with a pawn for the piece and Black's pawn structure horribly fractured has something close to equality. Marco's move, by contrast, at first blush seems like lunacy. So far as I have been able to determine, the move was never played before this game and--not surprisingly--has not been tried since. 7... cxB
<ajile> suggests 7...d5 as an improvement. But White them simply plays 8. Be2, avoiding the loss of a piece and achieving--if anything--the better chances. By contract, the text leaves White a piece down with doubtful compensation, the position after 7...cxB being: 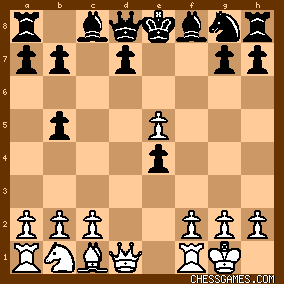
click for larger viewWhile Black is as yet undeveloped, a piece is a piece, and White has scant attacking prospects to justify his sacrifice. Marco, however, obviously thought otherwise, and his following efforts to go after Marshall makes the game the exciting contest it quickly now became. Definitely a fun game to play over! |
|
Oct-29-23
| | KEG: Post II
In fairness to the suggestion of <ajile>, which I perhaps dismissed too cavalierly in my previous post--capturing the Bishop on move 7 guaranteed that Marshall would be playing defense in his effort to win an arguably theoretically won position. As will be seen, Marshall at this stage of his career lacked the patience to play a la Karpov and win with his extra piece while fending off attack, and he eventually gave away his winning edge and then tried an unsound Queen sacrifice which allowed Marco to walk away with the game. So, perhaps, 7...d5--even if the wrong move theoretically--was a good choice for Marshall. Anyway, back to the actual game.
8. Nc3?!
A better chance lay in 8. Bf4. But Marco had a simple plan--attack at all costs. All I can say for that here is, IT WORKED. 8... d5!
Marshall's instinct to seek active play was spot on---for now. 
click for larger view9. exd6 e.p.
Not deigning to play for the trade of Queens and the win of a pawn or two with 9. Qxd5. That might be theoretically best, but it was not part of Marco's game plan. 9... Qxd6
10. Qh5+
Here we go.
10... g6
11. Qxb5+ Bd7

click for larger view12. Qxb7
Still going all-in for the attack and ignoring the slower but arguably better 12. Qe2. 12... Qc6
13. Qb3
He might alternatively have swapped Queens and tried for and endgame with two pawns for the piece with the better pawn structure (perhaps affording chances for a draw). But, to repeat the point, this was not part of Marco's game-plan. 13... Bd6
"Threatening Rb8 winning a [i.e., another] piece." (Bachmann) True, but 13...Nf6 or 13...Be6 were perhaps better. But Marshall loved tactics, thus his choice of 13..Bd6. The position was now:

click for larger view14. Re1
14. a4 seems a better way to meet Marshall's threat. Marco eventually played that move (on his next turn) anyway. 14... Nf6
15. a4
"Parrying the threat and so continuing to prevent Black from castling." (Bachmann) All true, but beginning here, Marshall began to dissemble, the position at this point being: 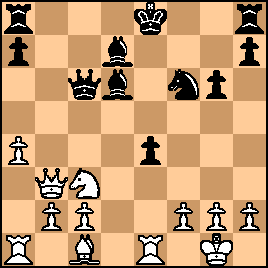
click for larger view |
|
Oct-30-23
| | KEG: Post III
15... Be5
This didn't necessarily blow Marshall's winning edge, but it is hard to see why he didn't play the much stronger and natural 15...Rb8. This is the sort of counter-attacking move I would have expected from Marshall, even at this early stage of his career. 16. Bg5

click for larger view16... Rb8
Here Marshall might have tried 16...Be6. But even if that was nominally better than the text (which is far from clear), Marshall after the text still had every reason to expect to win this piece up position. 17. Qa3

click for larger view17... BxN
"Black has given up an important defensive piece." (Bachmann) Perhaps, but ridding himself of the White Knight also had its points, as did thoroughly messing up White's Queen-side pawns. The main alternative was 17...Bf5, which Stockfish says is best. That may or may not be correct, but I still like Marshall's move. It was only after the text that Marshall completely ruined his chances. 18. bxB
click for larger viewSotckfish notwithstanding, White's position looks ugly and--let's not forget--he was still down a piece. From here, however, Marshall seemingly went bonkers: 18... Rf8?
Hard to understand. Marshall should have gotten out of the pin on the e-file and kept his options open for his Rooks by playing 18...Kf7! After the text, Marco suddenly had excellent counter-chances which he nicely seized--until his bauble on move 24. 19. Rad1
click for larger viewThe improvement in Marco's position is obvious.
19... Rb6
There was nothing wrong with this move--except Marshall's idea in playing it (which became horribly clear two moves later. 20. a5 Rb5
21. Rd6!
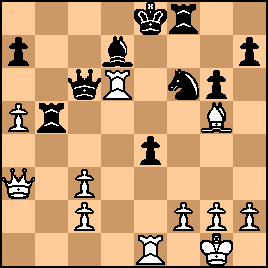
click for larger viewA highly complicated position had been reached. Marshall now pretty much had to play 21...Rxa5, after which the game might have continued 22. RxQ (or 22. Rb4 QxR 23. QxQ RxB where Black's two minor pieces and extra Rook approximately balance White's Queen and "extra [double] pawn) RxQ 23. RxN RxR 24. BxR Kf7 leaving a likely drawn ending with opposite color Bishops where White's extra pawn was probably of no significance. For whatever reason, Marshall here decided to sacrifice his Queen for dubious compensation (and a likely lost position). |
|
Oct-30-23
| | KEG: Post IV
21... RxB?
"Obtaining three pieces for the Queen, bit losing the game. 21...Rxa5 when White could settle for a draw by 22. RxQ or play for a win [and perhaps risk losing--KEG] by 22. Rb4." (Bachmann) With Marshall's last few moves, he had managed to turn a likely win into a likely loss. I know Marshall preferred attacking to defending, but this was ridiculous. The mature Marshall would never have done this. 22. RxQ BxR
23. Qd6!
The power of the Queen is such position is nicely displayed here. 23... Bd7
Practically forced, and leaving:
click for larger viewOne can now see what a bad bargain Marshall had made in giving up his Queen. Her majesty now rules the board, and saving the game looks like a tough task for Black. But not it was Marco's turn to falter:
24. f3?
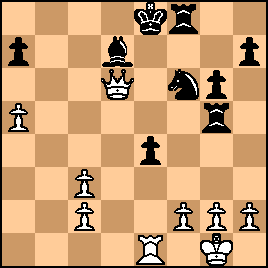
Marco had all sorts of likely winning plans; e.g., 24. Qb8+ followed by 25. Qxa7; 24. c4 threatening the further advance of this pawn; 24. Qc7; 24. a6. But Marco thought he could win more simply by exploiting the pinned Black e-pawn: 
click for larger viewNow, as if by magic, Marshall had a saving attacking scheme beginning with 24...Bh3! Play might then have continued 25. Re2 Kf7 26. fxe4 Kg8 27. Rf2 Nd7 28. RxR+ NxR 29. Qd3 after which Black with Rook and two minor pieces for White's Queen three extra pawns would have had chances to save the game. But here Marshall blew his chances for good with the sloppy: 24... Rd5?

click for larger viewNow the win was simple for Marco.
25. Qc7
Good enough, but the more brutal 25. Qa6 would have been faster. 25... Kf7
26. fxe4

click for larger view26... Rc8?
Marshall was almost certainly lost anyway, but only 26...Re8 offered any likelihood of being able to present stiff resistance. 27. Qf4 g5!

click for larger viewIn a lost cause, Marshall elected to go down fighting! But, as will be seen, Marco was unflappable from here and did not allow himself to become distracted from his relentless winning plan. |
|
Oct-31-23
| | KEG: Post V
28. Qg3
Crushing, and even stronger than 28. Qf2, which also wins easily. What followed was a massacre: 28... Rxa5
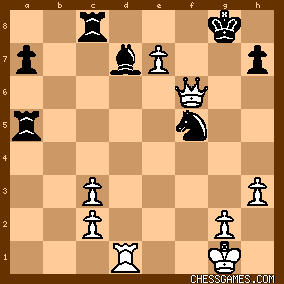
The fighting 28...Rd2 or maybe 28...Rdc5 might have offered better practical chances, but there was little chance for Marshall by now no matter what he did. 29. e5!
The killer:

click for larger view29... Ng4
A wild effort by Marshall. If his plan was to hold on for as long as possible, 29...Re8 was probably best. 30. h3
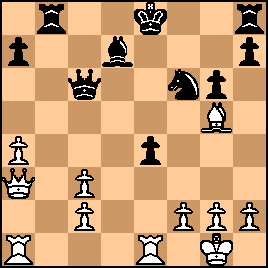
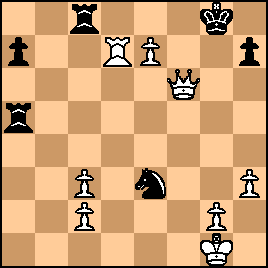
Sufficient to win, but the true immediate crusher was 30. Qd3. The text, however, was Marco's last move before the move-30 time control, so perhaps we should give him some leeway here. 30. e6+, discussed by several contributors on this site, would have been awful and blown the win; e.g... 30...Bxe6 31. RxB? [This move was given by several contributors on this site, but would have allowed Black completely off the hook. By contrast, White would still have winning chances with 31. Qd6!] KxR [31...Ra1+ as suggested by <Helloween> would have handed the game back to White after 32. Re1 RxR+ 33. QxR and now if 33...Re8 as suggested White wins with 34. Qa1] 32. QxN+ [as given by <Knezh>] then Black draws with 32...Rf5 as was correctly pointed out here back in 2005 by <SouCapi>. After Marco's 30. h3, the position was:

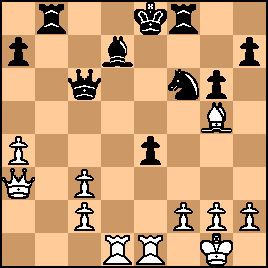
click for larger viewBlack now had nothing better than 30...Nxe5 or 30...Rxe5, both of which allow White to capture twice on e5 leaving White with Queen plus extra doubled (passed!) pawn for Rook and Bishop, which might at least have forced Marco to work hard to close out the game. But instead Marshall, looking to keep his pieces on the board, played: 30... Nh6?
From here, it was just target practice for Marco: 31. Qxg5
31. Qd3 also wins easily for White. The text left: 
click for larger viewMarshall might have spared himself the rest.
31... Nf5?!
Playing for miracles, but the "better" 31...Ra6 offered no real hope, so by this point Marshall was playing with the house's money. 32. Qf6+
Even more murderous was 32. Rd1.
32... Kg8
33. e6
Marco could also just have played 33. Rd1.
33... Be8
34. e7
Ouch! Marco must have been expecting Marshall's resignation any moment. But Marshall had other ideas on how to conclude his hopeless position: 
click for larger view34... Bd7
34...Bf7 might have staved off mate for a few more moves. 35. Rd1
click for larger viewMarshall by now surely knew he was a dead duck. But he contrived a hilarious finish to this wild game which Iwill display in my next post on this game. |
|
Oct-31-23
| | KEG: Post VI
35... Ne3?!?!
Desperation...or a wild swindle...or perhaps a cute joke. 36. RxB
click for larger viewNow comes Marshall's counter-attack:
36... Ra1+
37. Kh2
37. Kf2 Rf1+ 38. KxN RxQ 39. Rd8+ also wins. But Marco revealed a different way to win. 37... Nf1+

click for larger view38. QxN!
Neat!
38... RxQ
39. Rd8+

click for larger viewThe game looks clearly open, but Marshall had a final joke up his sleeve: 39... Rf8?!

click for larger viewChecking to see if Marco was asleep.
40. exR(Q) Checkmate !! |
|
|
|
|


