| Dec-22-05 | | Benzol: Would 16.♘c3e2 have been a better defence than 16.exd5? |
|
Jun-03-11
 | | GrahamClayton: 20...♗g4! is a problem-like move, answering the threats of 21. ♘xd7 & 21. ♕xh4. |
|
Sep-04-20
 | | Sally Simpson: ***
I used this game in a recent article for CHESS suggesting that when a non-chess player asks you how many moves does a good player see ahead. You show them this game and after 11...a5
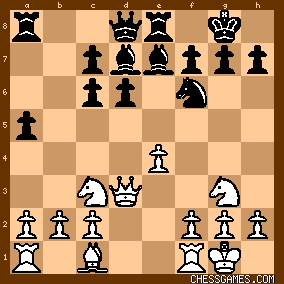
click for larger viewsay Black now had it all worked out to here.

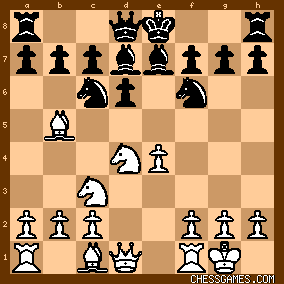
click for larger viewAnd if 26.Kc4 then 26...Qb4 mate. That is why Black played 11...a5 I added that mon-chess players deserve being made fun of for asking such stupid questions. *** |
|
Aug-28-21
 | | KEG: The main (and perhaps only) interest in this game between two also-rans at Monte Carlo 1902 (Napier finished 11th out of 20 and Mason finished 13th) lies in Mason's 14. Nxh2?! Even from a theoretical perspective, the move was not as bad as it has been described. As I will attempt to show, Mason was not lost after playing this (admittedly not fabulous) move. His bigger mistakes were 16...Bc5? and 18...Qh4? After the latter move, Mason was definitely lost (with best play, that is). In practice, the move was tough to meet over the board, and Napier got confused in the complications and (missing Mason's highly clever 20...Bg4!) threw away his advantage with 20. Nc5? and blundered away the game with 23. RxN?? This game is not one for purists. But it is fun to play over could probably be used in an intermediate course on tactics. 1. e4 e5
2. Nf3 Nc6
3. Bb5 Nf6
The then popular Berlin Defense makes another appearance. It later lost favor and 3...a6 became standard until Kramnik used it successfully in his 2001 match against Kasparov. 4. 0-0 Be7
4...Nxe4 was Kramnik's move. The text is not as good, but it's definitely playable. 5. Nc3 d6
6. d4!
White now has much the better game.
6... exd4
7. Nxd4 Bd7
click for larger view8. BxN
Hardly best. He could have played 8. NxN BxN 9. Qd4 0-0 10. BxN bxB 11. Qa6 with some pressure. The immediate trading off of White's light-square Bishop (giving Black, among other things, the two Bishops) has little to recommend it. 8... bxB
9. Nde2
White was still slightly better before this move which is far too slow to be useful. Napier might have tried 9. Re1 or 9. Qf3 or even 9. h3. 9... 0-0
10. Ng3 Re8
11. Qd3
A further over-refinement. 11. Re1 or 11. b3 or even 11. h3 were slightly better. 11... a5
12. b3 Bf8
13. Bb2

click for larger viewSo far, not a terribly interesting game. Chances were roughly equal. Mason here might have tried to create some action with 13...h5 or maybe 13...c5. Instead, he decided to pursue a questionable plan that gave this game what interest it holds. 13... Ng4?!
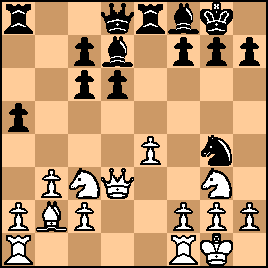
click for larger view14. f3
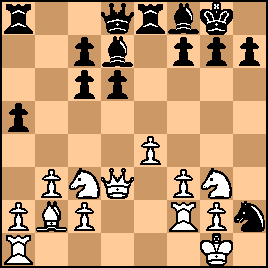
Hoffer gave 14. f4 Qh4 15. h3 as an option. But Black would likely not have cooperated and instead probably have played 14...d5! after which 13...Ng4?! wouldn't have seemed bad at all since now Black would definitely have been better. The text was hardly bad, though 14. h3 may have been slightly more accurate. In any case, White's best idea was to chase the Black knight. The position after 14. f3 was:

click for larger viewBeginning here, the fun begins. |
|
Aug-29-21
| | KEG: Post II
14... Nxh2?!
"Unsound. The Knight should remain imprisoned and would eventually be lost." (Hoffer) Actually, it's not that simple. Even with best play (not easy to find over the board), Black would end up with compensation even if some material is lost. In some variations, as will be seen, Black loses a piece for two pawns and some pressure. In another, he loses the exchange for a pawn and, again, some pressure. In sum, the text is theoretically inferior--though far from losing. In over the board play, all the tricks and traps ahead for White make this a reasonable practical choice. 15. Rf2
Obviously 15. KxN? loses to 15...Qh4+ 16. Kg1 QxN leaving Black up a pawn with a dangerous attack to boot. As I said, this line is tricky. The text was the only move to retain an advantage for White. After 15. Rf2, the position was:
click for larger view15... d5!
Mason might also have survived with 15...Qh4, but the text--which among other things released the f8 Bishop for attack--was Black's best chance. 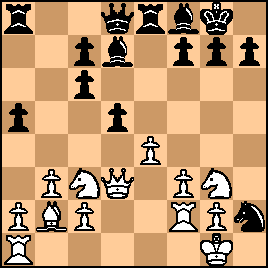
click for larger view16. exd5
Both Hoffer claimed that 16. Nce2 was correct. <Benzoi> on this site in 2005 on this site also suggested considering 16. Nce2. In fact, text leaves White with the better game, but almost certainly not with a win, while 16. Nce2 leaves White with no advantage, play would probably have proceeded: 16...Qh4 (the somewhat inferior 16...Bc5 17. Bd4! Bd6 18. e5 Bxe5 19. BxB RxB 20. KxafterN leaves White up a piece for two pawns but with Black still having attacking chances) 17. exd5 Bc5 18. Bd4 Bd6 19. dxc6 Bc8 20. Ne4 Bf5 21. Qc4 BxN 22. fxB Qh5 23. Rf5 Qg6 after which White's extra doubled pawn is useless. All in all, and contrary to prior analysis, Napier's 16. exd5 was best. The position now was: 
click for larger view16... Bc5
Strong as this looks, it made Mason's position precarious. Correct and probably saving the day for Black (though he might well also have survived after the text) was 16...Qh4 e.g., 17. dxc6 Bxc6 18. Nce2 (this move is not best here and the only chance for White to keep any advantage) Rad8 19. Qc3 Re6 20. Nf5 (forced) Qg5 (forced) 21. Ned4 Nxf3+ (forced) 22. NxN QxN 23. Nd4 Qd5 (or 23...Qe5) 24. NxR QxN leaving Black with a pawn for the exchange and some remaining attacking chances. Thus, 16...Qh4 would probably have allowed Mason to save the game. But matters were more complicated for him after the text, which left: 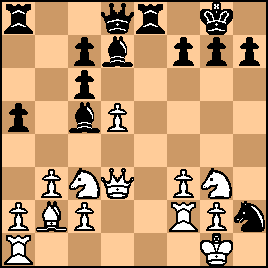
click for larger view17. Nce4 BxR+
18. KxB
Of course not 18. KxN Qh4 mate.
After 18. KxB, the position was:
click for larger viewAn interesting position!!
Can this White win from here with best play on both sides. Given all the upcoming mistakes by both sides (and by the commentators!), what followed most certainly did not answer this question. |
|
Aug-29-21
| | KEG: Post III
18... Qh4?
A tricky line that might have cost him the game. After extensive analysis and after allowing Fritz and Stockfish to conduct deep searches, it remains unclear whether White can win with best play. Black's best chances here lay in 18...24; 18...cxd5; or 18...f5. These are all complicated lines, and in each case Black would at the very least be on the brink of defeat. After the text, however, it looks clear that--with best play (tough as that would be to achieve over the board in this complicated position--White should now win. 19. Qd4!
This mating threat forces Black to weaken his position in one way or another. 19... f6
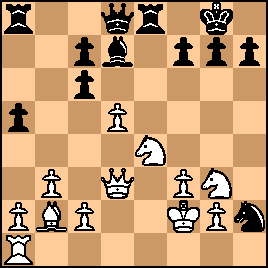
Almost certainly best. It left the position as follows: 
click for larger view20. Nc5?
This weak move turned the table completely. Now, it is White who must fight to survive. The winning move was 20. Rh1! (e.g, 20... Ng4+ (the best try) 21. fxN Qxg4 22. dxc6 after which White--with Knight and Bishop for Mason's extra Rook--should probably ultimately win). But after 20. Nc5?, the position was:
click for larger viewBlack can now seize the edge, but the correct move is hard to find. To Mason's credit, he found it over the board: 20... Bg4!!
"A problem-like move, but the only one to save the game." (Hoffer). "A problem-like move answering the threats of 21. NxB and 21. QxQ." (<Graham Clayton>). Black can also survive with 20...Nxf3 21. QxQ NxQ 22. NxB cxd5 23. Bxf6 gxB 24. Nxf6+ Kh8 25. NxR RxN after which Black should be able to hold the Rook and Knight ending. But the text if far better, and gives Black much the better chances--not to mention creating all sorts of tactical problems for White to solve. 21. Rh1
Too late! It was, however, the only move that gave Napier chances to save the game. 
click for larger view21... Re2+
The only move to keep the pressure on White.
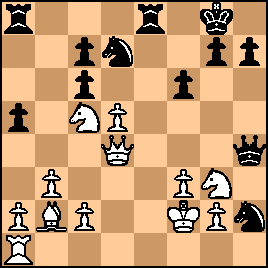
22. KxR QxN

click for larger viewAlthough not noted by any of the commentators, this was the crucial position and Napier's last chance to save the game. 23. RxN?
Now, the game was lost. The saving move was 23. Rg1! After the text, the position was:

click for larger viewAs Hoffer correctly stated, from here the game is "won by force" by Black. I will attempt to confirm this in my next post on this game. |
|
Aug-29-21
| | KEG: Post IV
23... Re8+
White is busted.
24. Kd2?
Napier was lost anyway, but this only made Mason's task earlier. If he wanted to play on, 24. Kd3 or 23. Ne4 were the best (though likely hopeless) tried. 24... Qe1+
25. Kd3 Bf5+
26. Kd3
If 26. Kc4 Black finished with 26...Qb4 mate.
After 26. Kd3, the position was:

click for larger view26... BxN+
This ultimately wins, but the real killer was 26...Qg3! (perhaps a tough move to calculate and play over the board) Black then wins after 27. Rh3 (27. Rh1 RxN 28. QxR BxQ+ 29. KxB Qg6+ 30. Ke3 Qxc2 31. Ba1 cxd5 or 27. Rh5 BxN+) Qxg2 28. Rh4 Qg3 etc. 27. fxB Qg3+

click for larger view28. Kc4?
If Napier wanted to play on, he had to try 28. Qe3, though his chances even then would be dismal. 28... QxR
29. dxc6 Qxg2
30. Qd5+ Kh8
31. Kd3 Qf3+

click for larger view32. Kd4?
This is suicide. But even the "better" 32. Kc4 held out little hope after 32...Qe2+ . 32... Qd1+
This works, but 32...h5 was the real killer.
But this all made no difference since Napier had seen enough. Resigns |
|
|
|
|


