Jul-15-18
 | | KEG: This draw between two also-rans at Munich 1900 has points of interest. An approximately endgame is reached by move 20. When Wolf presses too hard to seek a win, he loses a pawn but reaches a Bishops of opposite colors ending that he should have been able to hold. But some inaccurate play gives Halprin chances which he fails to exploit fully. When Wolf fights back gamely and seems about to survive, Halprin responds with a pretty exchange sacrifice that --though theoretically only good for a draw--gives him practical chances. When Wolf errs, Halprin is close to victory, but when he gives Wolf a chance the latter springs a cute combo of his own and is able to reach a drawn position. I tried to consult Fritz and Stockfish on this interesting ending, but their respective analyses were not only inconsistent with each other but internally inconsistent themselves (e.g., in one position, Fritz rates the game as 0.00 if Black plays as suggested but then rates the position as winning for White after Black made the suggested move). Simply put, this kind of endgame seems to befuddle many computer programs. 1. d4 d5
2. Nf3 Nf6
3. e3 e6
4. Bd3 c5
5. b3
Halprin apparently sought no more than equality from the opening. 5... Nc6
6. Bb2 Bd6
7. Nbd2 Qc7
Unlike Halprin, Wolf courts trouble by seeking complications. 7...cxd4 or 7...0-0 were more solid and sufficient for equality. 8. c4
8. dxc5 was much better and would have given Halprin the better game. The text allowed Wolf to equalize. 8... cxd4
9. exd4 b6
10. 0-0 0-0
11. Re1 Bb7
12. Rc1 Rad8
12...Ee7 or 12...Rac8 were slightly better, but Wolf is still OK. 13. Ne5!
This Pillsbury-like move gives White some chances. 13... dxc4
14. Ndxc4 Bb4
15. Re3
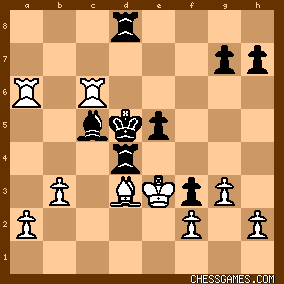
The position was now:
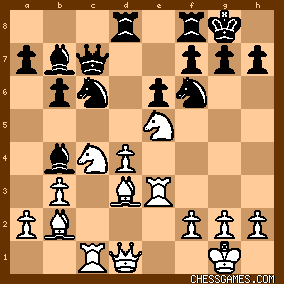
click for larger viewHalprin will has somewhat the better of the contest, but Wolf's position is hardly in critical condition. But here he tried to mix it up and got into trouble. 15... b5?!
15...g6 was the safe and solid choice for Black. But Wolf wanted complications, and he certainly gets them. 16. Na3
16. Nd2 would have given Halprin a fine position, but 16. d5! may have been Halprin's best chance to punish Wolf's temerity. 16... a6
Wolf's only chance here, but probably good enough to keep him in the game. 17. Qc2?
With one move, Halprin ruins his chances and gives Wolf the advantage he had been seeking. Halprin would still have had good chances with 17. Rh3 or even 17. NxN 17... Qd6
Wolf should have seized the chance to stock up on the c-file with 17...Rc8. After the text, Halprin is OK again. Halprin leaps at the chance to exchange down to an even ending. 18. NxN BxN
19. QxB BxN
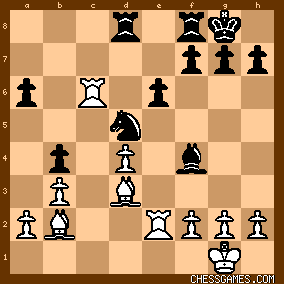
20. QxQ BxQ
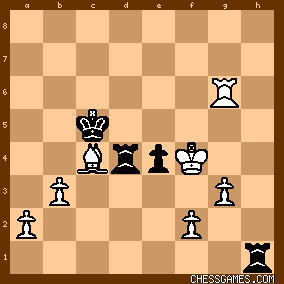
This left:

click for larger viewThis ending is about even. White has the two Bishops but has an isolated d-pawn. An early draw looked likely. But Wolf was still playing for a win, and--as I will discuss in my next post on this game--courted disaster. |
|
Jul-15-18
| | KEG: Post II
21. Rc6
Given the exposed position of the White Rook on e3, 21. Ree1 should be considered. 21. g3 is another reasonable possibility for White here, avoiding all possible back-rank mating ideas. 21... Bf4
The Bishop was well-posted. If Wolf wanted to chase White's Rook, 21...Nd5 immediately was better. 22. Re2 Nd5
23. Ba3
Allows b4 with gain of tempo, an opportunity Wolf seized. 22. a3 was better. 23... b4
24. Bb2
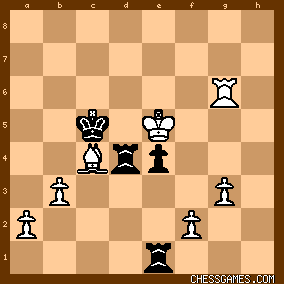
The position now was:
click for larger viewThere is plenty of play for both sides in this approximately even position. But here Wolf miscalculated and lost a pawn: 24... Nc3?
25. BxN bxB
26. Rxc3 Rxd4?
Did Wolf realize when he went down this rabbit-hole that his a-pawn was hanging? Or did he miss Halprin's pretty intermediate move (27. g3!)? IN any case, there was still time to avoid giving White two connected passed pawns by playing 26...a5 here and then going after White's isolated d-pawn. 27. g3!
Perhaps this was the move Wolf overlooked. This eliminates any back-rank mating threats and allows White to win the Black a-pawn in comfort. 27... Rfd8
Since White's King now has an escape square on g2, this move is no longer much of a threat to White, who can simply snatch the a6 pawn. 28. Bxa6
This left:

click for larger viewIs this position a win for White? White has an extra pawn, including two passed pawns on the Queen-side, but these sorts of Bishops of opposite color ending are always hard to win. By any reckoning, this is a difficult endgame. Neither side played it to best advantage. 28... Bd6
28...Bd2 would present more problems for White. After the text, White's road seems clear: passed pawns must be pushed. If there was a win here for White, it surely lay in advancing his two passed pawns on the Queen-side. Yet, amazingly, neither of these pawns moved from their current locations until move 68 (by which time the game was a dead draw). Incredible! 29. Rec2?
Black's threat of Ba3 (tying up the two passed pawns) looks obvious. 29. a4! was thus clearly best. But, as noted above, the a-pawn remained sitting on a2 for the next nearly 40 moves! 29... Kf8?
Missing the seemingly obvious 29...Ba3
30. Kf1?
Again failing to play 30. a4, and again allowing Ba3. 30... Ke7
Again failing to play Ba3 (or perhaps 30...Bb4 first) and again allowing White to achieve a likely winning position with 31. a4. 31. Ke2?
Yet again failing to advance his a-pawn.
31... e5?
Once again missing the chance to play Ba3, and creating new weaknesses in in his position. The position was now:
click for larger viewI will cover the next chapter in this endgame saga in my next post on this game. |
|
Jul-15-18
| | KEG: Post III
Thus far, Halprin had hardly distinguished himself in this ending. But he was still a pawn ahead and still had his two passed pawns on the Queen-side. After Wolf's last move (31...e5?), Halprin most definitely still had winning chances. 32. Rc6
Again declining to play a4, but the text has its points as well. 32... Rb8?
Another bad (and pointless) move by Wolf. He should have played for complications with 32...Bb4 (threatening Rd2+) or perhaps tried an immediate 32...f5. Absent some sort of counterplay, Wolf seemingly must lose. 33. R2c4
Chasing away Black's Rook from d4 has its points, but 33. Bc4 seems best. 33... Rd5
The alternative was to trade Rooks. Neither option was all that appealing, but the text was probably the lesser of two evils. 34. Rc3
A good spot for the Rook, and making c4 available for the White Bishop. 34... Kd7
More questionable play by Wolf. 34...Bb4 or 34...Ba3 were better. 35. Bc8+
This does not seriously imperil White's winning prospects, but why not 35. a4, of perhaps--if Halprin believed it sinful to push the a-pawn--35. Bd3? 35... Ke7
36. Ra6?
Still messing around. 36. a4! was surely (still) the road to victory. 36... Bb4
The alternatives were 36...Bc5 or 36...Rc5. The text looks as good (or bad) as anything. Despite all his dithering, Halprin still probably had a won game. 37. Rc4 Bc5
38. Bf5
Alternatively, he could have tried 38. Rc6.
38... Rbd8
39. Rc2 Bd6
Another weak effort by Wolf. 39...R5d6 was the best try. 40. Ra7+ Kf6
41. Be4 Rd4
42. Ke3 Ke6
43. Rc6
The position was now:
click for larger viewThe play by both sides in this endgame thus far had been spotty, sloppy, and uninspired. But, as I will discuss in my next post on this game, it was here that Wolf appeared to wake up and try an active defense that led Halprin to seek a win through a creative sacrifice of the exchange. |
|
Jul-15-18
| | KEG: Post IV
After seemingly playing in a fog in this endgame, Wolf suddenly came to life with: 43... f5!
A go for broke counter-attack. I love it!
As I perhaps should have noted, Black's pawn at h7 was not truly hanging for the last several moves since Wolf could have played g6 after Bxh7. After the text, however, Wolf does (intentionally) hang his h7 pawn as he hunts for bigger game. Wolf's 43...f5 may not necessarily save the game, but it does create serious complications and makes Halprin sweat a bit. 44. Bd3
44. Bc2 (to get the Bishop out of the range of the oncoming Black pawns) was better. 44... Kd5
The alternative was an immediate 44...f4+, but Wolf quite reasonably brings his King to join the counterattack. 45. Raa6 f4+!
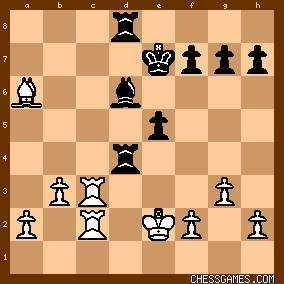
The position was now:

click for larger view46. Ke2!
Suddenly Halprin has to play with care to stay out of trouble. If 46. gxf4? exf4+ 47. Kd2 [not 47. Ke2? f3+ 48. Kd2 Bb4+ with a likely draw for Black] f3! and Black is very much back in the game. The text was the only way for Halprin to continue to play for a win. 46... f3!
Going for broke, and creating fascinating tactical possibilities. 47. Ke3
Once again, the only chance for Halprin to seek to win. 47... Bc5
Damn the torpedoes! Wolf throws the kitchen sink into his attack, and lets his h7 pawn hang. The position was now:
click for larger viewDare Halprin take the h7 pawn?
48. Bxh7
He does. The (arguably better) alternative was 48. Bf5. 48... Rf8!
Facing scary discovered checks by Black and a monster enemy pawn on f3, Halprin tries a brilliant stroke to turn the game back in his favor. 49. RxB+!
Getting rid of the pesky Black Bishop.
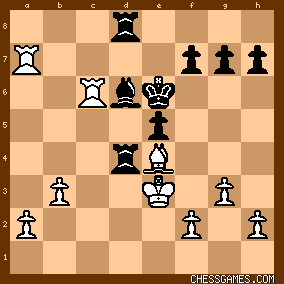
49... KxR
This left:

click for larger viewPractically a new game! For the sacrificed exchange, Halprin has two connected passed pawns and the chance to hunt the three weak Black pawns. Halprin still had the better chances, but at this stage Wolf certainly had his chances. In my next post on this game, I will discuss the manner in which Wolf now went astray and how Halprin converted his new opportunities into what should have been a win. |
|
Jul-15-18
| | KEG: Post V
Halprin stood better after his exchange sacrifice, but how should he try to convert his advantage. 50. Re6
This can't be right. There were two plans with prospects of success: (A) 50. Be4 (targeting Black's f3 pawn); or (B) 50. Bd3 (preparing to support an advance of his two passed Queen-side pawns). The text, by contrast, gave Wolf a chance at forceful counterplay. 50... Kd5?
This ain't it. Wolf should have targeted the White pawns with 50...Rd1! (though this involves the loss of his own e and f pawns). 51. Re7 g5
52. Bd3
Now Halprin's Bishop is in place to support a Queen-side pawn march, while Wolf has little immediate counterplay. 52... Rf6?
Come what may, Wolf had to try 52...g4. Halprin now nixes that plan. 53. h3!
The position was now:

click for larger viewBlack's pawns must now fall while White's Queen-side pawns are (yet again!) ready to march. Halprin should now surely have been able to win. 53... Rh6?
This only makes matters worse. 53...Kd6 or 53...Kc5 were the only (slight) legitimate chances. But now, with a series of very poor moves, Halprin throws away the win that was now within his grasp. 54. Rg7
This certainly did not throw away Halprin's win, but 54. Bc4+ would have left Wolf with little to play for. 54. Re8 was also very strong for White here. 54... Rxh3
Having said A he might as well say B, though his game is now in the last throes. 55. Rxg5
There was no hurry to grab this pawn. 55. Bc4+ was again best and crushing. 55... Rh1
Pressing ahead with what should have been a doomed plan. 56. Bc4+ Kd6
57. Rg6+ Kc5
This left:

click for larger viewHalprin now has a win with 58. a4! But, instead, he decides to grab Wolf's f-pawn first. 58. Kxf3?
Giving Wolf a new lease on life. It is now doubtful that White can win. One thing is for sure, Halprin gave himself no real chances from this point as the game drifted towards a draw. 58... e4+!
Did Halprin really miss this move?
59. Kf4
The position was now:
click for larger viewIt now appeared that Wolf would be able to save the game. But, as I will discuss in my next post on this game, there will still several ups and downs to follow before the game came to its conclusion. |
|
Jul-15-18
| | KEG: Post VI
59... Re1
This effort to maintain the Black e-pawn is destined for failure. By contract, 59...Rd2 gave him good chances to gobble enough White pawns to save the game. 60. Rg5+
60. a3 was the only winning line for Halprin here. 60... Kd6
61. Rg6+ Kc5
62. Ke5?
This overlooks Wplf's pretty drawing line and extinguishes Halprin's last chance to win. He had to play 62. a3. The only other move that would allow White to retain any edge here was 62. f3. The position was now:
click for larger viewBlack to play and draw:
62...e3!
The Tournament Book assigns "!" to this move, and I heartily agree. 63. fxe3
Halprin had no choice. If 63. f4?? RxB! 64. bxR e2 and Black wins! 63... Rxe3+
64. Kf6
64. Kf5 also gets White nowhere. Now Wolf has an easy draw, the position being: 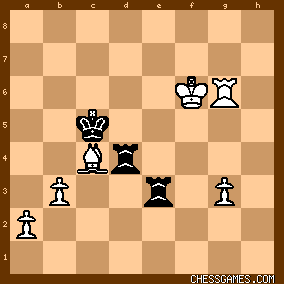
click for larger view64... Rd6+
65. Kg7 RxR+
66. KxR Rxg3+
This left:
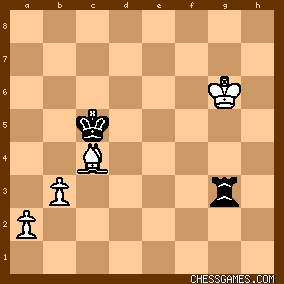
click for larger viewThis is now a clear draw once White plays a4. White cannot make progress, and Black can always draw by playing RxB followed by the capture of both remaining White pawns. 67. Kf5 Re3
68. a4
This pawn, which Halprin could have advanced successfully more than 40 moves ago now at last stirs only when all prospects of victory had evaporated. 68... Kb4
69. Be6 Kc5
70. Bc4 Kb4
71. Be6 Re1
72. Kf6 Ra1
1/2 -- 1/2 |
|
Jul-19-18
 | | offramp: User: KEG, I’ve got to say, I love every one of your posts. |
|
Jul-19-18
| | KEG: <offramp> I am glad (and flattered) that you enjoy my comments. Thank you! I enjoy analyzing games from a specific period and working hard to learn the players and the styles of that time. The chance this site offers to read the views of others on these games (especially knowledgeable players like you) is a great joy for me. |
|
| Jul-19-18 | | morfishine: User: KEG I much agree with <offramp> <KEG> You really should consider opening your forum for discussion since your analysis is so instructive and well thought out and at the very least, select an avatar!
best, morf |
|
Jul-19-18
| | KEG: <morfishine> Thank you for your kind comments. My computer skills are so feeble and my experience on sites such as this one is so limited that must confess that I do not know that opening a forum for discussion means. I had thought that my posts were already open for discussion. I will look into this further. Thank you for alerting me! As for selecting an avatar, I haven't come up with any great ideas. But I will think about this again. Thank you for reminding me about this. |
|
|
|
|


