|
< Earlier Kibitzing · PAGE 1 OF 3 ·
Later Kibitzing> |
| Dec-03-06 | | acirce: Tseshkovsky resigned in a drawn position.
Position after move 89:
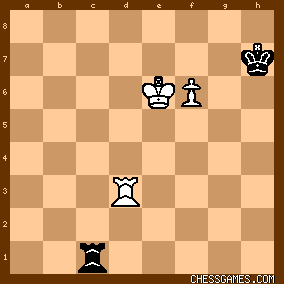
click for larger view90.Rh3+?? threw away an elementary win with 90.f7 Re1+ 91.Kf6 Rf1+ 92.Ke7 Re1+ 93.Kf8 reaching the Lucena position, or 90..Rc8 91.Ke7 Rc7+ 92.Rd7. After White removes his rook from the d-file the latter defensive attempt actually works: 90.Rh3+?? Kg6 91.Rg3+ Kh7 92.f7 Rc8! 93.Ke7 Rc7+ 94.Ke8 Rc8+ 95.Kd7 Ra8= (or ..Rb8=) |
|
| Apr-16-09 | | DoctorChess: 2nd!:) |
|
| Apr-16-09 | | EyesofBlue: So what's black's best move? (This game just ends with white winning?) |
|
Apr-16-09
 | | chessgames.com: 91...Kh7! is the only move that draws. |
|
| Apr-16-09 | | dumbgai: The solution to today's puzzle is...RESIGN! ;-) |
|
| Apr-16-09 | | shortsight: Funny, I picked 91...Kh7, but I couldn't exactly see why! |
|
| Apr-16-09 | | dzechiel: Black to move (91...?). White is up a pawn. "Medium" OK, black has only three legal moves:
- 91...Kh5
- 91...Kh6
- 91...Kh7
If this was my game I'd play
91...Kh7
This puts me closer to white's 8th rank with possibilities of blockading the f-pawn if the white rook abandons the g-file. I don't see any immediate stalemate threats here, but white will have problems advancing the pawn due to checks from the black rook. Time to check and see how this played out. |
|
Apr-16-09
 | | Jimfromprovidence: In this position, move 91 with black in check, white wants to play f7 followed by the threat of Rg8 after black's king moves to either h5, h6 or h7.
click for larger view91...Kh7 is the only move that prevents white from being able to play his rook to g8 after 92 f7.

click for larger viewNow the position looks drawish after 92…Rc8. |
|
| Apr-16-09 | | SamAtoms1980: I picked 91 ... Kh7 but after 92 f7, I looked for a stalemate which is a non-starter. The truth of the matter is that 92 ... Rc8 stops the promoting pawn straight up. |
|
| Apr-16-09 | | zooter: Continuing our stalemate motiff of the week, I'd go with 91...Kh5 and if the f-pawn becomes a queen with the same exact position then I have an opportunity to be stalemated, but however there seems to be multiple variations now and I'm not entirely sure of the continuation |
|
| Apr-16-09 | | zooter: bummer, I had to pick the losing move..! |
|
| Apr-16-09 | | soverink: I'm glad this time puzzle involves some basic endgame motifs, which are by no means clear even for greatest players, despite being analyzed in XIX century. For me, it was obvious that Black King has nothing to do on the greener pastures, and it belongs to 8 rank, as White Pawn lusts to run forward. I only had some doubts if it can be finally stopped. However, anyone who has similar doubts shall follow Tartakower's suggestion: "Noone ever won the game by resigning." |
|
| Apr-16-09 | | BraveUlysses: Hmm, pretty obvious lost position for black... 91....resign! Simple and best. |
|
| Apr-16-09 | | Once: I think we have at least three puzzles in one today. So apologies for a long post. The first puzzle is to realise that black has drawing chances here, so he should not resign. The second puzzle is to pick the best move from black's three possible king retreats. It should not be too hard to spot that 91...Kh7 is the best, because the others all lose. We can pick this move on general principles, because the king should stay as close as possible to the queening square. Or we can pick this move on specific variations, eg to work out what white will want to do in order to win. White needs to queen the f pawn. But he cannot simply march it up to f8 because black will defend by constant rook checks - eg Re1+, Rd1+ or Rc7+, Rc8+ and a draw by perpetual check. Or black will plonk his rook on the back rank so that he can recapture any new queen. So one requirement for white is to park his king on an uncheckable square so that he can play f8=Q without workplace harassment by the black rook. The other thing white needs is to defend the queening square with king or rook so that f8=Q cannot be prevented. After 91...Kh6? or 91...Kh5? White's choice of winning strategy will depend on how black defends. If black goes for the constant long checks, white will find an uncheckable square on g8. eg 91... Kh6 92. f7 Re1+ 93. Kd7 Rd1+ 94. Ke7 Re1+ 95. Kf8 Kh7 (other moves also lose) 96. Rh3+ Kg6 97. Kg8 
click for larger viewWhite has reached endgame nirvana. His f pawn is about to queen and his king is on the uncheckable g8 square. Even is black could play something like Ra8+ white would win with f8=Q. The other key variation is what to do is black stops the king from getting to g8 by checking along the c file. Then we might get something like this: 91...Kh6 92. f7 Rc8 3. Rg8 (the key move which will force f8=Q) Rc6+ 4. Kd5 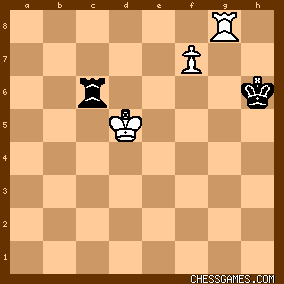
click for larger viewAnd we have reached a different nirvana. f8=Q cannot be prevented and the king is again on an uncheckable square. In either case, g8 is the crucial square and black loses because he cannot defend it with his king. So 91...Kh7 has to be the move because Kh6 and Kh5 do nothing to control g8. In reality, most players should be able to play 91...Kh7 with very little thought because it is clearly the move that black's position requires. The third and hardest part of the puzzle is to prove that 91...Kh7 draws. And that will have to wait, cos now I need to go to work. More later. |
|
| Apr-16-09 | | FHBradley: There's a stalemate motiff in this end-game as well. After, say, 92 f7 Rf1 93 Rg8 Re1+ 94 Kd6 Rf1, only 95 f8R wins, as after 95 f8Q the black King is stalemated. |
|
| Apr-16-09 | | Samagonka: To resign or not to resign, that's the question here. |
|
| Apr-16-09 | | ambe: after 92) f7 Rc8 what if 93) f8=R isn't this a win for white ? |
|
| Apr-16-09 | | whiteshark: 91...Kh7= is a <Lucena position>. |
|
Apr-16-09
 | | Honza Cervenka: This is basic rule of K+R+P vs K+R endings worth to remember. If defender doesn't control a field of promotion, then he should keep at least his King on "shorter" side of board (counting from column with opponent's pawn) and Rook on the "longer" side far away from opponent's King (due to possibility to give checks from side without harassment of opponent's King which must protect the Pawn as well). Quite interesting and instructive here is the fact that if final position from this game would be shifted one column to the left, then black would be lost, while if the black Rook would be in such a case on a1 instead of b1, the position would be drawish. |
|
Apr-16-09
| | Honza Cervenka: Here is some instructive material for study:
Black to move, white wins:

click for larger view1... Kg7 2. e7 Rb8 (Unfortunately for black, his Rook is not far away enough from white King to check him freely from side. It seems to be no problem at first glance but in fact white has devilish winning shot in store) 3. Kc7 Ra8 4. Ra3!! (That's the winning blow.) 4... Rh8 (or 4... Rxa3 5. e8=Q  ) 5. Kd7 Kf7 6. Rf3+ Kg7 7. e8=Q etc. ) 5. Kd7 Kf7 6. Rf3+ Kg7 7. e8=Q etc. Black to move draws:

click for larger viewIt is quite easy here: 1... Kg7 2. e7 Ra6+ (Only but sufficient.) 3. Kc7 (3. Kc5 Re6 =) 3... Ra7+ 4. Kd8 Ra8+ etc. In actual game the winning trick from diagram 1 doesn't work because black Rook has enough space on the "longer" side of board to escape King's and Rook's harassment: 91... Kh7 92. f7 Rc8 93. Kd7 Ra8 94. Ra3!? Rb8! (The only move here) 95. Rb3!? Ra8! etc. White can try it but black has always sufficient resources for successful defence here. |
|
| Apr-16-09 | | Hortensius: Draw is not obvious to me... |
|
| Apr-16-09 | | agb2002: Black needs to control g8 (to avoid an eventual Rg8 or Kg8) and check the white king along the last ranks. 91... Kh5 92.f7:
A) 92... Rc6+ 93.Kd7 Rf6 94.Ke7 + -.
B) 92... Rc8 93.Rg8 + -.
C) 92... Rf1 93.Ke7 Re1+ 94.Kf8 Ra1 95.Kg8 + -.
91... Kh6 92.f7:
A) 92... Rc6+ 93.Kd7 Rf6 94.Ke7 + -.
B) 92... Rc8 93.Rg8 + -.
C) 92... Rf1 93.Ke7 Re1+ 94.Kf8 Kh7 (94... Ra1 95.Kg8 + -) 95.Rh3+ Kg6 96.Kg8 + -. 91... Kh7:
A) 92.f7 Rc8
A.1) 93.Rf3 Kg7 94.Rg3+ Kh7 =.
A.2) 93.Ke7 Rc7+ 94.Ke8 Rc8+ 95.Kd7 Ra8 =.
A.3) 93.Kd7 Ra8 94.Ra3 Rb8 =.
B) 92.Rg7+ Kh6 93.Rd7 Kg6 94.f7 Re1+ 95.Kd6 Rf1 =.
C) 92.Ke7 Rc7+ 93.Ke8 Rc8+ 95.Kd7 Ra8 =.
Let's see. |
|
| Apr-16-09 | | Manic: To add to what <Honza> is saying above, the basic rule for checking from the side in this type of endgame is that your rook needs to be at least 3 files away from the file the pawn is located on. Note in <Honza's examples> the first example has the rook only two files away and the second has the rook 3 files away. This rule also applies to the "frontal attack" defensive principle where if your king is cut off from getting in front of the pawn by 1 file your rook must check from in front of the pawn. |
|
Apr-16-09
| | Honza Cervenka: <Hortensius: Draw is not obvious to me...> Well, I guess that with Vitaly Tseshkovky and maybe Gyula Sax as well you are not in such a bad company...;-D |
|
| Apr-16-09 | | Once: <whiteshark: 91...Kh7= is a Lucena position.> Don't think so. In a Lucena position, the player with the pawn wins... For my money, this is a variation of the Philidor draw. |
|
 |
|
|
< Earlier Kibitzing · PAGE 1 OF 3 ·
Later Kibitzing> |


