PawnSac: In this position black played 24...Ra5?!

click for larger view< Fusilli: It's true that the Ra5-b5-b3 maneuver risks leaving that rook stranded, > ..and the back rank weaker. My instinct was ..Rad8 to trade off a pair of rooks (if Rxd8 ..Bxd8 preserves the B), and bring the king forward on the light squares. Stockfish also considered ..Rad8 up to 40ply, but then switched to < 24. ..Bd8 > We humans don't like to block connected rooks, and K-side defense is a little sparse, so tend to frown on moves that optically looks uncoordinated. However, the Stockfish strategy to rotate the Nc6-e7-g6 where it pressures the dark squares and is also a good blockade, is very logical. So after < 24. ..Bd8 25.Ng2 Ne7 26.h4 Ng6 27. Rfe1 > we have this position with black to move : 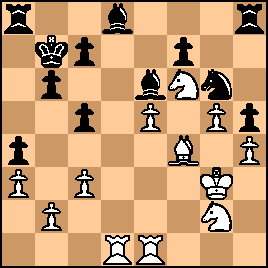
click for larger viewThis is more solid defense; a lot less double edged than the game. In this position, 27. ..Nxf4 allowing 28.Nxf4 is a mistake, as white can get very active on the K-side again. For example; If black tries to preserve his bishop with ..Bb3 then N6xh5! Bxd1 Rxd1 and white's pawns are very dangerous, eventually winning material. 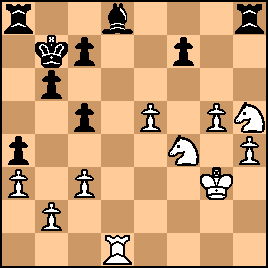
click for larger viewWhite can bring his king up and start a pawn push with excellent winning chances. After ..Kc6 (to stop Rd7) Kg4 white can plop his Nh5 back on f6 and start pushing h5, g6, etc. Back to diagram 2
click for larger viewThe N is strong on g6 as white has no LSB, so it's better to keep the position contained, and make white consume time to rotate his pieces and force the trade with his own knight. Black can use that time to bring his K to a better position. His only problem is that the rook is tied down to the defense of the H pawn, but after ...Bxf6 exf6 the rook is free and blacks K-side is barricaded. So from diagram 2, the continuation is 27. ..Bxf6 28.exf6 Bb3 29.Rd3 Kc6 30.Bc1 Rae8 31.Rxe8 Rxe8 32.Nf4 Nxf4 33.Bxf4 Bc2 34.Rd2 Bg6 35.Kf2 is perfectly equal (0.00) 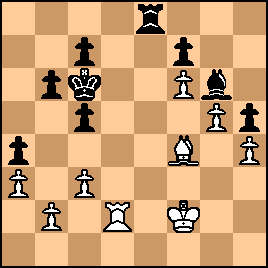
click for larger view | 


