| Feb-20-18 | | Serpentin: Marshall est tres chanceux de s'en tirer avec une partie nulle. Apres 11...Cc5 12.Fxh7 gagne tout simplement un pion en récupèrant le Cavalier en c5. Marshall joue activement pour contrebalancer et en amenant la partie dans une finale de tours ou ce sont les noirs qui attaquent! |
|
Jun-10-20
 | | KEG: Marshall and Janowski had a long rivalry over a period of decades. Overall, excluding speed/rapid contests and simultaneous exhibitions, Marshall and Janowski squared off 80 times, including four matches. Their games were often quite exciting, especially since they were both aggressive tactically-oriented players. As of the time of this 1901 game (and notwithstanding Marshall's strong showing at Paris 1900), Janowski was much the stronger player. In their classical games up to this point Janowski enjoyed a 4-1 edge (including his win against Marshall at Paris 1900). As of the time of this 11th round game, Janowski was leading the field (1/4 of a point ahead of Schlechter under the scoring system being used in this tournament). Through the first 10 rounds, Janowski was the only player without a draw (having won eight and lost two). This stood him well, since draws had to be replayed. Accordingly, Janowski had played the fewest games to this point. By contrast, Marshall had drawn a bunch of games and had won only once. He stood in 12th place out of 14 competitors going into this round (and ended up in 10th place by winning his games in Rounds 12 and 13, the latter by forfeit). Janowski certainly tried to avoid a draw here. Even when a level Rook and Pawn ending was reached, he played recklessly ("feebly" is the word used by the Tournament Book) and got into trouble on more than one occasion. The game eventually reduced to an "ending" in which Marshall had Queen and Knight Pawn against Janowski's Queen. This is a theoretical draw, but Marshall prolonged the game for almost 40 moves attempting to find a way to win. Remarkably enough, this 105 move game was nowhere near the longest game played in this Round at Monte Carlo 1901, since Tchigorin took 144 moves to defeat Mason in this same 11th round. Unlike Marshall, however, Tchigorin somehow managed to win an almost certainly theoretically drawn ending. Perhaps that is what inspired Marshall to play on here. 1. e4 e5
2. Nf3 Nf6
The Petroff. A Marshall favorite.
3. Nc3
Avoiding the Petroff, and offering Marshall the chance at a symmetrical Four Knights' Game. Though considered drawish, Janowski had success in this opening. 3... Bb4
Declining Janowski's invitation to enter into a Four Knights' Game and instead going in for a Three Knights' Defense. This is generally considered to give White some edge, but Marshall played his opening frequently, liking the unbalanced positions that can result. 4. Nxe5
4. Bc4 is the main alternative. Both moves are believed to yield a small advantage to White. 4... 0-0
This effort at rapid development is best.
5. Be2 Re8
As played by Pillsbury in his win against Maroczy at Vienna 1898. Marshall apparently liked what he saw in that earlier game, and repeated this same variation at Monte Carlo 1902 against Maroczy. 6. Nd3 BxN
7. dxB Nxe4

click for larger view8. 0-0 d5
Still following Maroczy-Pillsbury, Vienna 1898. 8...d6 and 8...h6 are both reasonable alternatives. 9. Nf4
Maroczy played 9. Be3 in his 1898 game against Pillsbury. Both that move and the text, as well as 9. Re1 and 9. f3, are all decent options. 9... c6
Marshall was so pleased with the opening here that he repeated this novelty against Marco at Monte Carlo 1902, that time without success (i.e., he lost). The less committal 9...Nf6 is arguably more solid. 10. c4
Maroczy played 10. Be3 in the above-mentioned 1902 game. The text looks even better. 10. Re1 is also good for White here. 10... d4
10...dxc4 is simplest, but the text is the most aggressive choice and exactly what one would expect from Marshall. 11. Bd3
Janowski was also taking no prisoners, and avoided the simple and solid 11. Re1. The position was now:
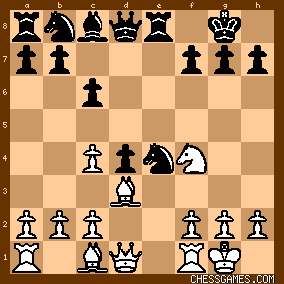
click for larger viewAs I will discuss in my next post on this game, in this position (in which White seems to have a small edge) Marshall ventured--and Janowski accepted--an interesting Pawn sacrifice that turned the game into the sort of slugfest one would expect from these two offense-minded competitors. |
|
Jun-10-20
 | | KEG: Post II
11... Nc5!
A bold pawn sacrifice, very much in Marshall's style: 
click for larger viewFine tactician that he was, there can be no doubt that Marshall saw the coming combination by which White can win a Pawn. 12. Bxh7+
Janowski also almost certainly knew what he was doing. He probably figured that--being the stronger player (at least at the time)--it was OK to allow Marshall some initiative in return for the extra (albeit doubled) pawn. 12... KxB
13. Qh5+ Kg8
14. QxN
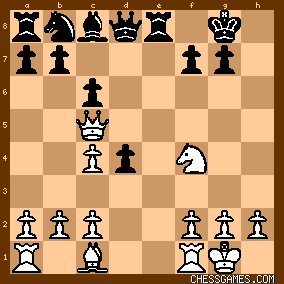
click for larger viewDid Marshall have adequate compensation for the sacrificed pawn? Probably not complete compensation. But he had an advanced d-pawn with which White would have to contend, a Rook on the open e-file, and the only White-square Bishop. My guess is that both sides liked their respective chances here. 14... Na6?
An awkward move that only drove Janowski's Queen to a better square. 14...Qf6 immediately was the best way to follow up his sacrifice. 15. Qh5 Qf6

click for larger view16. Nd3
Surprisingly tentative play by Janowski. 16. Bd2 keeping his Knight on f4 and bringing his three back-rank pieces into play was best. 16... Bf5!
Now Marshall's forces came to life.
17. Bd2
One move too late to obtain any major advantage. 17... Bg6
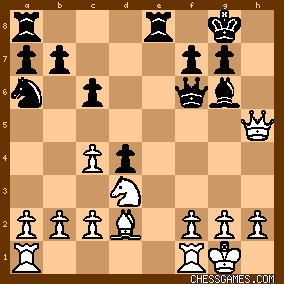
click for larger view18. Qd1?
An unbelievably weak response by Janowski. With 18. Qg4 or 18. Qh3, he still would have had the better prospects. After this lemon, Marshall regained the sacrificed pawn and suddenly had the better game: 18... BxN
19. cxB Qc5

click for larger viewThe d-pawn obviously must fall.
20. Be1 Nc5
21. b4
Janowski never liked to be a punching bag, but 21. f3 was sounder. 21... Nxd3
22. Qc2

click for larger viewJanowski may have relied on this move, but it only barely keeps his head afloat. As I will discuss in my next post on this game, Marshall here missed his chance to obtain a serious advantage. |
|
Jun-11-20
 | | KEG: Post III
22... Qe4
This allowed Janowski some relief. Best by far was 22...b5! which would made Janowski work hard to hold the game. 22...Qh7 and 22...Re5 were also better than the text. 23. Rd1!
Janowski was now very much back in the game.
23... NxB
23...Nf4 was no real improvement.
24. QxQ RxQ
25. Rfxe1 RxR+
26. RxR
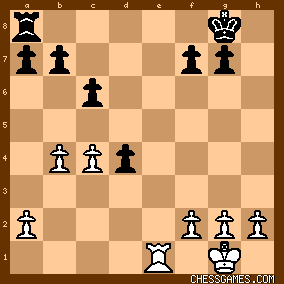
click for larger viewAlready looking like a draw, though Black is slightly better and a determined strong endgame player would make White suffer for a while with 26...a5 (or with 26...Kf8 first). But... 26... Rd8
Tantamount to a draw offer.

click for larger viewJanowski, however, was not satisfied with drawing against a player he considered (at least at this stage of their respective careers) as leagues beneath him. 27. Kf1 d3
28. Rd1 Rd4
29. a3 Kf8
30. Ke1 Ke7
31. Kd2 Rxc4
32. Kxd3

click for larger view32... Rg4
Not the most precise. 32...Rh4 or 32...b5 were surer and simpler roads to a draw. After all, is there really anything more in this position? 33. g3 a5
34. f4 axb4
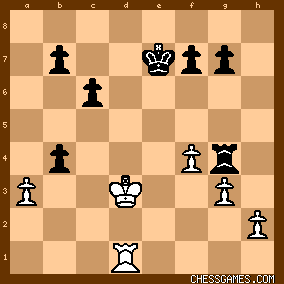
click for larger view35. Rb1!
Subtle play by Janowski, who still had hopes of getting blood from a stone. 35... g5?!
Needlessly giving Janowski some chances. 35...Rg6 or 35...b5 would seemingly lead to an inevitable peaceful conclusion. 36. Rxb4 b5

click for larger viewThis was Janowski's last chance to create any even slight winning chances with 37. fxg5 Rxg5 38. a4. Instead: 37. Ke4 gxf4
38. Kf5 Rg6
39. Kxf4

click for larger viewTime to call it a day and offer a draw? Not with Janowski in charge of the White pieces. From here, he seemed to go berserk, and managed--in a wild effort to create complications--to land himself in serious (and needless) trouble. |
|
Jun-11-20
 | | KEG: Post IV
39... Rf6+
40. Kg4
Not truly "bad," but the beginning of a bad idea. White is fine (i.e., is equal) with 40. or 40. Ke4. 40... Rg6+
41. Kh5?

click for larger viewCrazy play by Janowksi. Putting his King out of action. He would have been entirely fine with 41. Kf3 or 41. Kf4. The text is probably theoretically OK (i.e., with perfect play, White still has a draw). But now the situation can get difficult for White. 41... Rg8!
Stranding the White King, at least for now, on the h-file, and winning (with decent play) a pawn. 41. Rb2

click for larger viewMarshall could now have won a Pawn with 41...Ra8! since 41. Rb3 runs into 41...Rh8+ winning the White pawn on h2. But...
41... f5?
Sloppy play. Marshall eventually developed into a strong endgame player (though hardly at the level of Lasker, Rubinstein, Capablanca, or Carlsen). At this stage of his career, however, he was often careless, as here. 41...Ra8 might not necessarily have led to a win, but Janowski would have had to sweat to earn a draw from there. Now, however, the position was: 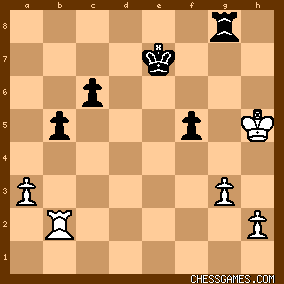
click for larger viewNow, Janowski could have played 42. Kh6!, since 42...Ra8 would now have allowed 43. Kg5. But Janowski, still tempting fate, played: 43. Kh4?
Now Marshall would have had some chances with 43...Ke6 or 43...Kd6. But instead, he played: 43... Kf6?
Now, Janowski had a chance to right his wrongs.
44. Kh3! Ke5
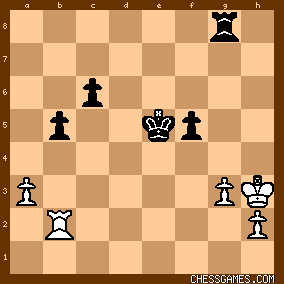
click for larger viewBut here, just as Janowski seemed to have emerged nearly unscathed (he had merely to play the simple 45. Kg2), he went nutso again: 45. Rc2?
This may not theoretically lose, but it gave Marshall at least practical chances. 45... Kd5
46. Rd2+ Kc5
47. Rc2+ Kd5
Marshall, rightly or wrongly, still seems willing to take a draw. 48. Rd2+ Ke4
49. Rc2 Rc8
50. Rc5 f4

click for larger viewHas Janowski played 51. gxf4, it is hard to see how he could have lost. But Janowski was still set on playing for a win, and pretty soon managed to work his way into a lost position. |
|
Jun-12-20
 | | KEG: Post V
51. g4?
This should have been fatal:
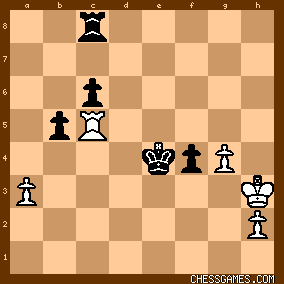
click for larger viewBut Marshall erred with:
51... Ra8?
51...Kd4 wins. The text let Janowski back in the game. 52. Rxc6 Ra3+
53. Kh4 Ra2

click for larger viewJanowski seems to be out of the woods, but...
54. h3?
Janowski would have been fine with 54. Re6+ or Kh3. Now, matters suddenly looked grim for him once again. 54... f3
55. Re6+ Kf4

click for larger viewJanowski might still have had a chance to hold the game with 56. Rb6. But he was still apparently searching for a win: 56. Rf6+
Driving Marshall's King to a powerful-and winning--perch. 56... Ke3

click for larger view57. Re6+
Sheer suicide. The only remote chance lay in 57. g5 or maybe 57. Rf8. Now, the game seems gone for Janowski. 57... Kf2

click for larger view58. g5 Ra4+
58...Kg1 also wins.
59. Kh5

click for larger view59... Kg3
59...Kg1 or 59...Kg2 win easily, and look obvious. But the text--though clumsy-- should also have won. 60. g6
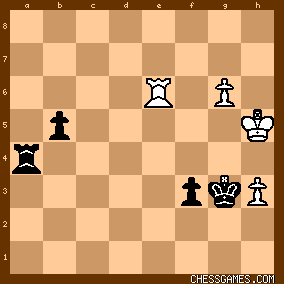
click for larger viewThe finale should have been easy for Marshall from here. But he now got sloppy, and blew the win as I will discuss in my next post on this game. |
|
Jun-12-20
 | | KEG: Post VI
60... Kxh3?
60...Ra7 should do the trick [61. Rf6 f2 62. Kh6 b4 63. g7 Rxg7 64. KxR b3 and one of the Black pawns must Queen]. Now, however, Janowski had a road to salvation.

click for larger view61. g7
61. Re3 looks easiest, but Janowski still had a heartbeat even after the text. 61... Rh4+
62. Kg6 Rg4+
63. Kh7 f2

click for larger view64. Rh6+ Kg3
65. Rg6
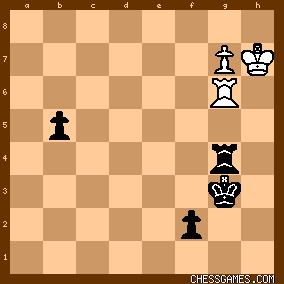
click for larger view65... RxR
66. KxR f1(Q)
67. g8(Q)

click for larger viewSo Marshall emerged with an extra pawn. But this is a book draw. To quote Reuben Fine in Basic Chess Endings in speaking of Queen and Pawn vs. Queen endings: "This is a draw unless White has a Bishop Pawn or center Pawn on the seventh supported by the King." Where the extra pawn is a b or g pawn,the game is generally a draw. Though this is a theoretical draw, it can get tricky. So Marshall decided to play the ending out for another 40 agonizing moves. He eventually managed to advance his b-pawn down to b2, but that was as far as it could go. 67... Qc4
68. Qb8+ Kf3
69. Qf8+ Ke3
70. Qh6+ Kd3
71. Qh3+
Check and pin. The tried and true way to hold such endings. 71... Kd4
72. Qh4+ Kc3
73. Qe1+ Kb2
74. Qe5+ Kb3
75. Qe3+ Qc3
76. Qe6+ Kb2
Setting a trap:
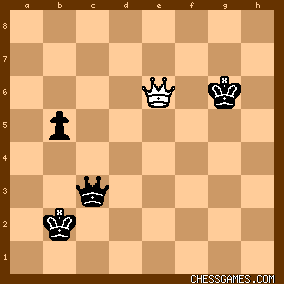
click for larger view77. Kg5
If 77. Qe2+ Qc2+ wins.
But Janowski was hardly likely to fall for this. 77... b4

click for larger viewSo Marshall's pawn has made it to b4. But that's far short, and even if the pawn gets to b2, it's still a draw. But Marshall continued to try. |
|
Jun-13-20
 | | KEG: Post VII
78. Qe2+
78. Kg6, based on the theme of defending such endings by keeping the King at a safe distance ("As a rule, it is best for [the weaker side's] to have his king as far from the pawn as possible, unless, of course, it can occupy a square in front of the pawn, in which case the game is a hopeless draw"--Fine, Basic Chess Endings) is probably simpler. But the text is also OK. 78... Qc2
79, Qe5+ Kb1
80. Kh4

click for larger viewThis move, as compared with 80. Kh5, is inconsistent with Fine's rule. I devoted a of time examining the above position trying to find a win for Black (especially after Stockfish gave Black +132.79 after Janowski's last move) but was unable--even with considerable computer assistance--to demonstrate a win. The lesson seems to be that such endings, even with less than perfect play by the defending side, are generally drawn and require only basic care to hold the game. 80... Qc4+
Stockfish gives 80...b3 as the winning move here, but after I played it out with variations more than 20 moves deep with both Fritz and Stockfish, the win proved elusive. Fritz has no preference between the text and 80...b3. Software analysis (except for those with perfect five-piece databases or with software capable of longer searches than I am able to conduct) are often unreliable in such endings. 81. Kh5 b3

click for larger viewMarshall's pawn had inched on square closer to Queening. But this did little to advance his chances to find a way to win this drawn ending. 82. Qe1+
Stockfish gives this as a losing move and gives 82. Kg6 as best. Once again, I was unable to find a win after a diligent search and examination. 82... Qc1
Stockfish's "winning" move here is 82...Kc2. If this is a winning line, I--once again--was unable to prove it. (Fritz thinks the text is as good [i.e., useless] as anything]. 83. Qe4+ Qc2
84. Qe1+ Qc1
85. Qe4+ Ka2

click for larger view86. Qa4+
Stockfish sees this as yet another losing move. Fritz doesn't see it, and thinks the text is just fine. I side with Fritz here. 86... Qa3
87. Qc4
The pinning them in action. One of the tools (along with Queen checks) that generally allows the weaker side to hold these sorts of endings. 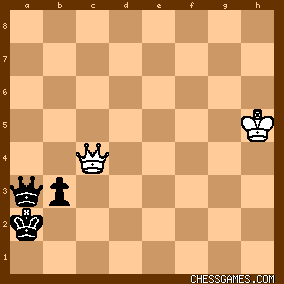
click for larger view87... Qa5+
Stockfish gives 87...Qd6 as the "winning move" here. Yet again, I just don't see it (and neither does Fritz). 88. Kg6 Qb6+
89. Kh7
Now following Fine's dictum (though Janowski obviously did not have Fine's book to study) of keeping his King far away from the advancing pawn. 89... Qb7+
90. Kg8
Now at an even safer distance!

click for larger view |
|
Jun-13-20
 | | KEG: Post VIII
90... Qg2+
91. Kf8
91. Kh8 seems most in accord with theory, but the text is also fine. 91... Qf3+
92. Kg8 Kb1
Playing to unpin advance his pawn.
93. Qc5 b2
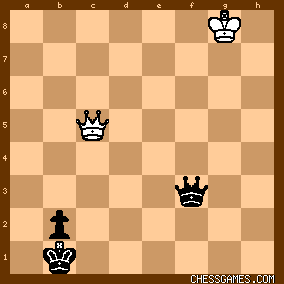
click for larger viewThis is as close as Marshall was to get to Queening his pawn. 94. Qc4 Qa8+
95. Kg7 Qa7+
96. Kh8
Safely in the remote corner. But the ending could still get tricky. 96... Ka1

click for larger view97. Qc3
The pinning theme once again in action. Remarkably, any other move for White loses here. 97... Qa4
98. Qe5 Qa8+
99. Kg7 Qb7+

click for larger view100. Kh8!
Amazingly, anything else can lead to trouble. I have investigated 100. Kf8 and while I can not find a definitive win for Black, White seems very much on the ropes (e.g., 100...Ka2 101. Qa5+ [101. Qe2 is better] Kb3 wins for Black). As always in these endings, the more remote the King is kept the easier it is to draw. 100... Qa6
101. Kg7
Keeping the pin in place.
101... Qa4
102. Kh8
Back to the corner.
102... Qb4
103. Kg7 Qb7+
104. Kh8 Ka2
105. Qe2
And now a horizontal pin.
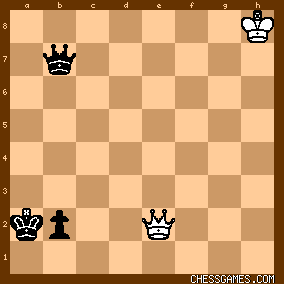
click for larger viewAnd here, Marshall abandoned his futile efforts and agreed to a draw. DRAWN
Janowski (this time playing Black) won the replay four days later. |
|
May-13-21
 | | g15713: Queen ending with a knight pawn is a theoretical draw if the defending king is in front or near the pawn or if the king is in the corner opposite the pawn's promotion square. F. 1.0
Black to move at 67

click for larger viewSyzygy says it is a tablebase draw
'https://syzygy-tables.info/?fen=6Q1... Game continued:
67...Qc4 68.Qb8+ Kf3 69.Qf8+ Ke3 70.Qh6+ Kd3 71.Qh3+ Kd4 72.Qh4+ Kc3 73.Qe1+ Kb2 74.Qe5+ Kb3 75.Qe3+ Qc3 76.Qe6+ Kb2 77.Kg5 b4 78.Qe2+ Qc2 79.Qe5+ Kb1 F. 1.1
White to move at 80

click for larger viewSyzygy says it is a tablebase draw
'https://syzygy-tables.info/?fen=8/8... Game continued with White playing 80. Kh4? going the wrong way
80. Kh6 is the correct way - head to drawing zone of northeast corner F. 1.2
Black to move at 80

click for larger viewSyzygy says Black is winning with 80...b3
'https://syzygy-tables.info/?fen=8/8... Black returned the favor by playing 80...Qc4+? <80...b3!> Game continued:
81.Kh5 b3
F. 1.3
White to move at 82

click for larger viewSyzygy says it is a tablebase draw with 82. Kg6 or Kh6
'https://syzygy-tables.info/?fen=8/8... White played 82. Qe1+? <Kg6 or Kh6!> Black returned the favor with 82...Qc1? <Ka2 or Kb2 or Kc2!> Game continued:
83. Qe4+ Qc2 84. Qe1+ Qc1 85. Qe4+ Ka2
F. 1.4
White to move at 86

click for larger viewSyzygy says it is a tablebase draw with 86. Qd5 or Qe6 or Qe2+
'https://syzygy-tables.info/?fen=8/8... White played 86. Qa4+? <86. Qd5 or Qe6 or Qe2+!> Game continued:
86...Qa3! 87. Qc4
F. 1.5
Black to move at 87

click for larger viewSyzygy says Black is winning with 87...Qd6
'https://syzygy-tables.info/?fen=8/8... Black played 87...Qa5+? <87...Qd6! helps prevent the White king to advance to drawing zone of northeast corner> Game continued:
88.Kg6 Qb6+ 89.Kh7 Qb7+ 90.Kg8 Qg2+ 91.Kf8 Qf3+ 92.Kg8 Kb1 93.Qc5 b2 94.Qc4 Qa8+ 95.Kg7 Qa7+ 96.Kh8 Ka1 97.Qc3 Qa4 98.Qe5 Qa8+ 99.Kg7 Qb7+ 100.Kh8 Qa6 101.Kg7 Qa4 102.Kh8 Qb4 103.Kg7 Qb7+ 104.Kh8 Ka2 105.Qe2 1/2-1/2 |
|
|
|
|


