| Jan-31-14 | | Poisonpawns: One of Tarrachs` best games. It is Morphy like;in that inspite of his opponents resistance, he is always able to find the move to extend the attack until the opponent finds it irrisitable. |
|
May-05-23
 | | KEG: I share the enthusiasm of <Poisonpawns> for Tarrasch's stunning play in this game, but I would not call Tarrasch's performance her "Morphy like." Rather, this was a strategic masterpiece in which Tarrasch outplayed Marco with iron logic, slowly crushing his experienced but less talented opponent until Marco was overwhelmed. No brilliant combinations here; just superb positional play that reduced Marco to helplessness before Tarrasch had reaped any material advantage. Prior to this Monte Carlo 1902 tournament, Tarrasch had played Marco seven times, winning six times and losing only once (at Budapest 1896, a tournament in which Tarrasch seemed badly out of sorts). The lifetime record between the two was similar: Tarrasch held an edge of nine wins against two loses and four draws. But at Monte Carlo 1902, Tarrasch had gotten off to a horrible start (three loses and one draw in his first four games). But then Tarrasch found his bearings. He had drawn against Marco as Black in Round 12, and this was the replay. Tarrasch by this stage was in the midst of a major comeback, and his crushing win here brought him to plus 3 for the tournament. Tarrasch followed up his win here with victories against Reggio and Wolf in Rounds 15 and 16, drawing close to the leaders. But he then faltered in the closing round, losing to Pillsbury and Teichmann and ending up plus 5 and tied for 5th to seventh place. But this was nonetheless a turning point in Tarrasch's career. He finished first in the gargantuan Monte Carlo 1903 tournament (despite an early loss there to Marco), showing that he was back playing the sort of chess that had brought him so many triumphs in the past. This game is a pleasure to play over and analyze. So much to learn from the well-organized mind of Tarrasch. 1. e4 e5
2. Nf3 d6
Philidor's Defense, a Marco specialty.
3. d4 Nd7
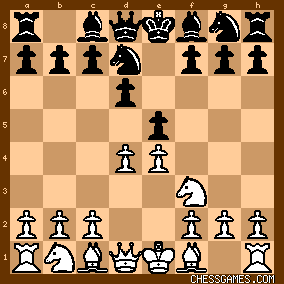
click for larger viewThe Hanham Variation. Marco continued to play this through 1920. Here at Monte Carlo 1902, Marco had already played the Hanham three times before the instant game, losing to Maroczy in Round 7 and to Wolf in Round 8, but then beating Reggio in Round 9. The variation is playable but usually leaves Black in a constricted position, making it just the sort of opening I would NOT want to try against Tarrasch. 4. Bc4
The usual move for White. A rarely played but excellent alternative is 4. c4. 4... c6
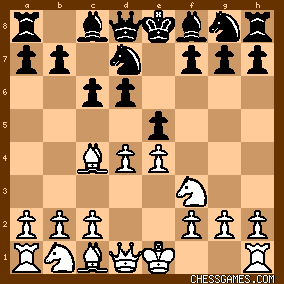
click for larger viewThe move most frequently played here by Black. It was a Marco favorite, and arguably best. I don't like this at all for Black, but it was played at least five times by Alekhine, so I'm not going to argue. Of most historic importance, 4...c6 was played here in 1963 in a famous off-hand blitz game between Bobby Fischer and Reuben Fine. Fischer won that game in just ten (10) moves. 5. Ng5
This seems wild and crazy, but it must be conceded that the text is hard to meet, though it was tried twice (unsuccessfully!) against Alekhine. Notably, in the famous Fischer-Fine game, Bobby played the strong and solid 5. 0-0. 5. exd5 is another good choice for White here. The Tournament Book here loved 5. Ng5:
"This simple move proves highly effective and disposes entirely of the defense." Notably, this reasoning did not persuade Alekhine, Tarrach here initially faltered in following up the move. 5... Nh6
Ugly. but pretty much forced.
6. Nc3
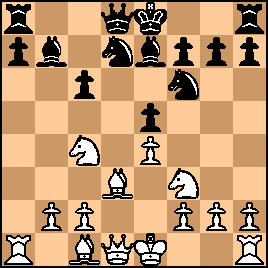
This can't be right, since in many variations White may want to play c3. Most flexible and simplest--and therefore probably best--is 6. 0-0. After the text, the position was:

click for larger viewTarrasch had not yet taken over the game. But stay tuned. |
|
May-05-23
| | KEG: Post II
6... b5
This move offends my sense of a proper pawn formation because of the potential backward c and d pawns, but I must acknowledge that is likely the best way to punish White's puny 6th move. Perhaps the worst problem with the move here is that is creates a position that Tarrasch obviously understood far better than did Marco. 7. Be2
A tough choice as to how to retreat the Bishop (to b3, or e2 or even f1). The text--though it blocks the White Queen--seems most flexible, so I will trust Tarrasch's judgment on this. To put it mildly, this is not the sort of decision in which I put great stock on what the engines say. 7... Be7
8. Nf3
Back to f3, suggesting that Tarrsch's 5. Ng5 followed by 6. Nc3 was not a great success. But, in the meantime, Black's position has sprung a few leaks. White has no great theoretic edge here, but this was fast becoming the kind of game in which Tarrasch's positional judgment was likely to shine (as it did here). 
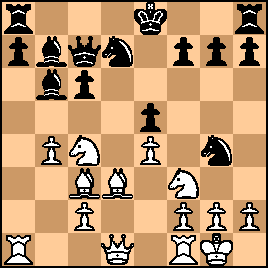
click for larger viewMarco's immediate problem was what to do about his h6 Knight. He obviously did not want to allow 9. BxN wrecking his King-side pawns. The simplest solution seems to be to play 8...Ng4 and later ...Ngf6. True, Black would lose time, but White has already lost time with Ng5 and then Nf3. 8...Ng8 looks ugly. Marco, however, decided on a different approach, and his choice allowed Tarrasch--by subtle play--to obtain a tight grip on the board. To handle this kind of set-up requires delicate maneuvering on both sides of the board. 8... b4?!
Ugh!
9. Nb1

click for larger viewThe engines all give 9. Na4 as best. But Tarrasch was more than a calculating machine, and knew exactly what he was doing, and within another six moves had a strategically won game. 9... Ng8?
Even uglier than his last move. Come what may, Marco should have tried 9...Ng4 or else bitten the bullet with 9...f5 and allowed 10. BxN. 10. a3!
Leaving himself excellent prospects on both sides of the board. Tarrasch didn't have a won game yet, but he was starting to take control: 
click for larger view10... Ngf6
11. Bd3 bxa3
Giving Tarrasch exactly what he wanted. The prosaic 11...exd4 or the more dynamic 11...c5 were better. 12. Nxa3

click for larger viewAfter the game, Marco reportedly complained that he had lost because of the unfortunate position of his Rook on a8. That was indeed part of his problem. But it was only a problem because of the power of the White Rook on a1, especially after the a3 Knight goes to c4. This, of course, did not happen by coincidence. The other positional nuance Tarrasch seems to have anticipated was the position of the other Black Rook on h8. Watching how Tarrasch exploited the flaws in Black's position is breathtaking. The final tactical chances that ultimately doomed Marco were already taking shape. |
|
May-05-23
 | | keypusher: <KEG> Do you think you'll ever review Tarrasch vs G Marco, 1898? Maybe you shouldn't; it's pretty one-sided. But it's one of the first master games I ever saw, featured in Saidy and Lessing's coffeetable book <The World of Chess>. |
|
May-05-23
| | KEG: <keypusher> I had just finished commenting on Vienna 1898 when I decided to begin posting my annotations here. The earliest tournament on which I have posted my comments on this site was London 1899. Among other things, this meant my comments on Hastings 1895 will not appear here. As it is, I wonder whether I will ever make it to such spectacular tournaments as New York 1924 and Nottingham 1936, let alone AVRO 1938, before I kick the bucket. But Tarrasch-Marco, Vienna 1898 was a great performance by Tarrasch, so I will make this one exception on your (qualified) recommendation. |
|
May-05-23
| | KEG: Post III
12... Bb7
Very weak. The Bishop is all but useless on b7, and Marco later had to play Bc8 on his 23rd move. There were many better choices for Black here. Best is probably 12...exd4. The Tournament Book said that "12...exd4 13. Nxd4 Ne5 should be considered." But it gives a misguided follow-up: 14. f4?! [instead of 14. Nc4 or 14. 0-0 which would maintain White's edge] NxB+ 15. QxN and then, instead of 15...c5 which yields approximate equality, 15...Bd7? after which White would be clearly for choice with 16. Nc4. After this slip by Marco, Tarrasch went to work: 13. dxe5
13. Nc4 also looks good for White, but I prefer Tarrasch's move. 13... dxe5
Marco could also have tried 13...Nxe5, but then White has a significant advantage with 14. NxN dxN 15. Nc4. 14. Nc4
click for larger viewA comparison of this position with the last one in my prior post (i.e., after 12. Nxa3) reveals the enormous progress Tarrasch had made in just the last few moves. 14... Qc7?
Marco was already in dire straits, but the text made matters far worse for him. He had to try 14...Bc5 or 14...0-0. 15. Bd2!

click for larger viewTarrasch could also just have castled, but the text leaves many strong possibilities in play, including a Queen-side attack beginning with b4 as well as a King-side attack after posting this Bishop on c3. In addition, 15. Bd2 allows the White Queen and later the other Rook to protect the Rook on a1 as and when the a-file get busted open. As was so often the case, Tarrasch had a marvelous feel for where to post his minor pieces. 15... Bc5
The game seems to have gotten to complex for Marco. This Bishop was not destined to become a key weakness for Black after it retreated to b6. Here, the natural-looking text was in fact a mistake. At first sight, c5 looks like a great spot for this Bishop. But, as will be seen, it was not. 15...0-0 or 15...c5 or even 15...Bd6 would have been better tried for Black. 16. b4?!
Homer nods. The text can hardly be called a mistake, but 16. Bc3 was clearly stronger. The battle would soon be decided on the King-side. The above being said, it must be conceded that over-the-board 16. b4 must have been troubling for Black since it forced him to decide what to do with his dark-square Bishop, and indeed Marco now completely collapsed and was dead lost within the next two or three moves. Thus, as a practical matter, the text worked like a charm. 16... Bb6?
As the sequel demonstrated, this was the wrong spot for this Bishop. Marco was in a difficult position already, and he had to try 16...Be7 or 16...Bb6 rather that place his Bishop on b6 where a deadly pin on the a-file was developing: 
click for larger view |
|
May-06-23
| | KEG: Post IV
17. Bc3!

click for larger viewThe White army is poised to pounce.
Black best chance to offer resistance (by way of counter-play) lay in 17...c5, though this blocks the diagonal for Black's b6 Bishop. But Marco saw a mirage, and now got overwhelmed: 17... Ng4?
The sort of coffee-house move that almost always led to disaster against Tarrasch. 18. 0-0
click for larger viewMarco's King-side attack now looks silly.
18... f6
Further weakening his game, but nothing looks very attractive for Black here. 19. Bd2!

click for larger viewNow that Black has committed himself, the text is extremely strong. In fact, White's position is so good that he had a different way to win: 19. Nh4. But the text is the sort of quiet killer I especially enjoy. 19... h5?!
Having played 17...Ng4, Marco probably should have bitten the bullet and played wither 19...Nxf2 or 19...Bxf2+ True, this had little chance against the likes of Tarrasch, but disparate material (here Rook and Pawn for Bishop and Knight) always complicates the winning process. In any case, after 19...h5 Tarrasch sailed easily to victory. Tarrasch's iron logic makes the rest of the game seem like child's play. 20. Nh4!

click for larger viewBrutally exploiting the holes in Black's position created by f6 and then h5. Although material was still equal and only a couple of pawns were gone for both sides, Tarrasch by now had a strategically won game. 20... Nf8?
If he wanted to play on, Marco had to take a deep breath and venture 20...0-0-0. This wouldn't be much fun at all for Black after 21. h3 Nh6 22. Ng6, but the text led to a catastrophe. 21. h3!

click for larger viewPretty awful for Black.
But Marco had a combination up his sleeve involving the sacrifice of a piece. Sad to say for Marco, his idea was fatally flawed, and he got quickly crushed. As I noted at the beginning of my comments on this game, it was the position of Black's two Rooks on a8 and h8 that doomed the brilliancy he had in mind. |
|
May-06-23
| | KEG: Post V
21... g6?!
So this was Marco's great idea: sac the Knight, open the h-file; and then slide the Queen over to the King-side and play for an all-out assault on the White King. Tarrasch,of course, saw that this threat (given the unfortunate position of the Black Rooks) was more bark than bite, and proceeded accordingly. 22. hxN hxg4
23. Qxg4

click for larger viewIf Marco thought he had any play for the sacrificed piece, he was soon to be disillusioned. 23... Bc8
This leaves the a8 Rook undefended and is thus completely hopeless, but--to be fair--everything else lost also. 24. Qg3

click for larger view24. Qf3 also wins. But Tarrasch's way of winning was prettier. With the Black a-pawn pinned, the Black Queen will have to recapture on b6, and this leads to the collapse of the Black game. 24... g5?!
I guess Marco didn't notice that his entire position was now hanging. But Tarrach most definitely noticed: 25. NxB
Game over.
25... QxN
26. Bxg5!

click for larger viewSince 26...fxB 27. Qxe5+ wins the house, Marco could well have resigned here. 26... Qd8
Hopeless, as was everything else.
27. Be3!
White now threatens...ah...just about everything. 27... Qe7
28. Bc5
Tarrasch had other ways to win, but this was as good as anything. 28... Qh7
Still praying for a miracle on the h-file.
29. BxN
Ending any remaining illusions Marco may have had: 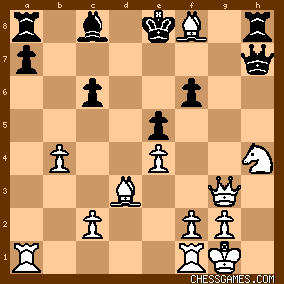
click for larger view1-0
White will be up a piece and a Pawn (even after 29...QxN 30. QxQ RxQ 31. Bc5), and his attack is still raging. |
|
May-10-23
| | keypusher: <But Tarrasch-Marco, Vienna 1898 was a great performance by Tarrasch, so I will make this one exception on your (qualified) recommendation.> Something to look forward to! |
|
May-10-23
 | | FSR: A very ineffective "fishing pole" by Marco. Incidentally, I just noticed that young George H Derrickson was a very enthusiastic proponent of that type of sacrifice. |
|
May-10-23
 | | perfidious: Ascribing Morphy-like traits to Tarrasch's play is vastly amusing, but hardly correct. |
|
May-10-23
| | FSR: <perfidious> Yes, Morphy was best known for sacrificing his pieces rather than refuting his opponent's unsound sacrifices, which is what Tarrasch did here. |
|
| May-11-23 | | Shangri La: KEG says best. |
|
|
|
|


