|
< Earlier Kibitzing · PAGE 3 OF 3 ·
Later Kibitzing> |
| Apr-16-09 | | YouRang: Well, the stalemate theme this week certainly suggests 91...Kh7, after which a subsequent f8=Q would render the black K immobile. But it's the only logical move anyway, since it must be there to prevent Rg8 tactics and to move toward the pawn if the white rook leaves the g-file. After 92.f7, I think it's pretty clear that black must check "horizontally" by moving the rook along the c-file. Checking vertically by moving the rook along the 1st rank eventually runs out of steam when the white king hides at f8 and then plays Rh3+ followed by Kg8. It's a little trickier if white plays 92.Rg7+, and frankly I couldn't see all the ways it could go from there. I presume black should play 92...Kh6 (rather than 91...Kh8) to avoid mating threats arising from f8=Q#, but beyond that, I don't think I can calculate all the lines we might see. However it turns out, it can't be any worse for black than resigning! :-) |
|
| Apr-16-09 | | Patriot: <agb2002: <Patriot: ... 92.Rg7+ Kh8 and a draw by stalemate looms)> I think that now wins 93.Re7, with the plan Kf7-Kf8-f7-Re8 followed by Re7-Ke8 or Rd8-Ke8 or Re4 (threatening mate and the Lucena bridge) depending on the position of the black rook. That's why I preferred 92... Kh6, trying to keep the king close to the white pawn, but perhaps I'm missing something.> I think you're right. But I don't think there is a Lucena bridge to be made, because one of the keys to Lucena is that the defender's king is cut off three files away from the pawn. |
|
| Apr-16-09 | | Eisenheim: Is the stalemate theme this week a product of it being April 15 - tax day? You can never win with taxes, no matter how far you think you are ahead. |
|
| Apr-16-09 | | johnlspouge: < <awfulhangover> wrote: This is neither Lucena nor Philidor position. This is the "Rook on long side and King on short side" defence strategy. > Agreed.
< <Jimfromprovidence> wrote: This position is a perfect example where the Nalimov table bases can greatly assist in understanding why 91...Kh7 draws and Kh5 or Kh6 do not. The table bases allow you to “walk” through the position ‘til its conclusion. > Indeed, the exercise was most instructive.
Thanks to both of you. |
|
| Apr-16-09 | | WhiteRook48: but the puzzle said 91....? not 91 ? |
|
| Apr-16-09 | | ChessEscudero: WHITE wins by 91)...Kh5 92)f7...Ra1 93)f8=Q...Ra6+ 94)Ke5...Ra5+ 95)Kd4...Kh4 96)Qf4+...Kh5 97)Kh6Qg4+...Qg6# With accurate play, Black draws by 91)...Kh7 |
|
| Apr-16-09 | | RandomVisitor: 90.f7! Re1+ 91.Kf6 Rf1+ 92.Ke7 Re1+ 93.Kf8 Rf1 94.Re3 Kg6 95.Re7 Rg1 96.Ke8 Rb1 97.Re6+ Kg5 98.f8Q Rb8+ 99.Kf7 Rxf8+ 100.Kxf8 wins. |
|
| Apr-16-09 | | Pawnage: Yes, I got it right! Resign! |
|
| Apr-16-09 | | TheBish: Sax vs Tseshkovsky, 1975 Black to play (91...?) "Medium" (2.5 stars)
Black is playing for a draw (definitely the theme this week), and he is in check, with only three possible moves (Kh7, Kh6, Kh5). Since time is running out on this one, I'm going to take an educated guess, and say the answer is probably 91...Kh7!, so that after 92. Rg7+ Kh8! and Black will have many stalemating (or perpetual check) opportunities with his king unable to move, preventing the normal maneuver 93. Kf7 followed by Kf8, f7 and the normal Lucena position maneuver -- look if up if you don't know it! After 91...Kh7! 92. Kf7, Black should draw easily after 92...Rc7+ followed by subsequent checks on the c-file. |
|
| Apr-17-09 | | BraveUlysses: A GM resigned this one and prima facie it just "looks" like a lost position for black. Yes, there is a chance of salvaging a draw with 91...h7, i.e white doesn't lose quickly as with other moves and might draw if white plays inaccurately, but a chance of a draw is not a fait accompli draw. Nobody has yet shown that resigning was too pessimistic. I think the GM was correct. |
|
| Apr-17-09 | | Once: <BraveUlysses: Nobody has yet shown that resigning was too pessimistic. I think the GM was correct.> Huh? As a general rule, rook and pawn endgames are pretty drawish. Lots of chances for book draws - for example, see the posts on the Philidor drawing methods. So unless your opponent has a clear win you ought to play on in the hope of a draw. <jfp>'s post says that this is a book draw according to the Nalimov tablebases. In the puzzle position, black has the choice between four possible outcomes. Worst is "resigns", since then he definitely loses. Nearly as bad is 91...Kh5 or 91...Kh6 which several posts have shown lose in fairly short order (but there is just a chance that white will go wrong). Best is 91...Kh7 which leads to a book draw (according to the computers) and a much tougher resistance for humans. Which is better - a definite loss from "resigns" or the chance of a draw? The GM was wrong. |
|
| Apr-17-09 | | patzer2: The solution to the Thursday, April 16, 2009 puzzle solution is 91...Kh7! to secure a table base draw. Instead, in the actual game, the GM missed the stalemate possibility and resigned. See the post by <Jimfromprovidence> for an excellent explanation of the ideas behind 91...Kh7! |
|
| Jul-12-10 | | David2009: Sax vs Tseshkovsky, 1975 shows me how much there is to learn about the endgame. Glancing at the final position I thought "1-0 the Lucena win." But not so! As the commentators point out 91 Kh7 holds - because Black has time to check from the side. What is truly amazing is that Crafty End Game Trainer LOSES this position (starting 91 Rg3+ Kh6??). Try it and see! http://www.chessvideos.tv/endgame-t... |
|
| Jul-13-10 | | BraveUlysses: <Once>, I get this now.
Thanks for the lessons guys. I learnt a lot on this one |
|
| Jun-18-14 | | Howard: Naturally, this game would probably have never received more than a second glance if the late Tseshkovsky had not resigned in a drawn endgame. The winner, Sax, would have been 63 today. |
|
| Jun-18-14 | | Howard: This endgame, by the way, also made the Informant's endgame puzzles section in one of the 1975 volumes. |
|
| Mar-24-21 | | Brenin: This pun shocks. |
|
| Mar-24-21 | | nalinw: Black didn't believe in miracles ..... |
|
Mar-24-21
 | | HeMateMe: So, what's the final verdict? After 91...K-h7 does black have a draw, with best play? |
|
Mar-24-21
 | | AylerKupp: <<HeMateMe> After 91...Kh7 does black have a draw, with best play?> Yes, as <Jimfromprovidence> indicated, 91...Kh7 is a draw <with best play by both sides> per the Nalimov tablebases, and that's as final as it can get. The <best play by both sides> is an essential caveat because this is a game between two human players and either or both of them (but not at the same time, of course!) can make a mistake in playing the rest of their moves. And, using the 7-piece Lomonosov tablebases available from http://tinyurl.com/zyqtoz9 (Android only) we can evaluate all the resulting positions from 79...Kxf8 to the end of the game.

click for larger viewSo I thought it would be interesting to determine the accuracy of each player's moves I classified their moves as follows, all assuming <best play by both sides>: Blunder = Move changes the most likely result from a win to a draw or loss, or a draw to a loss. Best play = If the most likely result is a draw then after the player's move the result is still a draw. Or, if the most likely result is Mate in <N> moves then after the player's next move the most likely result is Mate in <N-1> moves. Inaccuracy = Changes the number of moves to a win (mate) by more than one. For example, if following a move by White the position is determined to be a likely win by White in 20 moves, then (a) White's next move is considered to be an inaccuracy if after White's next move the position is determined to be a likely win by White in 20 moves or more; i.e. no improvement in the number of moves for White to mate. (b) Black's next move is considered to be an inaccuracy if after White's next move the position is determined to be a likely win by White in 18 moves or less; i.e. a reduction of the number of moves required for White to mate by more than one move. So, with my usual propensity for overkill, these are the statistics for this endgame: Total number of moves by each side (including 91...0-1) = 12 Number of Best Play moves: White = 9 (75.0%), Black = 8 (66.7%) Number of Inaccuracies:
White for 82.Rg2 (1; 8.3%), lengthens mate by 1 move Black for 82...d3, 83...Kh7 2 (2; 16.7%), shortens mate by 2 and 4 moves respectively Number of Blunders:
White for 87.Ke6, 90.Rh3+ (2, 16.7%), changes Win to Draw Black for 88...Rc1, 91...0-1 (2, 16.7%), changes Draw to Loss Of course, this is just one endgame of 7 pieces or less and is not representative of the accuracy of top-level players over many endgames with a likely number of pieces. |
|
Mar-24-21
 | | Breunor: Going through the posts from 12 years ago, great elucidation by Honza! Thanks for this! |
|
Mar-24-21
 | | ajk68: 90. Rh3+ ?? gives up the win.
Technique is to push the pawn to f7 and have the king take shelter from vertical checks on f8. It will then take black at least two moves to establish horizontal checks giving white time to give check on the h-file forcing the black king to g6, allowing the white king to g8. If black tries to take control of the g-file with his rook, then white positions his rook on the f-file behind the pawn. The white king will emerge from f8 to e7 and take shelter from vertical checks on f6. No defenders will then be in a position to stop the pawn from promoting. |
|
| Mar-25-21 | | RandomVisitor: After 3...c6 what is best play for white? Well...4.h3, of course...
click for larger view Stockfish_21031920_x64_modern:
<58/77 13:24:08 +0.97 4.h3 d6 5.f4> Nd7 6.Nf3 b5 7.Bd3 b4 8.Ne2 c5 9.0-0 cxd4 10.a3 b3 11.Nexd4 Ngf6 12.Nxb3 0-0 13.Qe1 Nh5 14.g4 Nhf6 |
|
Mar-25-21
 | | Jimfromprovidence: <ajk68> <90. Rh3+ ?? gives up the win.> What worsens that blunder is that white had three ways to win using any of his three pieces. He had 90 f7, 90 Rd8 or 90 Ke7 (per the table bases). The table bases are the answer keys that allow one to analyze and understand endgame moves that seem so similar but are in fact are different enough to change the outcome. In this game, for example, 90 Ke7, below, wins... 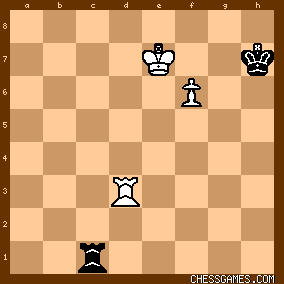
click for larger view...but 90 Kf7 draws.
click for larger view |
|
Mar-26-21
| | AylerKupp: <<ajk68> 90. Rh3+ ?? gives up the win.> Yes, by my definitions 90.Rh3 is a blunder, converting a likely win into a likely draw and therefore fully deserving the "??" assessment. But this game is another validation of the old adage that the winner of a game is the player that makes the next to last mistake since Black's 91...0-1 was also a blunder since it converted a likely draw into a definite loss. I therefore suppose that Black's last "move" should be recorded as 91...0-1?? I sympathize with Tseshkovsky since the same thing happened to me except even worse, converting a likely win into a loss by resigning thinking that I was the subject of a back rank mate. My opponent had just checked me on my back rank with no escape squares for my king and I missed that by interposing the rook that had just left the back rank by capturing one of my opponent's pieces I would have had a discovered check by my Bc5+ or Bb6+ (wherever my bishop was) and after White responded to that check I could have picked up the rook that was checking me with the rook that I had just moved down to interpose, leaving me 2 pieces up. I would have loved to have been able to keep my composure when, after interposing my rook and having my opponent capture it, and no doubt loudly exclaiming MATE!!!, I would have calmly said "Sorry, but that move is illegal; your king is in check." I wasn't helped that several of my "friends" were watching the game and they all began laughing when my opponent brought his rook down to my back rank and loudly exclaimed CHECK!!!, thinking that I had thrown away a won game. Well, I had, but not quite yet ... I had another move to make, ...0-1?? |
|
 |
|
|
< Earlier Kibitzing · PAGE 3 OF 3 ·
Later Kibitzing> |


