Jan-04-19
 | | keypusher: Looks like an Anderssen-Zukertort game from the 1860s. |
|
| Jan-05-19 | | The Kingfish: Probably the strongest Evan's Gambit ever played. After White gets his pawn to d5 and Black has his pawns on c5 and f6, we reach the sort of position that Anderssen often found himself. It's interesting to note that for the next 15 moves or so, the position doesn't really change and there's a bit of shuffling going on. This seems to suggest that White has compensation for the pawn but not more. When Black finally pawn breaks with 32...f5, then the dynamism of the White pieces can make itself felt. The whole while, White plays to keep the ...Na5 out of play. This seems to be one of the strongest forms of compensation in this variation of the gambit. White can take his time getting his pieces to optimal positions and even reposition them to even better squares should the position change, while Black can't really improve continually, because of his sidelined knight. |
|
Jan-06-19
 | | offramp: 55...Rf6.
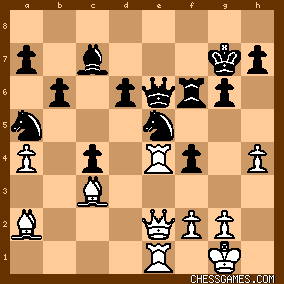
click for larger view
There follows some hard-to-calculate tactics, at least hard for me. |
|
Jan-10-19
| | keypusher: Part I
Despite the opening, this is trench warfare rather than a dashing gambit game — see AlphaZero vs Stockfish, 2018 for an example of the latter. The first eight moves are book. SF and A0 then make some major strategic decisions over the next dozen moves that give SF a solid position, but also leave its knight more or less marooned on a5. White initially puts most of his efforts into preventing Black from advancing his extra pawns on the queenside rather than undertaking anything positive, and both sides seem to be drifting. But slowly A0 wheels his forces to aim at the center and kingside. SF, for its part, commits to a dark-square Maginot Line defense anchored by a strongpoint knight on e5. A0 then breaks through the wall with a board-wide assault over dozens of moves. I think this is one of the greatest games I’ve ever seen. Certainly one of the most grandiose. The two machines follow standard paths until 10….exd4!?. The cg database has 10….Nxc4, 10....Ne7 (inviting White to regain the pawn with 11.dxe5 0-0), and 10….f6 — see Short vs A Filippov, 2009 for a nice game featuring …f6. My SF10 prefers 11….f6 through 41 ply, but at 42 ply (40 minutes, -0.39) switches to SF8’s choice here. SF’s 12….0-0 allows A0 to preserve its bishop. But it appears that the time for …Nxc4 has passed, since 12….Nxc4 13.Nxc4 0-0 14.a4! c6 15.Ba3 Bc7 16.e5! d5 (16….dxe5 is positionally desirable but tactically hazardous, viz. 17.Ncxe5 Qf5 18.Qb2! Bd8 (18….Re8 19.Bxe7 Rxe7 20.Nxc6! +-) 19.Nc4 and Black is in a terrible tangle). One of the fun things about this encounter are the echoes of game from the glory days of the Evans, here Chigorin vs Steinitz, 1892. 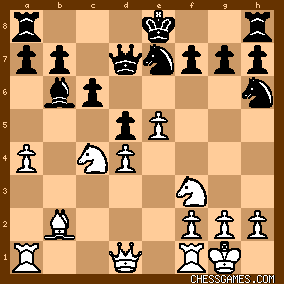
click for larger view Pretty close, right? But rather than Chigorin’s Nd6, in its similar position A0 could continue 17.e6! fxe6 18.Ng5 Ng6 19.Nxe6! Rd8 (19….dxc4 20.Nxf8 Nxf8 21.Bxf8 Kxf8 22.Qxh7 is worse for Black) 20.Nxd8 ±. 13.Bf1 Qd8 14.Ba3 Ng6
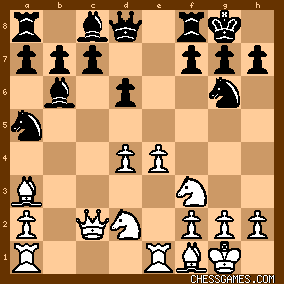
click for larger viewAnother big decision — after 15.d5 the knight will be high and dry. My SF10 thinks 14….Nac6 15.d5 Nd4 (15….Ne5 16.Nxe5 dxe5 17.Nc4 Bd4 18.Rab1 is better for White) 16.Nxd4 Bxd4 17.Rad1 Re8 is 0.00 at 40 ply. It evaluates the text move at -0.19 at 39 ply. 15.d5 (A0 makes a major commitment of its own) Re8 16.Bb4 Rb8 (an odd-looking move, but Black definitely wants to play …b7-b5 at some point) 17.Rad1 c6 18.Qb2 c5 SF’s last big decision for a while, closing the bishop’s diagonal and solidifying White’s center, but establishing a protected passed pawn on c5. Unfortunately, the pawn won’t move again until move 50. But my SF10 has no doubts about 18….c5 (-0.34, 40 ply). 19.Bc3 f6 |
|
Jan-10-19
| | keypusher: II

click for larger viewUp to now, there is nothing really new about this game. This precise pawn structure is at least 160 years old; it used to arise regularly from the so-called Normal Position (1.e4 e5 2.Nf3 Nc6 3.Bc4 Bc5 4.b4 Bxb4 5.c3 Ba5 6.d4 exd4 7.0-0 d6 8.cxd4 Bb6). Here Anderssen (and many others) used to play 9.d5?!. George Botterill in <Open Gambits> (one of my first chess books) argued that this was a positional mistake, allowing Black to blockade the center and gradually advance his pawn majority on the queenside, citing W Paulsen vs Anderssen, 1869. Here’s Paulsen-Anderssen after 16…f6: 
click for larger view The game continued 17.Nf5 b5 18.Kh1 c4 19.Bb1 b4 20.Bd4 Ba6 21.Qd1 c3 and Black’s pawns (eventually) go marching on. This example helps elucidate the next dozen or so moves; A0 doesn’t seem to quite know what to do affirmatively, but it’s figured out it needs to avoid getting Paulsened. 20.a4!? Bc7 21.Qa2 (keeping an eye on c4) Re7 22.h3 Bd7 23.Ra1 (A0 is using the knight as a hostage to keep the queenside pawns from advancing) 23….Kh8(?) This might be a key point in the game, I'm not sure. My SF10 evaluates 23….Qe8 at -0.49 (43 ply, 79 minutes) and 23….Kh8 at 0.00 (42 ply, 45 minutes). It’s hard to see why there would be such a big difference between two such little moves, but 23….Qe8 aims at a4 and reinforces the e-file, while 23….Kh8 makes the king a target on the long diagonal. Here’s an illustration of what might happen if White tries to attack after 23….Qe8: 24.Nh2 a6 25.Qb2 Qd8 (not 25….Bxa4?? 25.Rxa4 Qxa4 26.Bb5) 26.Ng4? b5! Black is breaking out on the queenside, and if 27.Nxf6+ gxf6 28.axb5 axb5 29.Bxf6 Qf8 30.Bxe7 Qxe7 it can hold out on the kingside. Now let’s try that same variation with 23….Kh8: 24.Nh2 Qe8 (one move late!) 25.Qb2 a6 26.Ng4 Qd8 27.Nxf6 gxf6 28.Bxf6+ Kg8 29.e5! dxe5 (29….Nxe5? 30.f4 +-; 29….Qf8? 30.e6 Bd8 31.Ra3 +-) 30.d6 Bxd6 31.Rad1 Qf8 32.Ne4 Re6 33.Qb6. White can regain his piece with a roughly equal position, which is a lot better than he fares in the first variation. Over the next several rather aimless moves, SF10’s evaluations seem to oscillate between -0.10 and 0.00 rather than the -0.3 and -0.4 evaluations a little earlier. After that, my SF10’s evaluations move steadily in White’s favor. 24.Nh2 Bb6 25.Rab1 (White doesn’t have to worry about queenside expansion at the moment, and 25.Qb2?! Kg8 26.Ng4 Bxg4! 27.hxg4 Ne5 28.Re3 c4 is not in his favor) Kg8 (It’s funny, most humans wouldn’t dare leave their king on the same diagonal as the enemy’s queen in a position like this; you’d have to consider e4-e5 on every move. But a strong engine can allow itself all sorts of liberties) 26.Ngf3 Be8 27.Kh2 Bc7 28.Rb2 Ra8 29.Ra1 |
|
Jan-10-19
| | keypusher: III

click for larger viewWhite’s heavy pieces look rather odd clumped in the southwest quadrant, but scoff all you want — queenside expansion is definitely not in the cards for Black. If 29….a6(?), then after 30.g3! Rb8? 31.Ne1! with ideas of f2-f4 and Ng2-h4, SF10’s evaluation has climbed to about +1. 29….Bd7! 30.Qb1! (preventing …f5 and threatening Bxa5 and Rxb7) 30….Bc8 31.Ng1 (See Isidor Gunsberg’s comments on Lasker vs Steinitz, 1894 and imagine what he would say about this game. But the knight is aiming at f5. Anyway, things are about to get a lot livelier.) 31….Qf8 32.Ne2 
click for larger view32….f5
SF’s first pawn move since 19….f6 and a major strategic commitment. Black’s idea is seen in the game: he will push his pawn to f4, physically blocking White’s pawn from moving there, and entrench his knight on e5. When the White knight arrives on f5 the bishop will take it, leaving an indefensible pawn on that square. This plan has some obvious downsides: Black is weakening himself on the a1-h8 diagonal, and will miss his light-square bishop. His own pawn on f4 will also be a constant cause for concern. So, does Black have to do this? The answer seems to be yes. This can be seen most clearly if Black is made to “pass” for a few moves: 32….Rb8 33.Ng3 Ra8 34.Nh5! Rb8 35.f4 (White’s threats include f4-f5 and Nf4-e6) Ra8 36.Qd3 Bd7 37.Qg3 b6 (37….f5? 38.Re1 fxe4? 39.Nxe4 40.Bd3 Rf7 41.Ng5 Bxg5 42.Qxg5 and the kingside caves in) 38.Bb5 Qf7 39.Rbb1 Kh8 40.f5 Ne5 41.Nf4 Bxb5 42.axb5 Bd8 43.Ne6 and Black will suffocate. Of course SF is never going to sit and wait to be smothered like that. But even after something more sensible after 32….Rb8 33.Ng3, like 33….Rf7 34.Qc2 Nf4 35.Rab1 Ra8 36.Nf3, White is clearly better (+0.85, 52 ply). 33.Ng3 f4 (33….fxe4 34.Ndxe4 helps White) 34.Nf5 Bxf5 35.exf5 Ne5 
click for larger view<Festung Stockfish>. |
|
Jan-10-19
| | keypusher: IV
36.Nf3!
A0 promptly offers to build a (pawn) wall of its own, since 36…Nxf3+ 37.gxf3 c4! (a good idea, stopping Bd3 and giving the knight an escape square) 38.f6! gxf6 39.Qf5 Qh6 (39….Rf7 40.Qxf4 Nb3 (freedom!) 41.Rd1 Nc5 42.Qxc4 Re8 43. Bd3 Nxd3 44.Qxd3 Bb6 45.Rg1+ Rg7 47.Rg4! with Qf4 and the advance of the h-pawn on tap (+2.05, 35 ply)) 40.Be2! Kf7 41.Rg1 Rg8 42.Rxg8 Kxg8 43.Bxf6 Rf7 44.Qc8+ Rf8 45.Qe6+ Rf7 46.Bc3 Qxe6 47.dxe6 Re7 48.Rb5 Rxe6 (48….Nb3 49.Rg5+ Kf8 50.Bxc4 Nc5 51.Rf5+ Kg8 52.Bf6 Rxe6 53.Bd4!, winning the rook outright) 49.Bxa5 (turns out freedom’s just another word for nothing left to lose) Rxe2 50.Bxc7 Rxf2+ 51.Kg1 Rxf3 52.Bxd6 Rxh3 53.Rxb7 and White’s extra piece will outweigh Black’s scattered extra pawns in the ending (+0.97, 45 ply). Each side will have to reckon with the other capturing on e5 or f3 for the next 15 or so moves. 36….Qf6 37.Qc2 (attending to the threat of …Nxf3+ and …Qxc3) b6 (White can always force this with Qd2, but now the light squares are even weaker) 38.Re1 Rf8 39.Qd1 (abandoning the pawn on f5, rather than saving it with 39.Nxe5?! dxe5 40.Bxa5 bxa5 41.Bd3 and although White has the advantage, it will be hard to break through the blockade) Rd7 40.Bb5 (“Though we seemed dead, we did but sleep.” This move keeps Black’s rooks from supporting the fortress knight from the e8 square) Rdd8 41.Rc2 (take my pawn, please! — of course the rook can’t go to e2 immediately because of …Nxf3+ and …Qxc3) 41….Qxf5 (Black obliges. If SF sits tight with, say, 41….Rf7, then 42.Bd3 Rff8 44.Nxe5 dxe5 45.Bxa5 bxa5 46.Rxc5 with a big advantage) 42.Rce2! (already e5 is tottering) 42….Nb7 43.Ba6! Na5 (the knight has to go back to a5, since if 43….Rb8?, 44.Nxe5 dxe5 45.d6! Nxd6 46.Rxe5 and Black will get overrun (+7.82, 35 ply)) 44.Re4!

click for larger view(44.Nxe5? dxe5 45.Bxe5 f3! 46.Re4 Bxe5+ 47.Rxe5 Qf6 would turn the advantage back to Black.) 44….Qf6. Stepping back into the pin doesn’t look right, but if 44….Qh5 45.Be2 Qg6 46.Bb5 Qh5 47.Qc2 Nb7 (47….Nxf3+?? 48.gxf3 Qxf3? 48.Re7 is mate in eight — not that SF would ever play this way, but it does demonstrate how critical the knight on e5 is; if 47….Rf5 48.Be2 Qg6 49.Nxe5 dxe5 50.Bg4) 48.Ba6 Na5 49.Nxe5 dxe5 50.Bxe5 Bd6 (now …f3 is no threat) 51.Be2! (again!) Qh6 52.Bg4 and White’s advantage is obvious. 45.Bb5 Nb7 (+0.42, 41 ply) 46.Bc4 Na5 47.Ba2 Kh8 48.Bb1 (not 48.Nxe5 dxe5 49.Bxe5 Bxe5 50.Rxe5 Qxe5+ 51.Rxe5 Rxf3 52.gxf3 c4 =) 48….Rde8 49.Kg1 |
|
Jan-10-19
| | keypusher: V
click for larger viewAfter you’ve played over a number of AlphaZero games, classic attacking formations like this start to become familiar. Everything is now aimed at the knight on e5 or the king. 49….Kg8 50.h4!
With the obvious threat of Nf3-g5-e6. The SF evaluation is now climbing towards +2 at 40 ply. Black can’t stop the knight with 50….h6, because of 51.Bd2! Nb7 (51….g5 52.Nh2 Bd8 53.Bc3 gxh4 54.Ng4 Qg7 55.Bxe5 dxe5 56.Rxe5 Rxe5 57.Nxe5 is about +5) 52.Rxf4 Qd8 53.Rxf8+ Rxf8 54.Nxe5 dxe5 55.Qc2 +-. 50….c4 (it’s starting not to matter what Black does, but clearing c5 for the knight seems like a good idea) 51.Ng5 g6 (to stop Nxh7) 52.Ne6 Rxe6 (Black finally has to give up material: worse is 52….Rf7 53.Rxf4 Qe7 54.Rxf7 Qxf7 55.h5! Bd8 56.hxg6 hxg6 57.Bxe5 dxe5 58.Qg4 with a crushing attack) 53.dxe6 Qxe6 54.Ba2 Kg7 55.Qe2 Rf6
click for larger view56.Bxc4 Naxc4 57.Qxc4 Qxc4 (57…..Nxc4 58.Rxe6 Ne5 59.Re7+ Rf7 60.R1xe5! dxe5 61.Rxc7! wins neatly. Nor can Black stay in the middlegame. If 57….Qe7 simply 58.Rxf4; if 57….Qf7 58.Qa6! Bb8 59.f3 Qe8 60.Rc1 Qe7 61.Bb4 followed by an invasion on the c-file.) 58.Rxc4 Nxc4 59.Re7+ Kf8 60.Bxf6 (this bishop sat on c3, eyeing a5 and the long diagonal, for over 40 moves) 60….Bd8 61.Re4 Nd2 62.Rxf4 Bxf6 63.Rxf6+ Ke7 (where’d everybody go?) 64.Rf4 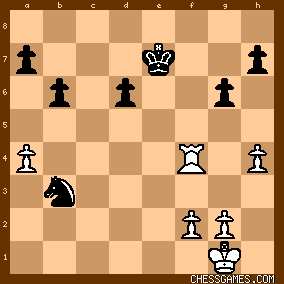
click for larger viewAt this point the SF10 eval is +2.61 at 41 ply. In the endgame, basically White has to make a passed pawn on the kingside while not letting Black get too active elsewhere. Compared to everything A0’s had to do up to now, this must have seemed like a walk in the park. 65.Kf1 Nc5 66.h5! a5! (making a target of the pawn on a4 — shouldn’t SF have tried to target that pawn about 45 moves earlier? 66….gxh5 67.Rh4 h6 68.Ke2 a6 69.Kf3 Ng7 70.Rb4! wins) 67.Ke2 Ne6 68.Rc4 Nc5 69.Ke3 Ke6 70.Rg4 Kf7 71.Rd4 Ke6 72.h6 (making the pawn on h7 a potential target, and making the pawn on h6 potentially passed after f4-f5-fxg6) Ke7 73.f4 Ne6 74.Rd2 Nc5 75.Ra2 It’s OK to put the rook on this passive square for now, since if Black tries to keep his knight on c5, then white will simply advance his pawns and king: 75….Ke7 76.g4 Ke7 77.Kd4 Ne6+ 78.Ke4 Nc5+ Kd5, etc. 75….Nd7 76.Rb2 Kf6 77.Rb5 1-0
An astounding game. |
|
| Jan-17-19 | | SChesshevsky: Another game in this match where SF doesn't seem very impressive. What irritates me the most is the shuffling moves that appear to do little but give A0 all the time it needs to improve its position. That ridiculous N on a5 to b7 and back.
The ...DSB between b6 and c7
The ...LSB from c8 to d7 to e8 and then back to d7 and then c8. The couple of ...Kh8 and ...Kg8 shuffles. I don't know how many of these were forced but they all appeared strange. I'm no expert in the Evans but I believe White's basic idea is to give up the pawn for tempo and open lines for an attack. Black's idea is probably to look for exchanges to reduce firepower for any attack and maybe give back the pawn to free its own pieces. Here SF seems to want to keep the pawn and try to set up some sort of blockade. I don't know if that's a legimate Evans idea but seems to fail miserably in this game. Interestingly, versus Houdini in 2013, SF seems to be able to force some concessions and gets in some exchanges and open lines. Houdini vs Stockfish, 2013 And in the match matched game, A0 seemingly has no problem getting both exchanges and some open lines fairly early. Stockfish vs AlphaZero, 2018 Here though, A0 was impressive in taking advantage of what I thought was SF's lackluster play and clearly deserved a nice win with the white pieces. |
|
Jan-19-19
| | keypusher: <SChessevsky> Thank you for these links! And thanks for enabling my A0 obsession. I’m an expert in the Evans if I’m an expert in any opening. As with many gambits, Black has the option of hanging on to the pawn and trying to make something of it (as SF did) and giving the pawn back for equality or, hopefully, a positional advantage (as A0 did). In the A0-SF game, as noted, the game wound up with a classic 19th century pawn structure. Here’s another example. As in the previously posted W. Paulsen-Anderssen game, Black attacks on the queenside, White attacks on the kingside, and Black wins. Maroczy vs Charousek, 1895 
click for larger view In none of the old games I saw did White do what A0 did — restrain Black’s queenside a la Nimzowitsch, and only attack later. And when I tried to find 20th century examples, basically there weren’t any. This whole variation had gone extinct, like the dodo or the carrier pigeon, because White stopped trying to play it. A0 happened upon it somehow, and treated it in (so far as I can tell) a completely new way. That’s really impressive to me. SF shuffled because it couldn’t figure out how to carry out the normal plan of queenside expansion. As long as White kept his bishop on c3 and his heavy pieces on the queenside, any time Black played ….b7-b5, White responded axb5 and the knight on at was hanging. If it went back to b7, it was only in the way. And if went to d8…well, what do you want a knight on d8 for? It was like Unzicker’s bad knight in tKarpov vs Unzicker, 1974. Of course I don’t want to make it sound like there was nothing Black could have done. But its opponent gave it a hard strategic problem that it couldn’t solve. As you noted, with Black A0 got an open game, with material equality. This was the position at the end of book, with Black to move. 
click for larger viewA0 played 8….exd4 9.cxd4 Nf6 10.0-0 0-0. If you check OE after 8.Nbd2, you don’t see anything like this. Black is attacking the pawn center with pieces; the simple threat is …Bxd2 followed by either …Nxe4 or …Nxd4 depending on White’s reply. SF can either defend the pawns where they are or push one of them. 11.d5 would be analogous to the A0-SF game, but it doesn’t work as well, because Black doesn’t wind up with a piece out of play: 11.d5 Ne7 12.Ba3 a6 13.Bd3 b5 (-0.30, 45 ply). Trying to keep the pawns where they are doesn’t work well: 11.Re1 Bb6 12.Bb5 a6 13.Ba4 Qg4 (-0.67, 47 ply). So, 11.e5 (-0.12, 47 ply) seems best, and leads practically by force to 
click for larger view Is that better than what SF did? Not necessarily; before these games were played, I’d say it was worse, since according to existing theory A0 got into a strategically unfavorable position with White. But it was definitely new! |
|
Jan-19-19
| | keypusher: <SChesshevsky> In Houdini vs Stockfish, 2013 the engines were presumably assigned the Normal Position. Houdini played the supposedly superior 9.Nc3, rather than 9.d5, and keeps the pawn on d4 thereafter. So the knight never gets locked out. Its interesting to see the similarities in SF's approach, e.g. it plays ...f6, then ...f5 as SF did here, but this time ...fxe4 turns out to be a decent move. It's not that SF8 played worse here than Stockfish did in that game; it's that it's playing a much stronger opponent. |
|
| Jan-19-19 | | SChesshevsky: <keypusher> Thanks for the look. I'm not sure that the the 19th century holding the pawn with a closed postion is the main idea for black, at least relatively lately. The games that I noticed as - is:
Nakamura vs Anand, 2014 Nisipeanu vs Caruana, 2015 and one I stumbled upon after the fact
Li Chao vs Ding Liren, 2016 all seemed to go with the idea of trying to exchange pieces and try to get at least some open lines. Here it seems A0 powerfully proves that if you don't do either, you might just be suffering from move 18 on with zero counterplay or even the simple abilty to improve the position. Maybe holding the pawn with a general closed position is OK. But when I play, if I have to make shuffling moves like SF did or had to, I know I'm pretty much lost. Same probably holds true for SF as well. |
|
Jan-19-19
| | keypusher: Thanks for those too. I didn’t mean to imply that hang-on-to-the-pawn is the right or modern way to play. My claim was much more narrow — that the particular formation that we saw in Paulsen-Anderssen and Maroczy-Charousek vanished because White abandoned it, until A0. |
|
| Jan-20-19 | | ChessHigherCat: If 17 Qa4:

click for larger viewHow does black avoid losing a piece? (good Monday/Tuesday puzzle although not of the usual "play and win" type) |
|
Jul-11-19
 | | Sally Simpson: ***
Hi K.P.
Just clicked though it - stopped here (Black to play) 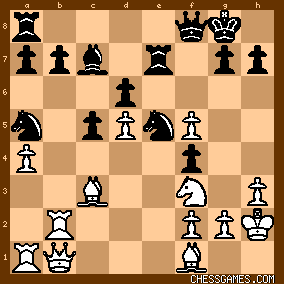
click for larger viewI'm thinking it's going to play 36...Nxf3 but instead S.F. plays 36...Qf6 self pinning. These things instantly raise my hackles. Stop!
Had to scroll down and you say:
"36…Nxf3+ 37.gxf3 c4! (a good idea, stopping Bd3 and giving the knight an escape square." Don't like 37...c4 prefer 37..Rf7 hitting the f5 pawn and if Bd3 then c4. If 38.f6 take it. Rxf6. the exchange for a pawn. There is something else going on there. *** |
|
Jul-12-19
| | Sally Simpson: ***
Hi Me,
Remember you are looking at computer chess and these things have no hang up about self-pinning. Jumped on Nxf3 and the exchange sac to get the WDSB with a plan of getting the a4 Knight to e5 (b6-Nb7-d8-f7-e5)
ridiculous. Should have gone to bed.
*** |
|
Jul-12-19
| | keypusher: < Sally Simpson: ***
Hi Me,
Remember you are looking at computer chess and these things have no hang up about self-pinning. Jumped on Nxf3 and the exchange sac to get the WDSB with a plan of getting the a4 Knight to e5 (b6-Nb7-d8-f7-e5) ridiculous. Should have gone to bed. ***>
Hi, you, I thought ...Rf7 and sacking the exchange was a good idea. The interesting thing to me is that after 36....Nxf3+ 37.gf Rf7 38.f6 Rxf6 SF10 figures out pretty quickly that the strongest move is not to take the rook at once, but to play 39.Bd3, to be followed by the rape, if you'll excuse the verb, of Black's kingside. It's a little surprising that that Black is helpless, until you compare White's bishop pair with Black's marooned knight and sniveling bishop. SF staked everything on holding e5. |
|
Jul-12-19
| | Sally Simpson: ***
I never even considered White not taking the exchange. Surprised Nxf3 not played but dog tired after such a long day. *** |
|
| Aug-20-19 | | Albion 1959: Morphy would never played the Evans Gambit like this. Those rip-roaring flashy sacrificial attacks from the 1850's against Amateur,or AN Other, where he wins in about 25 moves are far removed from Alpha Zero's handling of this vintage opening. A very deep, subtle and long-ranging positional play that not even strong grandmasters could easily fathom: |
|
Nov-01-19
| | keypusher: <45.Bb5 Nb7 (+0.42, 41 ply) 46.Bc4 Na5 47.Ba2 Kh8 48.Bb1 (not 48.Nxe5 dxe5 49.Bxe5 Bxe5 50.Rxe5 Qxe5+ 51.Rxe5 Rxf3 52.gxf3 c4 =) 48….Rde8 49.Kg1> In the parenthetical variation, should be <(not 48.Nxe5 dxe5 49.Bxe5 Bxe5 50.Rxe5 <f3! 51.Qxf3> Qxe5+ 52.Rxe5 Rxf3 53.gxf3 c4= )> AlphaZero vs Stockfish, 2018 |
|
|
|
|


