NeverAgain: *** Part 2 ***
17...Qh5 - Black maneuvers with tempo his Queen to the a1-h8 diagonal to forestall White's attempt to organize some pressure along it. 20. Qc1  - White has to abandon the long dark diagonal as he naturally doesn't want to exchange Queens. <20. Qa1> would be met by <20...Qd4>. - White has to abandon the long dark diagonal as he naturally doesn't want to exchange Queens. <20. Qa1> would be met by <20...Qd4>. 21. f4 - White reluctantly embarks on a kingside attack. Too bad his dark-squared Bishop is facing the *queenside*. 22...Be6 - Stockfish prefers <22...Bd7> Δ 23...Rae8, so as not to block the e-file. 23...Bxa2?! - instead of increasing his material advantage Black should think about securing his position. 24. e5!= - White goes onto attack.
24...Nc6 - a somewhat belated retreat.
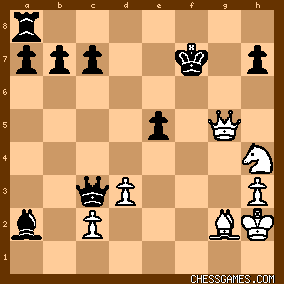
25. e6? - the wrong pawn! <25. f6!> would crack the black King's defence perimeter with all black pieces stuck on the queenside:
<25...Nxe5 26. fxg7+ Kxg7 27. Rf5 Rf7 28. Bxe5+ dxe5 29. Qg5+ Kf8 30.Rxf7+ Kxf7>

click for larger view
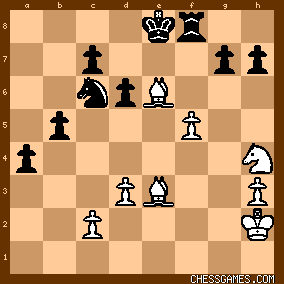
and now White could go for perpetual with <31. Qxh5+> or try for more with <31. Nf5>. 25...a5  - with f6 no longer much of a threat Black ignores the opponent's kingside machinations and starts pushing his passed a-pawn. - with f6 no longer much of a threat Black ignores the opponent's kingside machinations and starts pushing his passed a-pawn. 27. Rf4? - with a view to possible transfer to the h-file after Ng6+, as well as keeping an eye on the enemy passer. However, <27. Re2> is more prudent, doesn't block the g3 Bishop and adds an extra threat of e7. After <27. Re2 Qf6> (otherwise <<28. Ng6+>> is devastating) <28. Qh5 Kg8 29. Bf4> (not possible with the Rook on f4) Black would be rather busy parrying the onslaught.
Stockfish considers the drastic <29...Bxe6> the best way for Black to break the ring tightening around his King and keep his advantage. A simple plan is to exchange a few of the attacking pieces off and get back to passer pushing: <30. Rxe6 Qf7 31. Qxf7+ Kf7 32. Bd2 Rae8 33. Bd5 Rxe6 34. Bxe6+ Ke7 35. Bg5+ Ke8 36. Be3 b5  > >

click for larger view
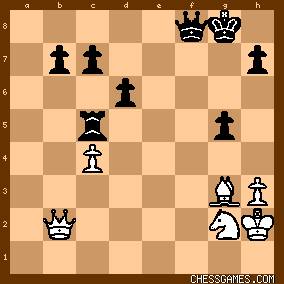
but at least it would be a fight. Instead White goes after the mirage along the h-file. 27...Qf6 - the threat of Ng6+ can no longer be ignored. 30. Qg4? - White twitches and sounds a retreat. The ...Bxe6 threat is best met with <30. Be1>, planning to include the Bishop in the attack with tempo by transferring it to either the a1-h8 or the c1-h6 diagonal. This would force Black to part with some material to prevent White from turning tables on him. Although the position after <30...Rc5 31. c4 Bxc4! 32. dxc4 a3> (luring the white Queen away) <33. Qe2 g5! 34. Rf3 a2 35. Qxa2 Qe5+ 36. Bg3 Qxe4 37. Qb2+ Kg8 38. f6 Qxe6! 39. fxe7 Qxe7 40. Rxf8 Qxf8 41. Ng2>

click for larger view
doesn't leave White much hope of salvation, he could count on putting up a fight in an adjournment session. With Korchnoi's notorious penchant for extra material this would have been the best practical choice.
As it is, Lazarev barely made it to the time control. | 


